10. Advanced Simulation Concepts
November 2, 2023 · View on GitHub
In this chapter we want to present some of the advanced simulation concepts we acquired through experience.
10.1. Helpful Links
Every simulator has its own specific strengths and constraints. Please refer to the official documentations to get more detailed insights:
- Pybullet
- Mujoco
10.2. Custom Meshes
Both Mujoco and Pybullet support the use of custom meshed objects. But both simulators will only approximate the 3D mesh using its convex hull for performance reasons.
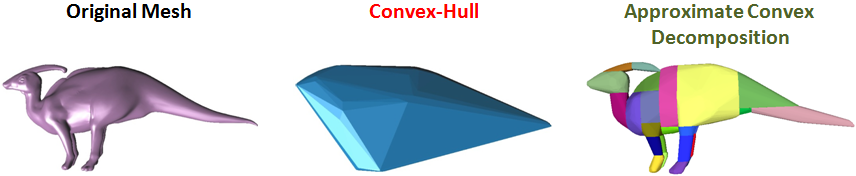
From V-HACD Project
Any concave sections or holes (e.g. donut shape) will be "ignored" by simulation. To counter this, one must first decompose the mesh into convex parts. This must be done manually in a 3D modeling software like Blender. The aforementioned V-HACD Project is a Blender Plugin which can support you in this task.
10.2.1. Mujoco: Mesh Jittering
When using custom meshes in a Mujoco simulation, you might encounter jittering: The objects do not lie still on the table, but move around slightly. See also from the developers this forum answer.
In summary: Mujoco cannot compute multiple collision points for custom meshes. If decomposed into submeshes, it can detect collisions for each submesh, thus increasing the stability of the simulation.
For concave meshes this should always be done (as mentioned before). But convex custom meshes, e.g. a pyramid block, are easily overlooked when preparing a simulation. Also, the decomposition of a highly convex mesh must probably be done manually without the help from a plugin. The aforementioned V-HACD plugin will probably detect that the original mesh is already convex and perform none to minimal adjustments, which do not help with the Mujoco Simulation.
10.3. Timesteps:
When creating a scene, you can decide a "temporal resolution" of the simulation. The parameter dt governs, what length of each time step of the simulation is. The default values is 0.001, meaning that 1 sec of simulated time consists of 1000 simulation steps. This of course is a tradeoff between simulation accuracy and performance, as smaller timesteps will result in a more realistic simulation, but also invoke additional computational load.
10.3.1. mujoco-py: nsubsteps
mujoco-py offers additional optimization potential, which we DO NOT expose to our users at the moment, but want to document here nonetheless.
A Mujoco environment / scene is defined via an XML file, which we parse and load into a mujocopy.MjSim object. When creating this object, one can set an optional parameter nsubsteps:
sim = mujocopy.MjSim(xml_model, nsubsteps=1)
Remember: Mujoco is a C++ physics simulator, mujoco-py is a library containing python bindings. If you know that you need high simulation accuracy, but only perform calculations which can handle coarser timesteps, you could change this parameter. Then, every call of the python function sim.step() will perform nsubsteps number of simulation steps in C++ at a resolution of dt. For example:
1to1_sim = MjSim(model, nsubsteps=1) # t= 0.000
1to1_sim.step() # t = 0.001
1to1_sim.step() # t = 0.002 ...

1to100_sim = MjSim(model, nsubsteps=100) # t = 0.000
1to100_sim.step() # t = 0.100
1to100_sim.step() # t = 0.200 ...
10.4. Mujoco Advanced Physics Settings
In Mujoco there are a couple of parameters which define the physical behavior of your object. We have created a "best practices" document, which you can follow to get an intuition for the most important parameters.
Furthermore the Mujoco Documentation will give you a very detailed overview of computation models and parameters.
10.5. Converting .urdf to .xml files
In case we have an object as .urdf file (PyBullet format) available and want to load it in Mujoco, we need to convert it into a .xml file . The steps for doing such a conversion are explained in this section.
1. Add Mujoco tags
Given the .xml file we want to add Mujoco tags such as <meshdir, balanceinertia, discardvisual> on top of the file. For more details on tags see here. An example can be found below.
<robot name="example">
    <mujoco>
        <compiler meshdir="../mesh/example_dir/" balanceinertia="true"/>
    </mujoco>
    <link name="MP_BODY">
        ...
</robot>
2. Check the mesh file format
The conversion only works if the mesh files are in .stl file format. Luckily there are many free (online) converters available that can convert .dae or .obj files into .stl. For example, a converter can be found here.
3. Conversion
Enter the path ~/mujoco/mujoco200/bin first and run the following command:
$./compile /path/to/model.urdf /path/to/model.xml
Note that model.xml is created by executing the command and should therefore not exists prior to the conversion.
4. Test the Model (optional)
We can look at the converted model in the interactive Mujoco simulator by running:
mujoco200/bin$ ./simulate /path/to/model.xml