Webex Space Archiver
May 16, 2026 · View on GitHub
Archives the messages of a Cisco Webex space to a single HTML file.
Warning
This repository is semi actively maintained.
Many thanks for the kinds words received from the users and the feedback they have been providing over the past years!
- Features
- Requirements
- Start
- Configure
- Release notes
- Troubleshooting
- Release Notes
- Feedback & Support

This code was written for a customer as an example. I specifically wanted 1 (one) .py file that did everything. It's not beautiful code, but it works :-)
Feedback? Please go here and let me know what you think!
VIDEO
SCREENSHOT
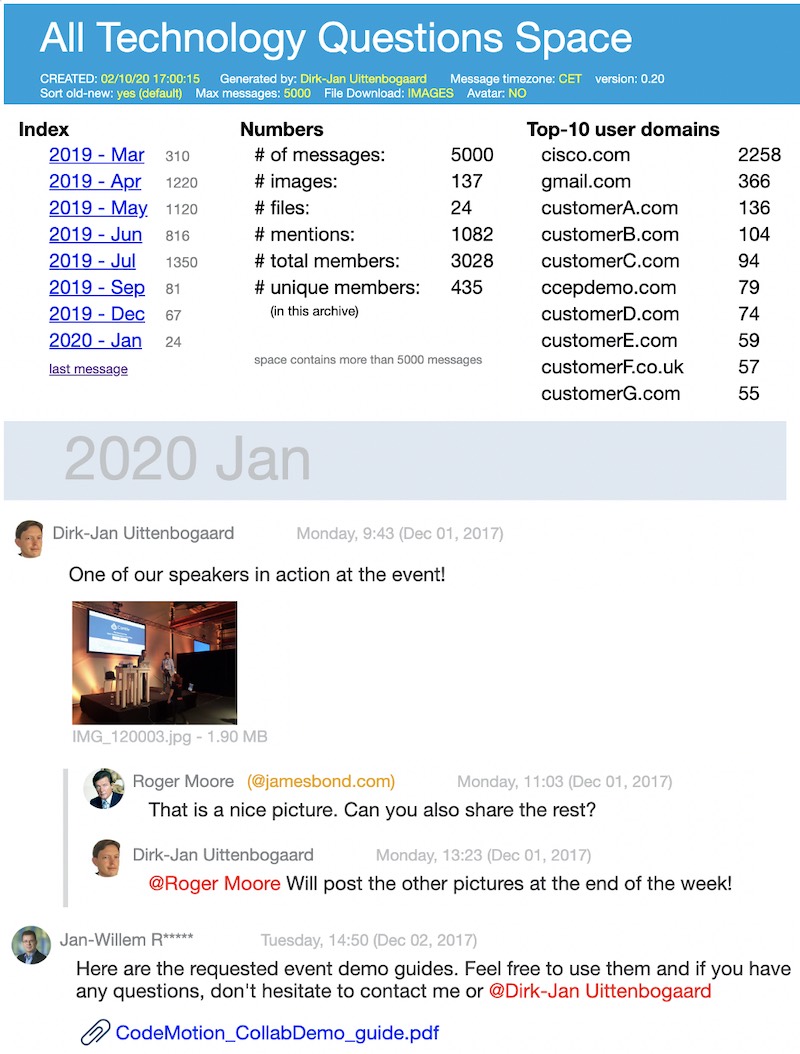
Example HTML file of an archived Webex space:
REQUIREMENTS
- A (free) Webex account
- Python 3.9 or higher
- Python 'requests' library
- Be a member of the Webex message space you want to archive
- Mac: SSL fix (see troubleshooting section at the end)
Features
- Archives all messages in a space
- Find space ID with built in search function
- Batch archiving with multiple config files & command line parameters
- Generate .sh/.bat which runs the archive script for all of your spaces. (Instructions are inside the generate_space_batch.py file.)
- Deal with threaded messages
- Support for automatic and manual DST configuration ('summertime')
- Download images, files or both (with msg file date)
- All files are organized: \spacenamefolder with subfolders for \files, \images, \avatars
- Export space data to JSON and/or TXT file
- Restrict messages by number of messages, number of days, from- date or from-to date
- Display: messages grouped per month, with navigation at the top
- Display: show full user names
- Display: show (linked or downloaded) user avatars
- Display: attached file-names + size
- Display: "@mentions" in a different color
- Display: quoted or formatted text
- Display: external users in different color (users with other domain)
- Display: images in popup when clicked
- Support for blurring email addresses and names
- Print: just like it appears on the screen
It doesn't
- Clean your dishes
- Download whiteboards (unless you post a snapshot)
- Download/display files shared in external Enterprise Content Management systems (Onedrive/Sharepoint)
- Display reactions to messages (not accessible via API)
- Mow your neighbours lawn (I've tried)
- Render cards
NOTES
- The message TIME displayed is in the UTC timezone. The timezone on your device defines how this UTC time/date is displayed. A message send at 12:43 CEST is stored as 10:43 UTC. When you change your timezone to PDT (UTC-7) it will be displayed as 03:43.
- When printing the generated HTML file in Firefox: File, Print, check "print background colors and images", then print or save to PDF
Start
-
Meet the requirements
-
Run the script (
python webex-space-archive.py) to create the configuration file webexspacearchive-config.ini (if it does not exist) -
In the webexspacearchive-config.ini file, save your developer token or (👍better!) create an environment variable called "WEBEX_ARCHIVE_TOKEN" with your token
-
Run the script:
python webex-space-archive.py
| Parameter | Description |
|---|---|
| nothing | use standard configuration .ini file |
| CONFIG_FILE | use non-standard configuration .ini filetestspace.ini |
| SEARCH_STRING | search for space name to get the space IDciscolive |
| SPACE_ID | use this SPACE_ID with standard configuration .ini fileY2lzY29zcGFyazovL3VzL0lfS05FVy95b3Vfd291bGRfdHJ5X2hhaGE |
| CONFIG_FILE SPACE_ID - or - SPACE_ID CONFIG_FILE | use non-standard configuration .ini file and provided SPACE_ID (a combination of the examples above) |
UPGRADE? Replace the .py file and keep the configuration file (.ini). To get changes in the .ini file, run the script once without .ini file and it will create one for you with the latest remarks and features.
Configuration
This section describes the parameters in the webexspacearchive-config.ini file.
Personal Access Token
mytoken = YOUR_TOKEN_HERE
You can get your Personal Access Token from the developer.webex.com website.
- log in (top right of the page)
- Look for Your Personal Access Token in the green box labeled Access the API
- Copy the token
- Paste the value
Alternatively, you can store your token in an environment variable:
- Windows:
set WEBEX_ARCHIVE_TOKEN=YOUR_TOKEN_HERE - Mac/Linux:
export WEBEX_ARCHIVE_TOKEN='YOUR_TOKEN_HERE'
Warning
The token is only valid for 12 hours. After that, you will need to generate a new one (just repeat the steps).
Space ID
myspaceid = YOUR_SPACE_ID_HERE
To find the space ID, you must first set up your token as explained in the above section.
- Run the script with a search argument as a parameter.
- A list of all Spaces matching your search argument with the corresponding spaceIds will be printed
Alternatives:
- Go to Webex Developer List rooms, make sure you're logged in, set the 'max' parameter to '900' and click Run. If you don't see the RUN button, make sure 'test mode' is turned on (top of page, under "Documentation")
- From the Webex client, go to help / copy space details. Then in Webex talk to the bot "spaceidbot@webex.bot" and paste the space details. In return you get the space ID to be used here
Download Files
downloadfiles = info
Do you want to download images or images & files? Think about it. Downloading images and files can significantly increase the archive time and consume disk space.
Downloaded images or files are stored in the subfolder.
Options:
no: (default) no downloads, only show the text "file attachment"info: no downloads, only show the filename and sizeimages: download images onlyfiles: download files and images
User Avatar
useravatar = link
Do you want to show the user avatar or an icon? Avatars are not downloaded but linked. That means the script will get the user Avatar URL and use that in the HTML file. So the images are not downloaded to your hard-drive. Needs an internet connection in order to display the Avatar images.
Options:
no: (default) show user initialslink: link to avatar images (needs internet connection!)download: download avatar images
Limit number of Messages
maxtotalmessages = 5000
Restrict the number of messages that are archived.
Some spaces contain 100,000 messages and you may not want to archive all of them.
- (empty) : (default) last 1,000 messages
- 4000 : (example) download the last 4,000 messages
- 60d : (example) download messages from the last 60 days. 120d = 120 days
- 22052021- : (example) download messages after May 22nd 2021 (ddmmyyyy-)°
- 22052021-18082021: download messages between May 22nd and August 18 2021 (ddmmyyyy-ddmmyyyy)°
° the date format is configurable in the Python code, variable maxmsg_format
Output File Name
outputfilename = yourfilename.html
Enter the name of the output HTML file. If EMPTY, the filename will be the same as the Archived Space name (recommended).
Sorting of archived messages.
sortoldnew = yes
Options:
yes: (default) last message at the bottom (like in the Webex client)no: latest message at the top
Output JSON
outputjson = no
In addition to the .html file, how would you like to store your messages?
Options:
no: (default) only generate .html fileyes/both: output message data as .json and .txt filejson: output message data as .json filetxt: output message data as .txt file
Daylight Savings settings
dst_start = L,7,3  ; (last Sunday of March)
dst_stop = L,7,10  ; (last Sunday of October)
The generated .ini files contains EU and US examples. See DST dates around the world.
Options:
- empty :(default) using DST data from your (local) system
- parameter 1 : Week number in a month. 1-4 (1st, 2nd, 3rd, 4th) or L (last)
- parameter 2 : Weekday number. 1-7 (1=Monday, 7=Sunday)
- parameter 3 : Month. 1-12 (1=January, 12=December)
Blurring
blurring = yes
Blur names and email addresses in html file
Options:
- empty /
no: (default) no blurring yes: Blur names. Note that it is only a VISUAL blur, data can still be copy/pasted.
Troubleshooting
Most of the errors should be handled by the script.
- SSL Issue: On a Mac: the default SSL is outdated & unsupported. Check out the readme.rtf in your Python Application folder. That folder also contains a "Install certificates.command" which should do the work for you.
Release Notes
Please refer to the Change Log for details.
Feedback & Support
Open an issue on Github or if you know my personal email address: send a message on Webex (not via email!).