Configuration - Setting up the npm-script
June 16, 2018 · View on GitHub
Ionic uses npm scripts and ionic-app-scripts for the build system. This new build system was introduced in version RC0.
Table of contents
1. Extending package.json
In order to run this library's npm-script for building the icon fonts, you have to extend your package.json file. This file contains all dependencies of your app and is the main configuration for the build process.
1.1 Add npm-scripts
Add the ionic2-custom-icons script and bind it to ionic:watch:before and ionic:build:before:
...
"scripts": {
  "ionic:watch:before": "ionic2-custom-icons",
  "ionic:build:before": "ionic2-custom-icons",
  ...
}
...
Make sure you are using at least version 3.5.0 of ionic-cli if you are using the 3.x branch.
In case you use an older version of ionic-cli (2.x) set the scripts as follows:
...
"scripts": {
  "build:before": "ionic2-custom-icons",
  "serve:before": "ionic2-custom-icons",
  ...
}
...
If you are unsure what version of ionic-cli you are using, run the command ionic --version. If you don't have a good reason, update to the latest version by running npm update -g ionic.
The script automatically gets called BEFORE Ionic's build (ionic build) and serve (ionic serve) process starts. ionic2-custom-icons is the node script that runs the fonts creation. Thus the generated fonts and the SCSS data are ready to be processed and bundled by Ionic's build tools in the subsequent phase.
See the package.json file of the example project for reference.
Windows users: If you encounter the following error message, please see the issue #31 containing a workaround.
'ionic2-custom-icons' is not recognized as an internal or external command
1.2 Set paths to config files
As already mentioned, the generated fonts and the SCSS data need to be processed and bundled in the main build phase of Ionic's build tools. For this to work you have to modify the paths processed by the copy and sass task which is achieved by extending Ionic's default configuration.
The first step to do so, is setting paths to custom config files for Ionic's copy and sass task. The ionic2-custom-icons library is also configured by a config file.
Add the following config property to your package.json:
...
"config": {
  "ionic_copy": "./config/copy.config.js",
  "ionic_sass": "./config/sass.config.js",
  "custom_icons": "./config/custom-icons.config.js"
}
...
Note: Of course you can set any path you would like to use. Just make sure to adjust it in the next step.
Again, see the package.json of the example project for reference.
2. Config files
In this step you will set up the config files that are referenced in the previous step.
2.1 Config for copy and sass task
ionic-app-scripts provide default config files for the copy and sass task which you can copy and extend.
The safest way to get these config files is to look into your local node_modules directory.
node_modules/@ionic/app-scripts/config
(Alternatively you can get the files from the project's GitHub repository: ionic-app-scripts/config. But be warned(!) that these config files may be incompatible with your local installation as the code is being actively developed on.)
Copy the files copy.config.js and sass.config.js to a directory called config in your app's root directory. See the following screenshot for a better understanding:
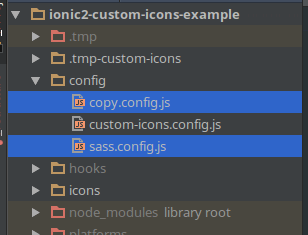
Please note that you have to check and may adapt the two config files everytime you update the @ionic/app-scripts library. Hopefully the Ionic team provides a better solution in the future.
2.1.1 Edit config/copy.config.js
Add(!) the following property to the module.exports object:
copyCustomIcons: {
   src: ['{{ROOT}}/.tmp-custom-icons/fonts/**/*'],
   dest: '{{WWW}}/assets/fonts'
}
See the copy.config.js of the example project for reference.
2.1.2 Edit config/sass.config.js
Remove all properties except includePaths and variableSassFiles. (Don't worry about the now "missing" properties. Ionic merges them from the default config during the build process.)
Now add the following strings to the includePaths array:
'node_modules/ionic2-custom-icons/ionic/scss/',
'.tmp-custom-icons/scss/'
Next, add the following string to the variableSassFiles array:
'.tmp-custom-icons/scss/variables.scss'
See the sass.config.js of the example project for reference.
2.2 Config for ionic2-custom-icons
This library also needs minimal configuration. You have to add each icon set you want to use to the file config/custom-icons.config.js.
See the following example:
// customIcons config
module.exports = {
  iconSets: [
    {
      src: 'icons/my-icons-1/*.svg',
      id: 'mi1'
    },
    {
      src: 'icons/my-icons-2/*.svg',
      id: 'mi2'
    }
  ]
};
Each icon set needs to be added to the iconSets array. An icon set config is an object that consists of the following two properties: src and id:
| Option | Type | Description |
|---|---|---|
src | stringor Array | Source image files matching the provided glob or array of globs. Glob refers to node-glob syntax or a direct file path. See gulp.src(globs[, options]) for more info. |
id | string | A unique, preferably short, identifier string for the icon set. May not contain whitespace. Use this value for the directive's set attribute. |
Note: Make sure to use the module.exports property as presented in the example.
See the custom-icons.config.js of the example project for reference.
Advanced configuration
TODO