or
October 23, 2025 · View on GitHub
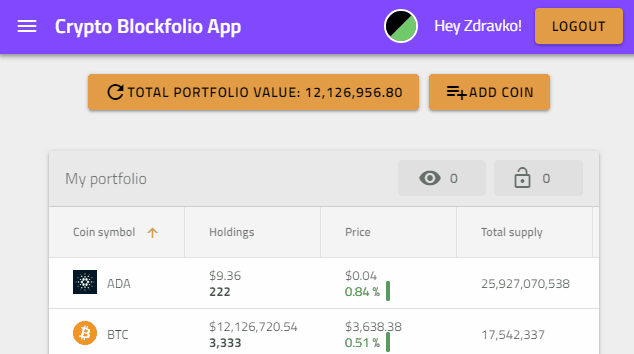
![]()
Inspired by Ignite UI for Angular
Application that uses Angular framework, Firebase Auth and Real time databse, and Ignite UI for Angular components.
Open https://igniteui.github.io/crypto-portfolio-app/ to see the web app.
- base href used for the web app -
<base href="https://igniteui.github.io/crypto-portfolio-app/">
Note: The Angular build process (using the new application builder) outputs static files into the
dist/browserdirectory.
During CI/CD, the GitHub Action uploads this folder to GitHub Pages (./dist/browser), which serves as the root of the hosted site.
This project is generated with Angular CLI.
Start using the app
Prerequisites
- Node.js: Use node version 18+ (recommended)
- CryptoCompare API Key: Generate CryptoCompare API key (Used by data services)
- Firebase Project (applicable when the project is forked): Create a Firebase project (Used for authentication and data storage)
Build Commands
Local Development Builds
For testing and local development with actual Firebase configuration:
# Development build with local config
ng build -c local

# Production build with local config (optimized, but uses actual Firebase secrets)
npm run build:local
# or
ng build -c production-local
Production Builds
For deployment (uses placeholder variables that get replaced during CI/CD):
# Standard production build (for CI/CD)
npm run build
# or
ng build -c production

# Web bundle for GitHub Pages
npm run build:web:prod
Available npm Scripts Summary
| Command | Purpose | Firebase Config | Optimization |
|---|---|---|---|
npm run start:local | Development server | Local secrets | None |
npm run build:local | Local production testing | Local secrets | Full |
npm run build | CI/CD production | Placeholders | Full |
npm run build:web:prod | GitHub Pages | Placeholders | Full |
Create web bundle (update the hosted website)
Use the command npm run build:web:prod or you can manually build the project with:
- Run
ng build - Go to
dist folderand copy paste the content in thedocsfolder. Change the base href url to be<base href="https://igniteui.github.io/crypto-portfolio-app/">
Note: If you receive 'ERROR Error: Uncaught (in promise): TypeError: Cannot read property 'from' of undefined. TypeError: Cannot read property 'from' of undefined'), use
npm run build:web:noProd
dist and docs folders
docs folder is used for the GitHub Pages site. Related to Publishing your GitHub Pages site from a /docs folder on your master branch
Use npm run build:local for local testing or npm run build for CI/CD deployment.
Development server
Run ng serve for a dev server. Navigate to http://localhost:4200/. The app will automatically reload if you change any of the source files.
Firebase Setup
Step 1: Create Firebase Project
- Go to Firebase Console
- Click "Create a project" or select an existing project
- Follow the setup wizard
Step 2: Add Web App to Firebase Project
- In your Firebase project console, click the Web icon (
</>) - Register your app with a nickname (e.g., "Crypto Portfolio App")
- Copy the Firebase configuration object - you'll need these values:
// Your Firebase Config (example)
const firebaseConfig = {
  apiKey: "AIzaSyExample123...",
  authDomain: "your-project.firebaseapp.com",
  databaseURL: "https://your-project-default-rtdb.firebaseio.com/",
  projectId: "your-project-id",
  storageBucket: "your-project.appspot.com",
  messagingSenderId: "123456789012",
  appId: "1:123456789012:web:abcdef123456"
};
Step 3: Enable Authentication
- In Firebase Console → Authentication → Sign-in method
- Enable Email/Password provider
- Enable Google provider (optional)
- Add your domain to Authorized domains (e.g.,
localhost, your GitHub Pages domain)
Step 4: Setup Firestore Database
- In Firebase Console → Firestore Database → Create database
- Start in test mode (you can configure rules later)
- Choose your preferred location
Step 5: Setup Realtime Database (if using)
- In Firebase Console → Realtime Database → Create database
- Start in test mode
- Choose your preferred location
Local Development Setup
Option 1: Local Environment Files (Recommended)
This approach keeps your Firebase secrets separate and secure:
-
Create local environment files:
For development: Create
src/environments/environment.local.ts:export const environment = { production: false, firebaseConfig: { apiKey: 'your-actual-api-key-here', authDomain: 'your-project.firebaseapp.com', databaseURL: 'https://your-project-default-rtdb.firebaseio.com/', projectId: 'your-project-id', storageBucket: 'your-project.appspot.com', messagingSenderId: 'your-sender-id' } };For production builds: Create
src/environments/environment.prod.local.ts:export const environment = { production: true, firebaseConfig: { apiKey: 'your-actual-api-key-here', authDomain: 'your-project.firebaseapp.com', databaseURL: 'https://your-project-default-rtdb.firebaseio.com/', projectId: 'your-project-id', storageBucket: 'your-project.appspot.com', messagingSenderId: 'your-sender-id' } }; -
Available npm scripts:
# Development server with local Firebase config npm run start:local # Production build with local Firebase config (for local testing) npm run build:local # Regular production build (for CI/CD - uses placeholder variables) npm run build -
Angular CLI commands:
# Development
ng serve -c local              # Serve with local config
ng build -c local              # Build with local config (dev mode)

# Production (local testing)
ng build -c production-local   # Production build with local config

# Production (CI/CD)
ng build -c production         # Production build with placeholders
Option 2: Direct Configuration (Quick Setup)
⚠️ Warning: This method exposes secrets in tracked files. Remember to revert changes before committing!
Replace the placeholder values in src/environments/environment.ts with your actual Firebase config for local development:
export const environment = {
  production: false,
  firebaseConfig: {
    apiKey: 'your-actual-api-key-here',          // Replace with your apiKey
    authDomain: 'your-project.firebaseapp.com',  // Replace with your authDomain
    databaseURL: 'https://your-project-default-rtdb.firebaseio.com/', // Replace with your databaseURL
    projectId: 'your-project-id',                // Replace with your projectId
    storageBucket: 'your-project.appspot.com',   // Replace with your storageBucket
    messagingSenderId: 'your-sender-id'          // Replace with your messagingSenderId
  }
};
⚠️ Important: Remember to revert these changes before committing to Git!
CryptoCompare API Setup
- Get your API key from CryptoCompare
- Add it to
data.service.tsasprivate apiKey: string = '<your-api-key>'
Install and Run
- Run
npm install - Run
ng serve -o(orng serve -c localif using local environment file)
Production Deployment
For production deployment to GitHub Pages, the Firebase configuration will be automatically injected from GitHub secrets during the CI/CD process. See DEPLOYMENT.md for details.
Environment Files Overview
This project uses multiple environment files for different scenarios:
| File | Purpose | Firebase Config | Git Tracking |
|---|---|---|---|
environment.ts | Development (default) | Placeholders | ✅ Tracked |
environment.prod.ts | Production (CI/CD) | Placeholders | ✅ Tracked |
environment.local.ts | Local development | Real secrets | ❌ Ignored |
environment.prod.local.ts | Local production testing | Real secrets | ❌ Ignored |
Why This Structure?
- Security: Real Firebase secrets never get committed to Git
- Flexibility: Different configs for different scenarios
- CI/CD: Automated deployment replaces placeholders with actual secrets
- Local Testing: You can test production builds locally with real Firebase data
Troubleshooting
"apiKey not found" Error in Production Builds
Problem: Running ng build --configuration production creates a build that doesn't work locally because it uses placeholder variables like ${FIREBASE_API_KEY}.
Solution: Use the local production build instead:
# Instead of this (uses placeholders):
npm run build

# Use this (uses actual Firebase config):
npm run build:local
Firebase Configuration Issues
"Firebase: No Firebase App '[DEFAULT]' has been created"
- Ensure your Firebase configuration is properly set in the environment file
- Check that all required fields are filled with actual values (not placeholders)
- Verify you're using the correct build configuration (
-c localfor local development)
"Firebase: Error (auth/unauthorized-domain)"
- Add
localhostto authorized domains in Firebase Console → Authentication → Settings → Authorized domains - Add your GitHub Pages domain if deploying there
"Firebase: Error (auth/operation-not-allowed)"
- Enable the authentication method you're trying to use in Firebase Console → Authentication → Sign-in method
"Cannot read property 'from' of undefined"
- This usually indicates a missing or incorrect Firebase configuration
- Verify all Firebase config values are correctly set in your local environment files
- Try using
npm run build:web:noProdfor development builds
Build Command Quick Reference
| What you want to do | Command to use |
|---|---|
| 🔧 Local development | npm run start:local |
| 🧪 Test production build locally | npm run build:local |
| 🚀 Deploy to GitHub Pages | npm run build (CI/CD handles this) |
| 📦 Manual GitHub Pages build | npm run build:web:prod |
Getting Firebase Configuration Values
You can find your Firebase configuration in:
- Firebase Console → Project Settings → General → Your apps → Web app
- Or click "Add app" → Web → Copy the config object
Example of where to find each value:
apiKey: Found in Firebase config objectauthDomain: Usuallyyour-project-id.firebaseapp.comdatabaseURL: Found in Realtime Database section (if using)projectId: Your Firebase project IDstorageBucket: Usuallyyour-project-id.appspot.commessagingSenderId: Found in Firebase config object
More
Loading spinners in the app - SpinKit