Build An Alexa How-To Skill
March 10, 2019 · View on GitHub
Setting Up A Lambda Function Using Amazon Web Services
In the first step of this guide, we built the Voice User Interface (VUI) for our Alexa skill. On this page, we will be creating an AWS Lambda function using Amazon Web Services. You can read more about what a Lambda function is, but for the purposes of this guide, what you need to know is that AWS Lambda is where our code lives. When a user asks Alexa to use our skill, it is our AWS Lambda function that interprets the appropriate interaction, and provides the conversation back to the user.
-
Go to http://aws.amazon.com and sign in to the console. If you don't already have an account, you will need to create one. If you don't have an AWS account, check out this quick walkthrough for setting it up.

-
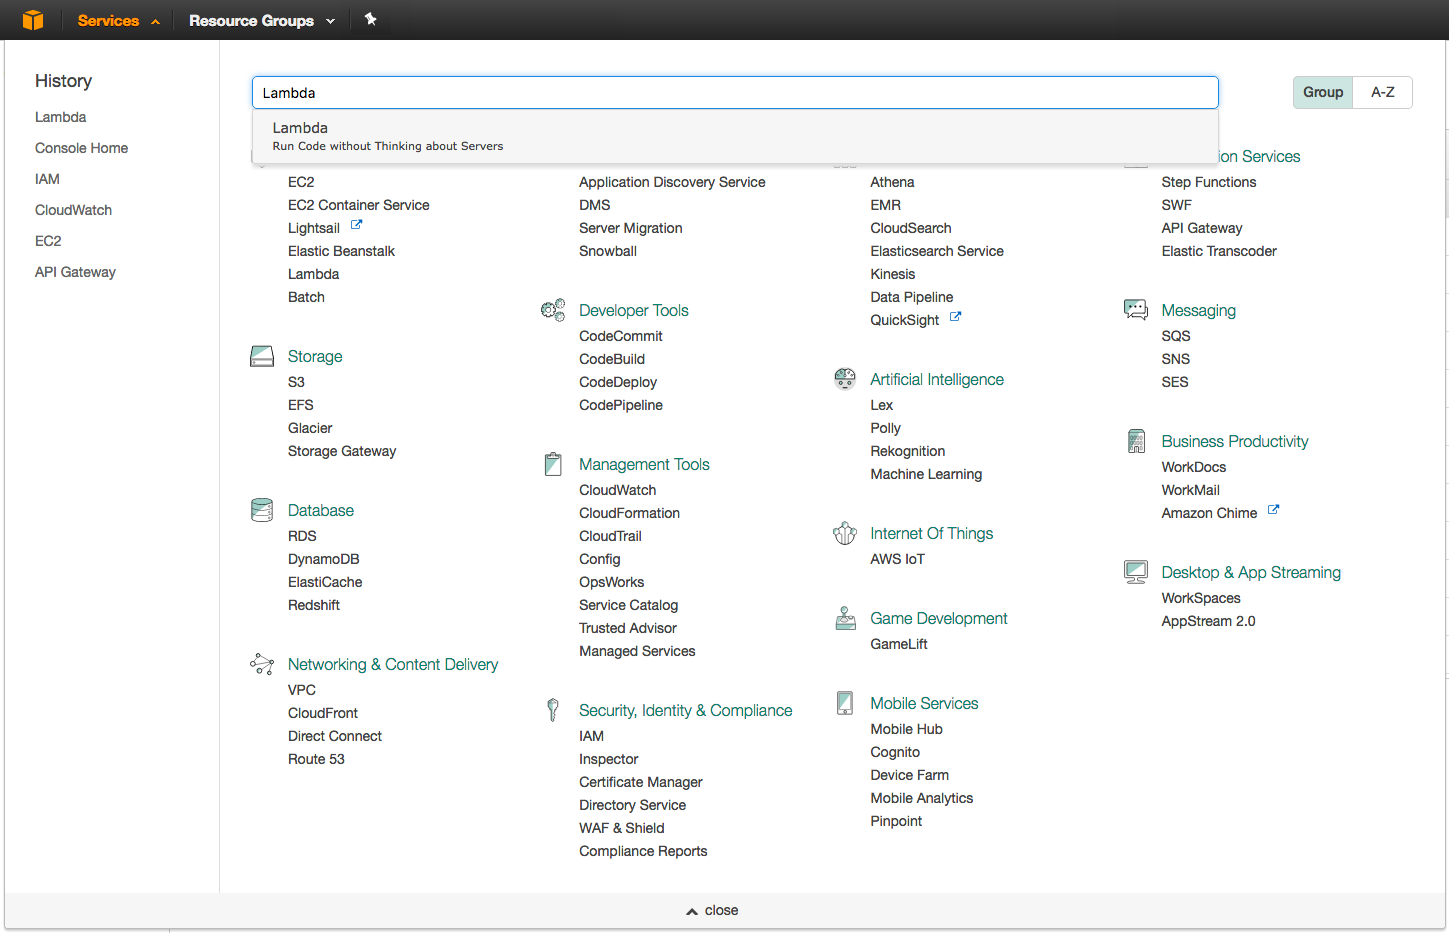
Click "Services" at the top of the screen, and type "Lambda" in the search box. You can also find Lambda in the list of services. It is in the "Compute" section.
-
Check your AWS region. AWS Lambda only works with the Alexa Skills Kit in these regions: US East (N. Virginia), US West (Oregon), Asia Pacific (Tokyo) and EU (Ireland). Make sure you choose the region closest to your customers.

-
Click the orange "Create function" button. It should be near the top of your screen. (If you don't see this button, it is because you haven't created a Lambda function before. Click the blue "Get Started" button near the center of your screen.)

-
There are three boxes labeled "Author from scratch", "Blueprints" and "Serverless Application Repository". Click the radio button in the box titled "Serverless Application Repository" We have created a repository as a shortcut to getting everything set up for your skill.
-
Search for the application repository named "alexa-skills-kit-nodejs-howtoskill". You can find it using the provided search box.
-
Click on the repository. This repository will create the Lambda function, add Alexa Skills Kit as its trigger, and sets up an IAM role for you. It will also add the code from this GitHub repo and include it's dependencies to your Lambda function so that you don't have to upload it yourself.
-
Click the deploy button at the bottom of the page.
-
Wait for the status of all resources to change to CREATE_COMPLETE
-
Click the Test App button to go to the Lambda console.
-
Open the function that was just created by clicking on it.
-
If you want to secure this Lambda function follow the instructions found here
-
You should see the Amazon Resource Name (ARN) a unique identifier for this function in the top right corner of the page. Copy the ARN value for this Lambda function for use in the next section of the guide.

Connecting Your Voice User Interface To Your Lambda Function
Now that we have created both the voice user interface for the intents and utterances we expect from our users plus the Lambda function that contains all of our logic for the skill, we need to connect those them together.
-
Go back to the Amazon Developer Portal and select your skill from the list. You may still have a browser tab open if you started at the beginning of this tutorial.
-
While on the Build tab, select the Endpoint tab on the left side navigation panel.
-
Select the "AWS Lambda ARN" option for your endpoint. You have the ability to host your code anywhere that you would like, but for the purposes of simplicity and frugality, we are using AWS Lambda. (Read more about Hosting Your Own Custom Skill Web Service.) With the AWS Free Tier, you get 1,000,000 free requests per month, up to 3.2 million seconds of compute time per month. Learn more at aws.amazon.com/free. In addition, Amazon now offers AWS Promotional Credits for developers who have live Alexa skills that incur costs on AWS related to those skills.
-
Paste your Lambda's ARN (Amazon Resource Name) into the textbox provided for Default Region.
-
Click the Save Endpoints button at the top of the main panel.
