Ballerina GitHub Connector
August 13, 2026 · View on GitHub




GitHub is a widely used platform for version control and collaboration, allowing developers to work together on projects from anywhere. It hosts a vast array of both open-source and private projects, providing a suite of development tools for collaborative software development.
This Ballerina connector is designed to interface with GitHub's REST API (version 2022-11-28), facilitating programmatic access to GitHub's services. It enables developers to automate tasks, manage repositories, issues, pull requests, and more, directly from Ballerina applications.
Setup guide
To use the GitHub Connector in Ballerina, you need a GitHub account. If you already have one, you can integrate the connector with your existing account. If not, you can create a new GitHub account by visiting GitHub's Sign Up page and following the registration process.
The connector supports two ways of authenticating with the GitHub REST API:
| Authentication | When to use |
|---|---|
| Personal Access Token (PAT) | A static token bound to your own user account. Simplest option, suited for scripts and single-user automation. Also use this for an OAuth App token, which does not expire. |
| OAuth2 refresh token grant | A GitHub App user access token, which expires after 8 hours and is renewed automatically by the connector. Suited for applications acting on behalf of other users. Requires a GitHub App with expiring user authorization tokens enabled — OAuth Apps do not issue refresh tokens. |
Option 1: Personal Access Token (PAT)
Step 1: Access GitHub Settings
- Once logged in, click on the profile picture in the top-right corner of the page.
- Select Settings from the dropdown menu.
Step 2: Navigate to Developer Settings
- Scroll down in the sidebar on the left side of the settings page.
- click on Developer settings located near the bottom.
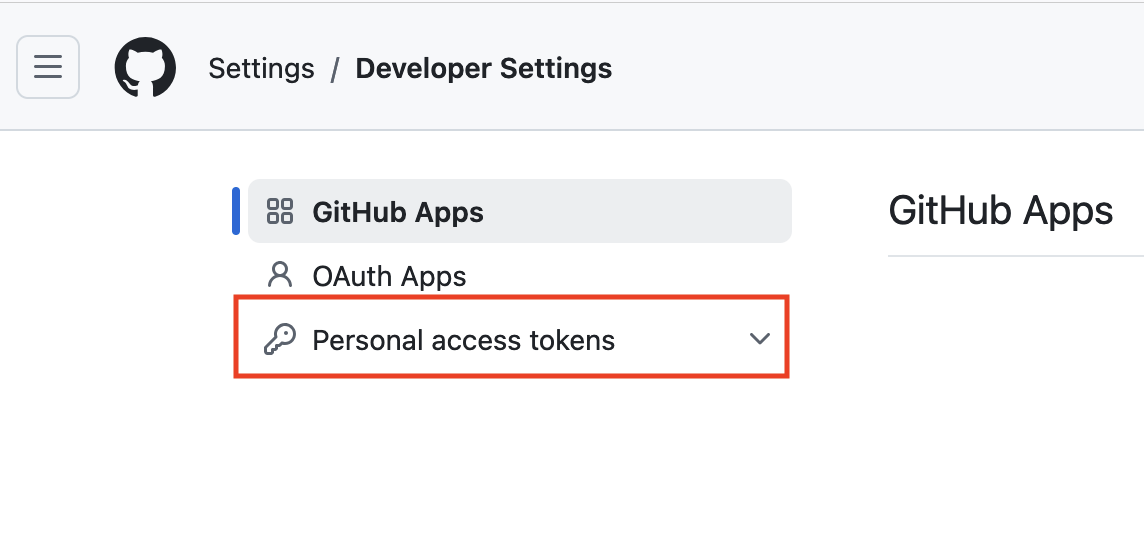
Step 3: Go to Personal Access Tokens
-
Inside Developer Settings find and click on Personal access tokens.
<img src=https://raw.githubusercontent.com/ballerina-platform/module-ballerinax-github/master/docs/setup/resources/1-developer-settings.png alt="GitHub Developer Settings" width="50%">
Step 4: Generate a New Token
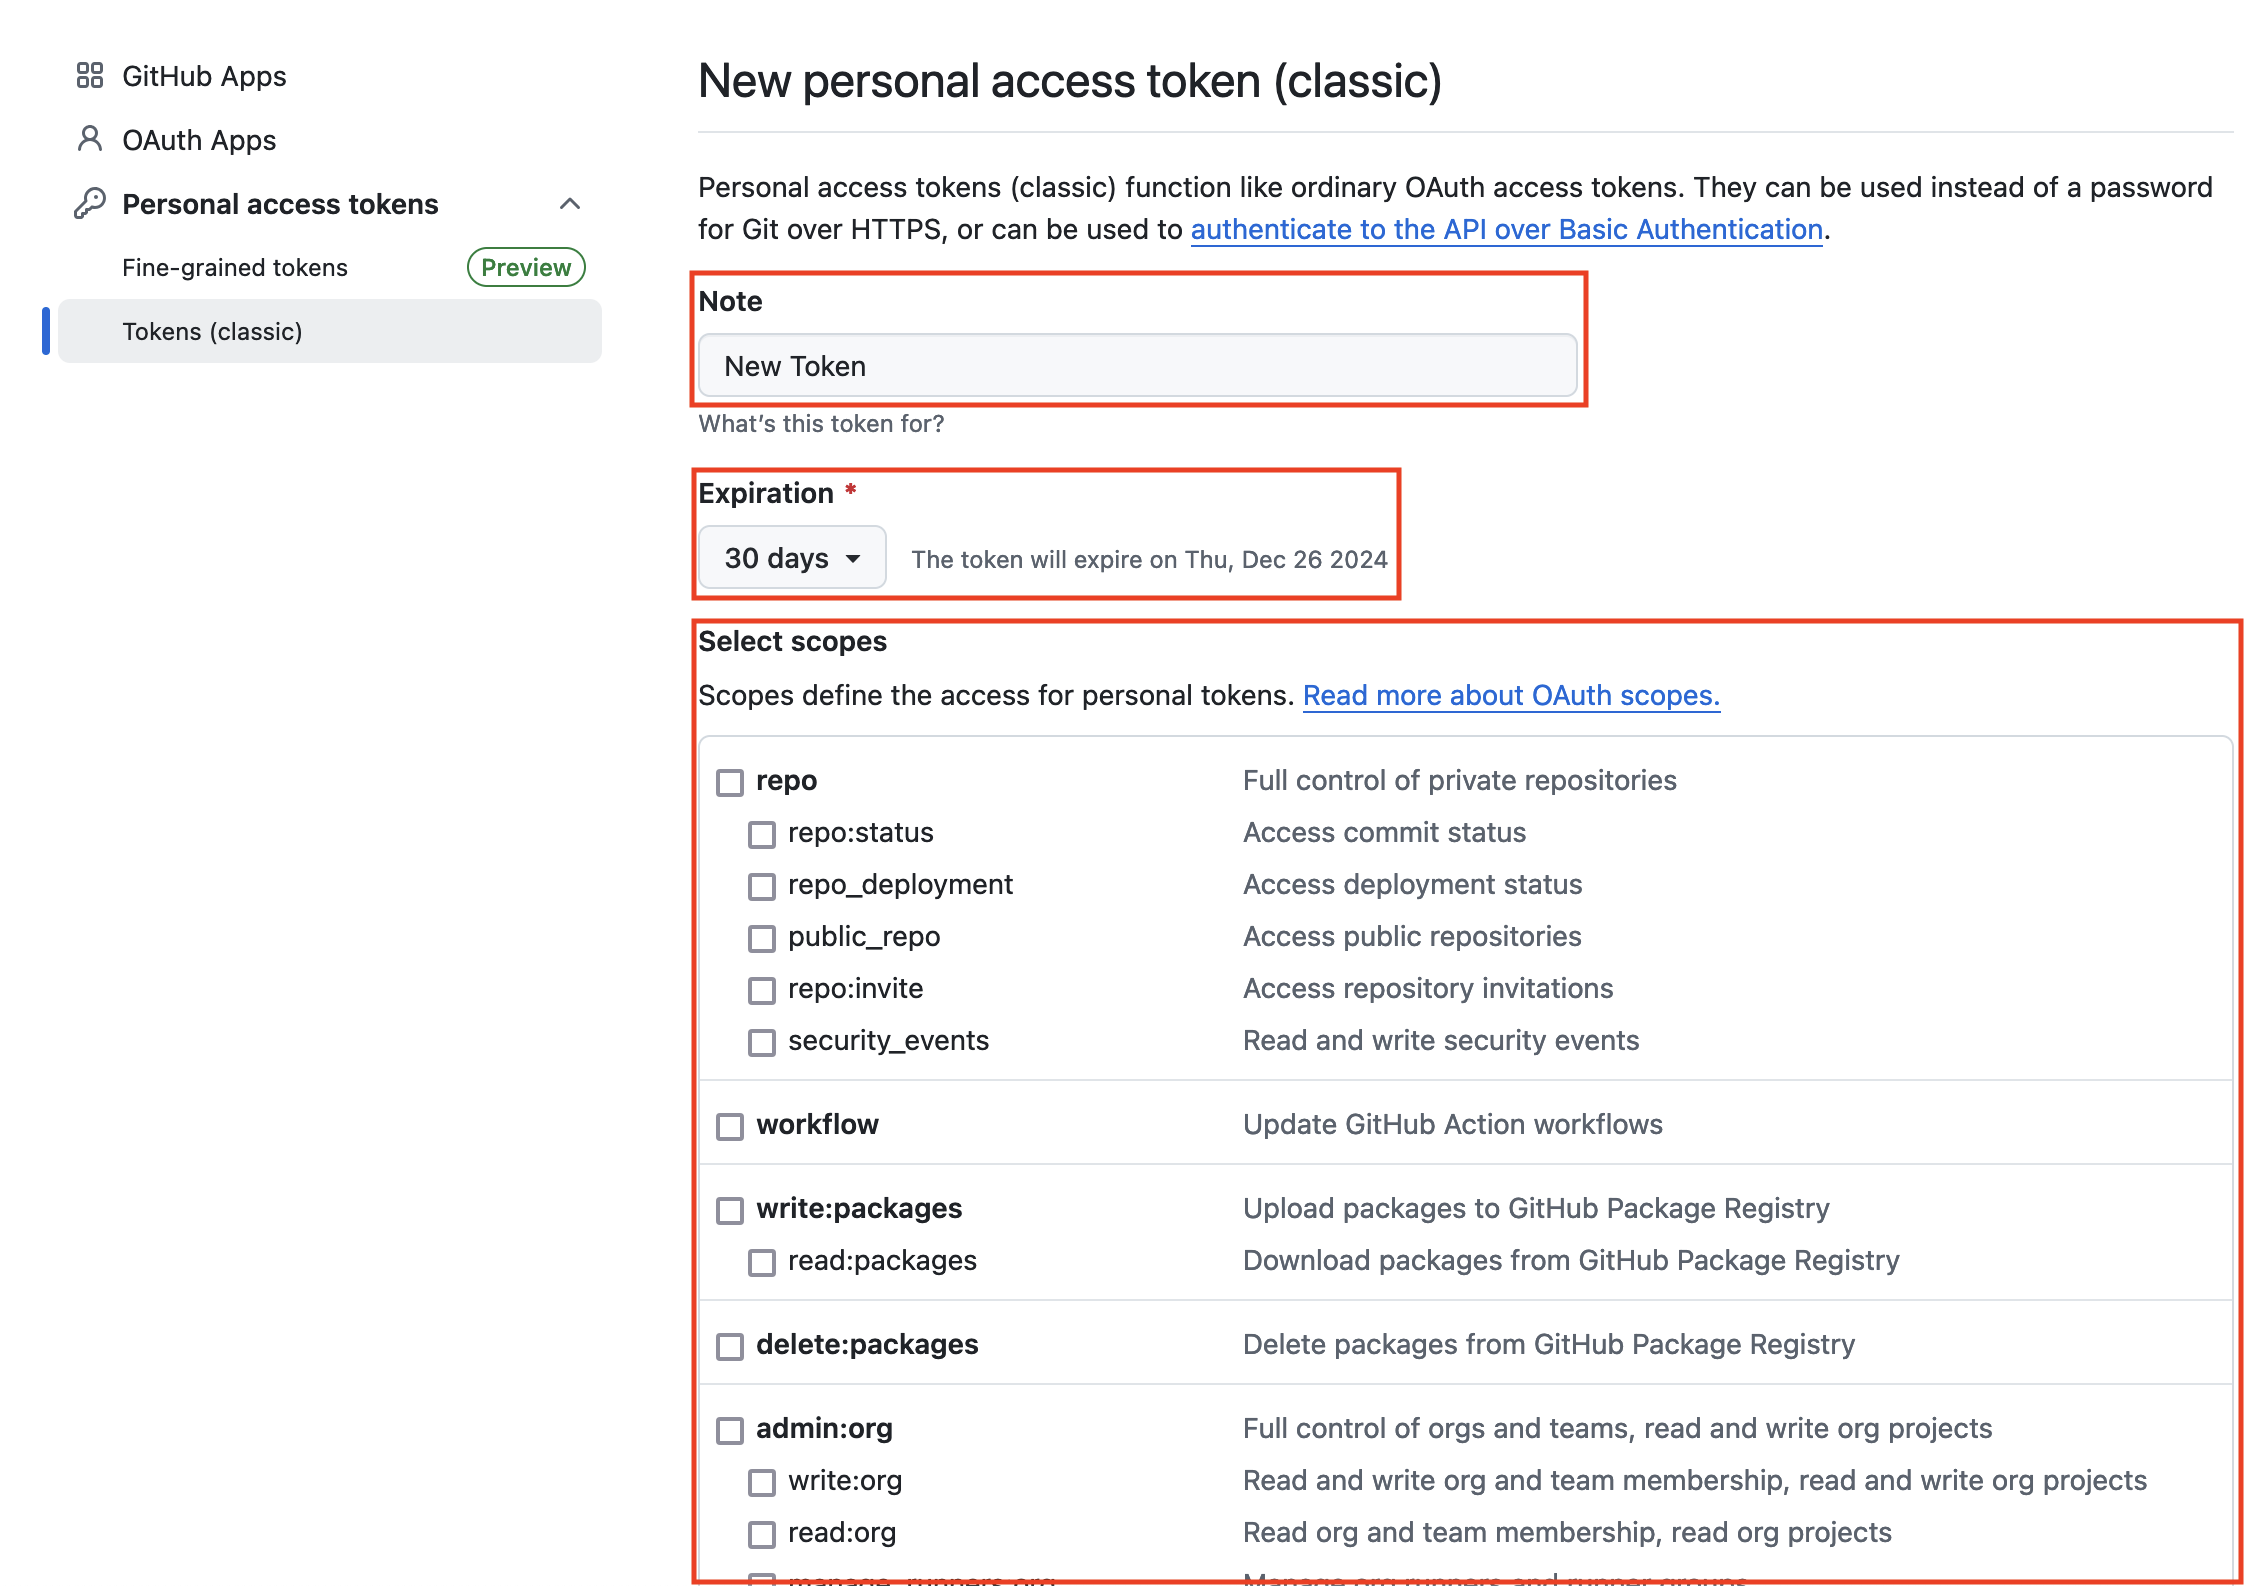
- Click on the Generate new token button and choose either classic or fine-grained. The steps and screenshots below show a classic token; the fine-grained equivalent is noted in Step 5. You might be asked to enter your password again for security purposes.
Step 5: Configure & Generate the Token
-
Note: Give your token a descriptive name so you can remember its purpose
-
Expiration: Select the duration before the token expires (e.g., 30 days, 60 days, 90 days, custom, or no expiration).
-
Select Scopes (classic tokens): Scopes control access for the token. Choose what you need the token for (e.g., repo access, user data access). For typical repository operations, selecting
repois often sufficient. -
Select Permissions (fine-grained tokens): Fine-grained tokens have no scopes —
repoand the other classic scopes do not appear. Instead, pick a Resource owner, limit Repository access to the repositories you need, and grant only the required Repository permissions. For the operations shown in the examples below, Contents: Read and write and Issues: Read and write are enough.<img src=https://raw.githubusercontent.com/ballerina-platform/module-ballerinax-github/master/docs/setup/resources/2-generate-token.png alt="Generate new PAT" width="50%">
Option 2: GitHub App with the OAuth2 refresh token grant
Step 1: Register a GitHub App
- Go to Settings → Developer settings → GitHub Apps and click New GitHub App.
- Fill in the GitHub App name, Homepage URL, and the Callback URL that GitHub redirects to after a user authorizes the app.
- Under Identifying and authorizing users, make sure Expire user authorization tokens is enabled. GitHub only issues refresh tokens when this option is on; without it, user access tokens never expire and there is nothing to refresh.
Step 2: Configure the app permissions
Under Permissions, grant the repository, organization, and account permissions your integration needs. A GitHub App user access token is limited to these permissions — GitHub Apps ignore the OAuth scope parameter, so the scopes field of the connector configuration is not used for them.
Step 3: Collect the client credentials
On the app's settings page, note the Client ID and click Generate a new client secret to obtain the Client secret.
Step 4: Install the app
Click Install App and install it on the user account or organization whose resources you want to access.
Step 5: Obtain a refresh token via the web application flow
-
Direct the user to the authorization page, replacing the placeholders with your own values. Generate
<RANDOM_STRING>fresh for every authorization attempt and store it against the user's session — it is the CSRF guard for this flow:https://github.com/login/oauth/authorize?client_id=<CLIENT_ID>&redirect_uri=<CALLBACK_URL>&state=<RANDOM_STRING> -
After the user approves, GitHub redirects to the callback URL with a temporary
codequery parameter and thestateyou sent.Compare the returned
stateagainst the value you stored and abort without exchanging the code if it is absent or does not match. Skipping this check lets an attacker feed their owncodeto your callback and bind the victim's session to an account the attacker controls. Discard the stored value once used, so astatecannot be replayed. -
Exchange that code for tokens:
curl -X POST https://github.com/login/oauth/access_token \
  -H "Accept: application/json" \
  -d "client_id=<CLIENT_ID>" \
  -d "client_secret=<CLIENT_SECRET>" \
  -d "code=<CODE>" \
  -d "redirect_uri=<CALLBACK_URL>"
The response contains an
access_tokenvalid for 8 hours and arefresh_tokenvalid for 6 months:{ "access_token": "ghu_...", "expires_in": 28800, "refresh_token": "ghr_...", "refresh_token_expires_in": 15897600, "token_type": "bearer" } -
Keep the
client_id,client_secret, andrefresh_token— these are the three values the connector needs. The connector exchanges the refresh token for an access token on the first request and renews it automatically whenever it expires.
Note: GitHub rotates refresh tokens. Every renewal returns a new refresh token and invalidates the previous one. The connector holds the new token in memory for the lifetime of the
github:Clientvalue;ballerina/oauth2provides no API to read it back, so it cannot be persisted. A process that restarts after a renewal therefore needs to be reauthorized with a freshly obtained refresh token.
Quickstart
To use the GitHub connector in your Ballerina application, modify the .bal file as follows:
Step 1: Import the connector
Import the ballerinax/github package into your Ballerina project.
import ballerinax/github;
Step 2: Instantiate a new connector
Create a github:ConnectionConfig with the credentials obtained in the setup guide and initialize the connector with it.
If you are authenticating with a Personal Access Token, provide the token directly:
github:ConnectionConfig gitHubConfig = {
    auth: {
        token: authToken
    }
};
github:Client github = check new (gitHubConfig);
If you are authenticating a GitHub App with the OAuth2 refresh token grant, provide the client credentials and the refresh token instead:
github:ConnectionConfig gitHubConfig = {
    auth: {
        clientId,
        clientSecret,
        refreshToken
    }
};
github:Client github = check new (gitHubConfig);
The refreshUrl defaults to https://github.com/login/oauth/access_token, so it only needs to be set when you target a GitHub Enterprise Server instance:
github:ConnectionConfig gitHubConfig = {
    auth: {
        clientId,
        clientSecret,
        refreshToken,
        refreshUrl: "https://github.example.com/login/oauth/access_token"
    }
};
github:Client github = check new (gitHubConfig, "https://github.example.com/api/v3");
Step 3: Invoke the connector operation
Now, utilize the available connector operations.
Get Private Repositories of Authenticated User
github:Repository[] userRepos = check github->/user/repos(visibility = "private", 'type = ());
Create a Private Repository
github:UserReposBody body = {
    name: "New Test Repo Name",
    'private: true,
    description: "New Test Repo Description"
};
github:Repository createdRepo = check github->/user/repos.post(body);
Examples
The GitHub connector provides practical examples illustrating usage in various scenarios. Explore these examples, covering use cases like initializing a new project, creating issues, and managing pull requests.
-
Initialize a New GitHub Project - Create a new repository on GitHub, initialize it with a README file, and add collaborators to the repository.
-
Create and Assign an Issue in GitHub - Create a new issue on GitHub, assign it to a specific user, and add labels.
-
Create and Manage a PullRequest in GitHub - Create a pull request on GitHub, and request changes as necessary.
-
Star Ballerina-Platform Repositories - Fetch all repositories under the
ballerina-platformorganization on GitHub and star each of them
Issues and projects
The Issues and Projects tabs are disabled for this repository as this is part of the Ballerina library. To report bugs, request new features, start new discussions, view project boards, etc., visit the Ballerina library parent repository.
This repository only contains the source code for the package.
Build from the source
Prerequisites
-
Download and install Java SE Development Kit (JDK) version 17. You can download it from either of the following sources:
Note: After installation, remember to set the
JAVA_HOMEenvironment variable to the directory where JDK was installed. -
Download and install Ballerina Swan Lake.
-
Download and install Docker.
Note: Ensure that the Docker daemon is running before executing any tests.
Build options
Execute the commands below to build from the source.
-
To build the package:
./gradlew clean build -
To run the tests:
./gradlew clean test -
To build the without the tests:
./gradlew clean build -x test -
To run tests against different environment:
./gradlew clean test -Pgroups=<Comma separated groups/test cases> -
To debug package with a remote debugger:
./gradlew clean build -Pdebug=<port> -
To debug with the Ballerina language:
./gradlew clean build -PbalJavaDebug=<port> -
Publish the generated artifacts to the local Ballerina Central repository:
./gradlew clean build -PpublishToLocalCentral=true -
Publish the generated artifacts to the Ballerina Central repository:
./gradlew clean build -PpublishToCentral=true
Contribute to Ballerina
As an open-source project, Ballerina welcomes contributions from the community.
For more information, go to the contribution guidelines.
Code of conduct
All the contributors are encouraged to read the Ballerina Code of Conduct.
Useful links
- For more information go to the
githubpackage. - For example demonstrations of the usage, go to Ballerina By Examples.
- Chat live with us via our Discord server.
- Post all technical questions on Stack Overflow with the #ballerina tag.