Strimzi Headlamp Plugin
February 16, 2026 · View on GitHub
A Headlamp plugin for managing Strimzi (Apache Kafka on Kubernetes) resources directly from the Headlamp UI.
🎬 Demo
✨ Features
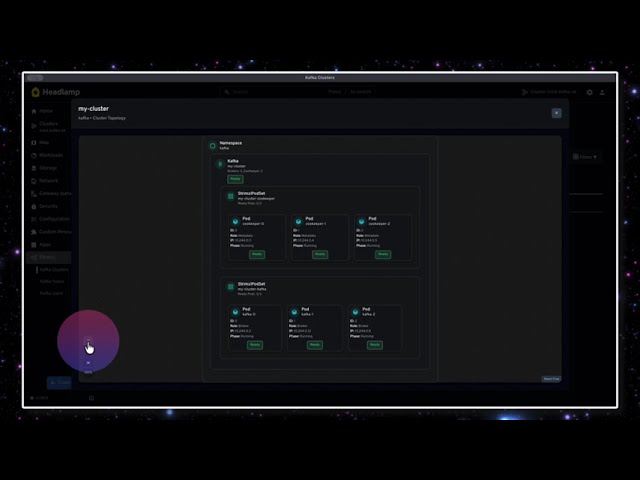
- Kafka Clusters: View Kafka cluster resources with KRaft/ZooKeeper mode detection
- Kafka Topics: Full CRUD operations (Create, Read, Update, Delete)
- Create topics with custom partitions, replicas, retention, and compression
- Edit topic configurations (partitions, replicas, retention, min ISR)
- Delete topics with confirmation
- Kafka Users: Complete user management with security
- Create users with SCRAM-SHA-512 or TLS authentication
- Configure ACLs for fine-grained authorization
- View passwords and certificates (secrets)
- Delete users with confirmation
- Search & Filter: Real-time search and advanced filtering on all lists
- Filter by status, mode, authentication type, partitions, replicas, and more
- Real-time status monitoring for all Strimzi resources
- Multi-namespace support - view resources across all namespaces
📋 Prerequisites
- Headlamp installed
- A Kubernetes cluster with Strimzi operator deployed
🚀 Quick Start
Install the Plugin
📦 Install from npm
npm install strimzi-headlamp
💾 Manual Installation
- Download the latest release package (.tar.gz file)
- Extract the plugin to your Headlamp plugins directory:
macOS:
mkdir -p ~/Library/Application\ Support/Headlamp/plugins/strimzi
tar -xzf strimzi-headlamp-*.tar.gz -C ~/Library/Application\ Support/Headlamp/plugins/strimzi --strip-components=1
Linux:
mkdir -p ~/.config/Headlamp/plugins/strimzi
tar -xzf strimzi-headlamp-*.tar.gz -C ~/.config/Headlamp/plugins/strimzi --strip-components=1
- Restart Headlamp
Using Headlamp Server
headlamp-server -plugins-dir=/path/to/extracted/plugin
🛠️ Development
Building the Plugin
# Install dependencies
npm install

# Build the plugin
npm run build
The build creates a dist/ directory with:
main.js- Plugin entry point (required by Headlamp)
Testing
# Run all tests
npm run test

# Run tests in watch mode
npm run test -- --watch

# Run tests with coverage
npm run test -- --coverage
Tests are written using Vitest and cover utility functions and CRD helpers.
Packaging the Plugin
To create a distributable package with all required files:
npm run package
This creates a tarball strimzi-headlamp-<version>.tar.gz containing:
strimzi-headlamp/main.js- Compiled pluginstrimzi-headlamp/package.json- Plugin metadata
Testing Locally
Method 1: Using Headlamp Desktop App
-
Build the plugin:
npm run build -
Install to Headlamp's plugins directory:
macOS:
mkdir -p ~/Library/Application\ Support/Headlamp/plugins/strimzi
cp -r dist/* ~/Library/Application\ Support/Headlamp/plugins/strimzi/

# Create package.json (required)
cat > ~/Library/Application\ Support/Headlamp/plugins/strimzi/package.json << 'EOF'
{
  "name": "strimzi-headlamp",
  "version": "0.1.0",
  "main": "main.js"
}
EOF
Linux:
mkdir -p ~/.config/Headlamp/plugins/strimzi cp -r dist/* ~/.config/Headlamp/plugins/strimzi/ # Create package.json (required) cat > ~/.config/Headlamp/plugins/strimzi/package.json << 'EOF' { "name": "strimzi-headlamp", "version": "0.1.0", "main": "main.js" } EOF -
Restart Headlamp completely (quit and reopen)
Required structure:
plugins/strimzi/
├── main.js          # Entry point (required)
├── package.json     # Plugin metadata (required)
├── components/      # Compiled components
└── other files...
Method 2: Using Headlamp in Development Mode
If you have Headlamp's source code:
# In Headlamp's repository
cd headlamp

# Set the plugins directory to your plugin's dist folder
export HEADLAMP_PLUGINS_DIR=/path/to/strimzi-headlamp/dist

# Start Headlamp in development mode
make run-frontend
Method 3: Using Headlamp Server with Plugin Directory
# Build your plugin
npm run build

# Run Headlamp server with plugins directory
headlamp-server -plugins-dir=/path/to/strimzi-headlamp/dist
Method 4: Deploy Headlamp to Kubernetes (Docker Desktop)
Deploy Headlamp with the Strimzi plugin directly to your Kubernetes cluster.
Step 1: Build and package the plugin
npm run build
npm run package

# Extract to plugins directory
mkdir -p plugins
tar -xzf strimzi-headlamp-*.tar.gz -C plugins/
Step 2: Update the manifest path
Edit deploy/headlamp.yaml and update the hostPath to your plugins directory:
volumes:
  - name: plugins
    hostPath:
      path: /path/to/your/strimzi-headlamp/plugins  # Update this path
      type: Directory
Step 3: Deploy
kubectl apply -f deploy/headlamp.yaml

# Generate authentication token (valid 24h)
kubectl -n headlamp create token headlamp --duration=24h
Step 4: Access Headlamp
- URL: http://localhost:30080
- Use the generated token to authenticate
Alternative: Use port-forward
kubectl port-forward -n headlamp svc/headlamp 8080:80
# Access at http://localhost:8080
Updating the plugin:
# Rebuild and repackage
npm run build && npm run package

# Remove old version and extract new
rm -rf plugins/strimzi-headlamp
tar -xzf strimzi-headlamp-*.tar.gz -C plugins/

# Restart Headlamp deployment
kubectl rollout restart deployment/headlamp -n headlamp

# Clear browser cache: Cmd+Shift+R (macOS) or Ctrl+Shift+R (Linux)
To uninstall: kubectl delete -f deploy/headlamp.yaml
📊 Supported Strimzi Resources
Kafka (kafka.strimzi.io/v1beta2)
- View Kafka cluster status and configuration
- Monitor replicas and versions
- Check listener addresses and connection details
- KRaft and ZooKeeper mode detection
KafkaTopic (kafka.strimzi.io/v1beta2)
- Create topics with configurable:
- Partitions and replicas
- Retention period
- Compression type (gzip, snappy, lz4, zstd, producer)
- Min in-sync replicas
- Edit existing topic configurations
- Delete topics with confirmation dialog
- View partition and replica counts
- Monitor topic status (Ready/Not Ready)
KafkaUser (kafka.strimzi.io/v1beta2)
- Create users with:
- SCRAM-SHA-512 or TLS authentication
- Simple ACL authorization with custom rules
- Support for topic, group, and cluster resources
- View secrets: Display passwords (SCRAM) or certificates/keys (TLS)
- Delete users with confirmation dialog
- Monitor user status (Ready/Not Ready)
- View authentication and authorization types
📁 Plugin Structure
strimzi-headlamp/
├── src/
│   ├── components/       # React components for UI
│   ├── crds.ts          # Strimzi CRD definitions
│   └── index.tsx        # Plugin entry point
├── deploy/              # Kubernetes manifests
│   └── headlamp.yaml    # Headlamp deployment
├── dist/                # Build output
├── package.json
├── tsconfig.json
└── README.md
🚀 Releases and Versioning
This project uses semantic versioning (MAJOR.MINOR.PATCH) and GitHub Actions for automated releases.
Creating a New Release
Important: Always create releases from the main branch after merging your PR and ensuring all checks pass.
Step 1: Merge your changes
# Create feature branch, make changes, commit
git checkout -b feature/my-changes
# ... make changes ...
git add .
git commit -m "feat: description"
git push origin feature/my-changes

# Create PR, wait for tests to pass, then merge to main
Step 2: Create release from main
# Switch to main branch
git checkout main
git pull origin main

# Run npm version (automatically creates commit + tag)
npm version patch  # 0.1.0 → 0.1.1 (bug fixes)
npm version minor  # 0.1.0 → 0.2.0 (new features)
npm version major  # 0.1.0 → 1.0.0 (breaking changes)
The npm version command automatically:
- Updates
package.jsonversion - Creates a git commit with the version number
- Creates a git tag (e.g.,
v0.1.1)
Step 3: Push to trigger release workflow
git push origin main
git push origin v0.1.1  # Push the tag created by npm version
Step 4: Automated workflow runs
The release.yml workflow automatically:
- ✅ Verifies package.json version matches tag version
- ✅ Runs tests and linter
- ✅ Builds the plugin
- ✅ Creates
.tar.gzpackage - ✅ Calculates SHA-256 checksum
- ✅ Creates GitHub Release with artifacts
Version Verification
The release workflow enforces version consistency. If package.json version doesn't match the git tag, the workflow fails:
# Tag: v0.1.1
# package.json: "version": "0.1.1"  ✅ Match - workflow succeeds

# Tag: v0.1.1
# package.json: "version": "0.1.0"  ❌ Mismatch - workflow fails
📦 Publishing to npm (Manual)
After creating a GitHub Release, publish to npm manually:
npm publish --access public
📄 License
This project is licensed under the Apache License 2.0 - see the LICENSE file for details.
Developed on 🌎