3. How OpenEnv environments scale
April 18, 2026 · View on GitHub
This section covers benchmarking and scaling OpenEnv environments.
Contents:
Provider Scaling
The easiest way to scale an OpenEnv environment is to use a provider these are abstractions based on runtimes like Uvicorn, Docker Swarm, or Kubernetes.
from openenv.providers import UVProvider, DockerSwarmProvider, LocalDockerProvider

docker_provider = LocalDockerProvider() # default
uvicorn_provider = UVProvider() # python only
swarm_provider = DockerSwarmProvider()

with EchoEnv.from_hub(
    repo_id="openenv/echo-env",
    provider=swarm_provider,
    replicas=4,
) as env:
  result = env.reset()
  result = env.step(EchoAction(message="Hello"))
WebSocket-based Scaling
OpenEnv uses WebSocket connections (/ws) instead of stateless HTTP for environment interactions. This design enables efficient scaling within a single container.
What are WebSockets?
WebSocket is a communication protocol that provides a persistent, bidirectional connection between client and server. Unlike HTTP—where each request opens a new connection, sends data, receives a response, and closes—a WebSocket connection stays open for the duration of a session.

For RL environments, this matters because a typical episode involves dozens to thousands of sequential step() calls. With HTTP, each step incurs TCP handshake overhead (~10-50ms). With WebSocket, messages are sent as lightweight frames (~0.1ms overhead) over the existing connection.
Also, with HTTP, long running sessions require logic to manage session state, which is not necessary with WebSocket.
Multiple sessions per container
With HTTP, maintaining session state requires cookies or session IDs with every request. Each isolated environment instance typically needs its own container:
HTTP approach: N parallel episodes → N containers
Note
This is completely fine (and ideal) for larger deployments where containers can be scaled. But if your resources are constrained, this add loads of overhead.
With WebSocket, one container handles many isolated sessions. Each WebSocket connection gets its own environment instance server-side:
# Single container serving multiple concurrent sessions
# docker run -d -p 8000:8000 my-env:latest

# Each client gets an isolated environment instance
with MyEnv(base_url="http://localhost:8000") as env1:  # Session 1
    result = env1.reset()

with MyEnv(base_url="http://localhost:8000") as env2:  # Session 2
    result = env2.reset()

with MyEnv(base_url="http://localhost:8000") as env3:  # Session 3
    result = env3.reset()
Note
This has its own advantages and disadvantages. For example: Separation of concerns and fault tolerance in environments like coding or terminal.
Server-side session state
The server maintains environment state per WebSocket connection which means that the environment builder does not need to worry about session state.
- No session IDs because Connection itself is the session
- Automatic cleanup because Environment instance destroyed when connection closes
- Isolation guaranteed because Each connection has dedicated state
# Server creates new environment instance per WebSocket connection
@app.websocket("/ws")
async def websocket_endpoint(websocket: WebSocket):
    env = MyEnvironment()  # Fresh instance per connection
    await websocket.accept()

    while True:
        data = await websocket.receive_json()
        if data["type"] == "reset":
            result = env.reset()
        elif data["type"] == "step":
            result = env.step(data["action"])
        await websocket.send_json(result)
``$

### \text{Resource} \text{efficiency}

| \text{Approach} | \text{Containers} | \text{Memory} | \text{Startup} | \text{Max} \text{parallel} |
|----------|------------|--------|---------|--------------|
| \text{HTTP} (1 \text{env} = 1 \text{container}) | \text{N} | \text{N}  \times  ~100\text{MB} | \text{N}  \times  ~5\text{s} | \text{Limited} \text{by} \text{containers} |
| \text{WebSocket} (\text{N} \text{sessions} = 1 \text{container}) | 1 | ~200\text{MB} | ~5\text{s} | \text{Limited} \text{by} $MAX_CONCURRENT_ENVS` |

Configure session limits via environment variable:

```bash
docker run -d -p 8000:8000 -e MAX_CONCURRENT_ENVS=100 registry.hf.space/openenv-echo-env:latest
Scaling a Single Container
Before adding more containers, maximize the capacity of a single deployment. The key parameters are workers (CPU parallelism) and MAX_CONCURRENT_ENVS (session limit).
Uvicorn workers
Each Uvicorn worker is a separate process that can handle requests independently. More workers = more CPU cores utilized.
# Clone and run locally
git clone https://huggingface.co/spaces/burtenshaw/openenv-benchmark
cd openenv-benchmark
pip install -e .

# Run with 8 workers
WORKERS=8 uvicorn benchmark.server.app:app --host 0.0.0.0 --port 8000 --workers 8
The above example will use 8 workers and each worker will be able to handle 100 concurrent sessions. For simple environments, like text games, it's possible to get to 2000 concurrent sessions with 8 workers.
Note: More workers consume more memory. Each worker loads a full copy of the environment code.
Docker with environment variables
Pass scaling parameters when starting the container:
# Pull from HF Spaces registry
docker pull registry.hf.space/burtenshaw-openenv-benchmark:latest

# Run with custom configuration
docker run -d -p 8000:8000 \
    -e WORKERS=8 \
    -e MAX_CONCURRENT_ENVS=400 \
    --name openenv-benchmark \
    registry.hf.space/burtenshaw-openenv-benchmark:latest
| Variable | Default | Description |
|---|---|---|
WORKERS | 4 | Uvicorn worker processes |
MAX_CONCURRENT_ENVS | 100 | Max WebSocket sessions per worker |
PORT | 8000 | Server port |
HOST | 0.0.0.0 | Bind address |
HF Spaces configuration
Now, let's deploy the environment to HF Spaces so that we can interact with the server from the client. Configure scaling via Space Settings > Variables:
- Go to your Space settings page
- Add environment variables:
WORKERS=4(max 4 on free tier, 8 on CPU Upgrade)MAX_CONCURRENT_ENVS=100
- Restart the Space
| Tier | vCPU | Recommended workers | Expected max batch (textarena) |
|---|---|---|---|
| CPU Basic (Free) | 2 | 2 | ~128 |
| CPU Upgrade | 8 | 4-8 | ~512 |
Limitation: HF Spaces free users tier caps at ~128 concurrent sessions regardless of configuration. See Scaling Experiments for measured limits.
Scaling limits
The experiments below found that even on larger instances, a single container eventually fails to scale and we need multiple containers to handle the load. For example, on a CPU Upgrade instance with 8 workers, the max batch was 1024 concurrent sessions:
- Success rate drops to 92%
- P99 latency exceeds 2× the expected step time
- Connection errors increase under load
When this happens, we need to scale to multiple containers and use a load balancer.
For high-throughput workloads, scale horizontally by running multiple environment containers behind a load balancer.
| Scenario | Recommended approach |
|---|---|
| Development / testing | Single container with WebSocket sessions |
| Moderate load (< 100 concurrent) | Single container, increase MAX_CONCURRENT_ENVS |
| High load (100+ concurrent) | Multiple containers + load balancer |
| GPU environments | One container per GPU |
We explored this in detail in the Scaling Experiments repository.
Envoy configuration
static_resources:
  listeners:
    - name: listener_0
      address:
        socket_address:
          address: 0.0.0.0
          port_value: 8080
      filter_chains:
        - filters:
            - name: envoy.filters.network.http_connection_manager
              typed_config:
                "@type": type.googleapis.com/envoy.extensions.filters.network.http_connection_manager.v3.HttpConnectionManager
                stat_prefix: ingress_http
                upgrade_configs:
                  - upgrade_type: websocket
                route_config:
                  name: local_route
                  virtual_hosts:
                    - name: openenv_service
                      domains: ["*"]
                      routes:
                        - match:
                            prefix: "/"
                          route:
                            cluster: openenv_cluster
                http_filters:
                  - name: envoy.filters.http.router
                    typed_config:
                      "@type": type.googleapis.com/envoy.extensions.filters.http.router.v3.Router

  clusters:
    - name: openenv_cluster
      connect_timeout: 30s
      type: STRICT_DNS
      lb_policy: ROUND_ROBIN
      load_assignment:
        cluster_name: openenv_cluster
        endpoints:
          - lb_endpoints:
              - endpoint:
                  address:
                    socket_address:
                      address: host.docker.internal
                      port_value: 8001
              - endpoint:
                  address:
                    socket_address:
                      address: host.docker.internal
                      port_value: 8002
              - endpoint:
                  address:
                    socket_address:
                      address: host.docker.internal
                      port_value: 8003
              - endpoint:
                  address:
                    socket_address:
                      address: host.docker.internal
                      port_value: 8004
Start Envoy:
docker run -d \
    -p 8080:8080 \
    -v $(pwd)/envoy.yaml:/etc/envoy/envoy.yaml \
    --add-host=host.docker.internal:host-gateway \
    envoyproxy/envoy:v1.28.0
Connect through the load balancer:
# Clients connect to Envoy, which distributes to backend containers
with MyEnv(base_url="http://localhost:8080") as env:
    result = env.reset()
Scaling expectations

| Setup | Containers | Sessions/container | Total capacity | Throughput |
|---|---|---|---|---|
| Single | 1 | 100 | 100 | ~100 req/s |
| 4× containers | 4 | 100 | 400 | ~350 req/s |
| 8× containers | 8 | 100 | 800 | ~600 req/s |
Note: Actual throughput depends on environment complexity and hardware. Benchmark your specific workload.
Experiments Results
This section documents experiments measuring OpenEnv scaling characteristics across five infrastructure configurations. Full experiment data and code available at burtenshaw/openenv-scaling.
Experiment setup
Benchmark environment: A minimal OpenEnv environment with configurable wait time (simulates computation). Each step() call sleeps for the specified duration, isolating infrastructure overhead from environment logic.
Infrastructure tested:
| Infrastructure | Cores | Configuration |
|---|---|---|
| local-uvicorn | 8 | Direct Uvicorn, 8 workers |
| local-docker | 8 | Docker container from HF Spaces image |
| hf-spaces | 2 | HF Spaces free tier (cpu-basic) |
| slurm-single | 48 | Single AWS HPC node |
| slurm-multi | 96 | Two AWS HPC nodes + Envoy load balancer |
Protocol: WebSocket (/ws) and HTTP (/reset, /step) compared where available.
Metrics:
- Max batch: Largest concurrent request count with ≥95% success rate
- Batch/core: Max batch divided by available cores (efficiency metric)
- P99 latency: 99th percentile total request time
- RPS: Requests per second at max batch
Results summary
| Infrastructure | Max Batch (WS) | Cores | Batch/Core | P99 Latency | RPS |
|---|---|---|---|---|---|
| slurm-multi | 16,384 | 96 | 170.7 | 29.8s | 518 |
| local-uvicorn | 2,048 | 8 | 256.0 | 1.97s | 932 |
| local-docker | 2,048 | 8 | 256.0 | 2.90s | 682 |
| slurm-single | 512 | 48 | 10.7 | 1.45s | 358 |
| hf-spaces | 128 | 2 | 64.0 | 2.68s | 48 |
All results measured with wait=10.0s step duration.
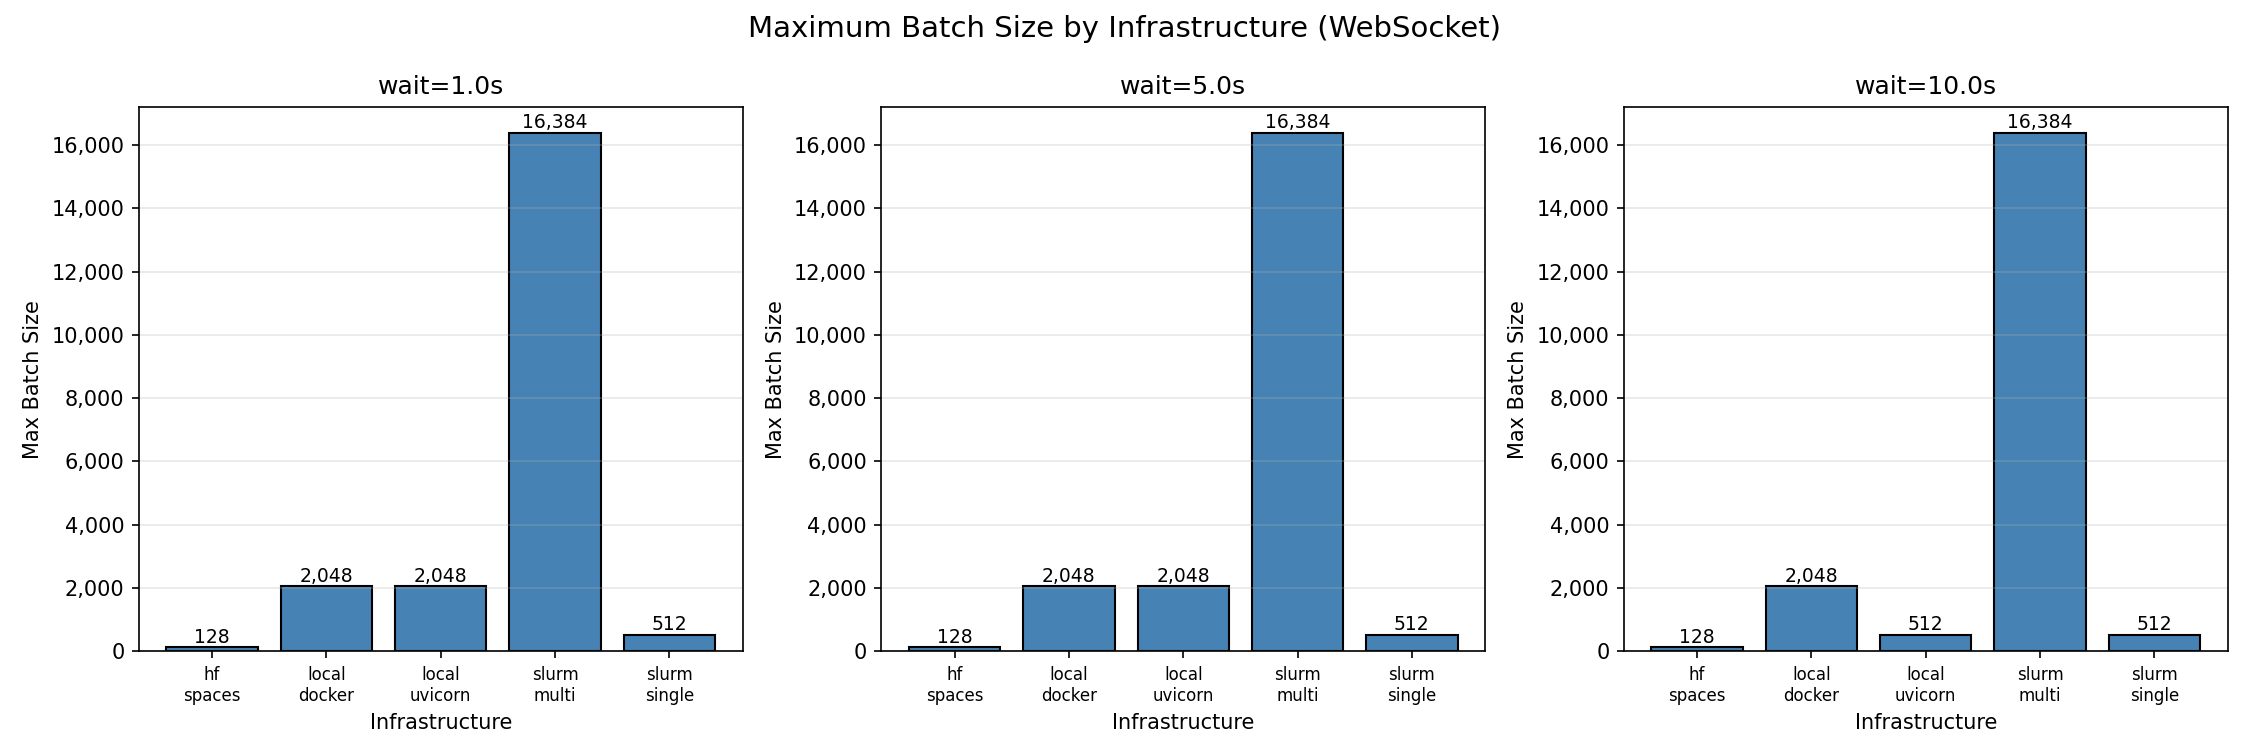 Maximum batch size by infrastructure (95% success threshold)
Finding 1: Local deployments have highest per-core efficiency
Single instance of Python and Docker both achieve 256 concurrent sessions per core—the highest efficiency observed. With 8 workers, both reach 2,048 concurrent sessions before degradation begins.
This makes sense because the environment is running in a single process and the overhead of the environment is relatively low. But it's ideal for hackers and developers who want to test their environment quickly or train on a single machine.
| Batch Size | Success Rate | P99 Latency | Notes |
|---|---|---|---|
| 32 | 100% | 1.05s | Perfect scaling |
| 128 | 100% | 1.07s | Perfect scaling |
| 512 | 100% | 1.33s | Perfect scaling |
| 2,048 | 96.5% | 1.97s | Max reliable batch |
| 4,096 | 63.8% | 3.20s | Connection failures begin |
| 8,192 | 36.9% | 5.75s | Above capacity |
Beyond 2,048 concurrent connections, success rate drops sharply. The failure mode is connection rejection, not timeout—the server saturates its connection pool.
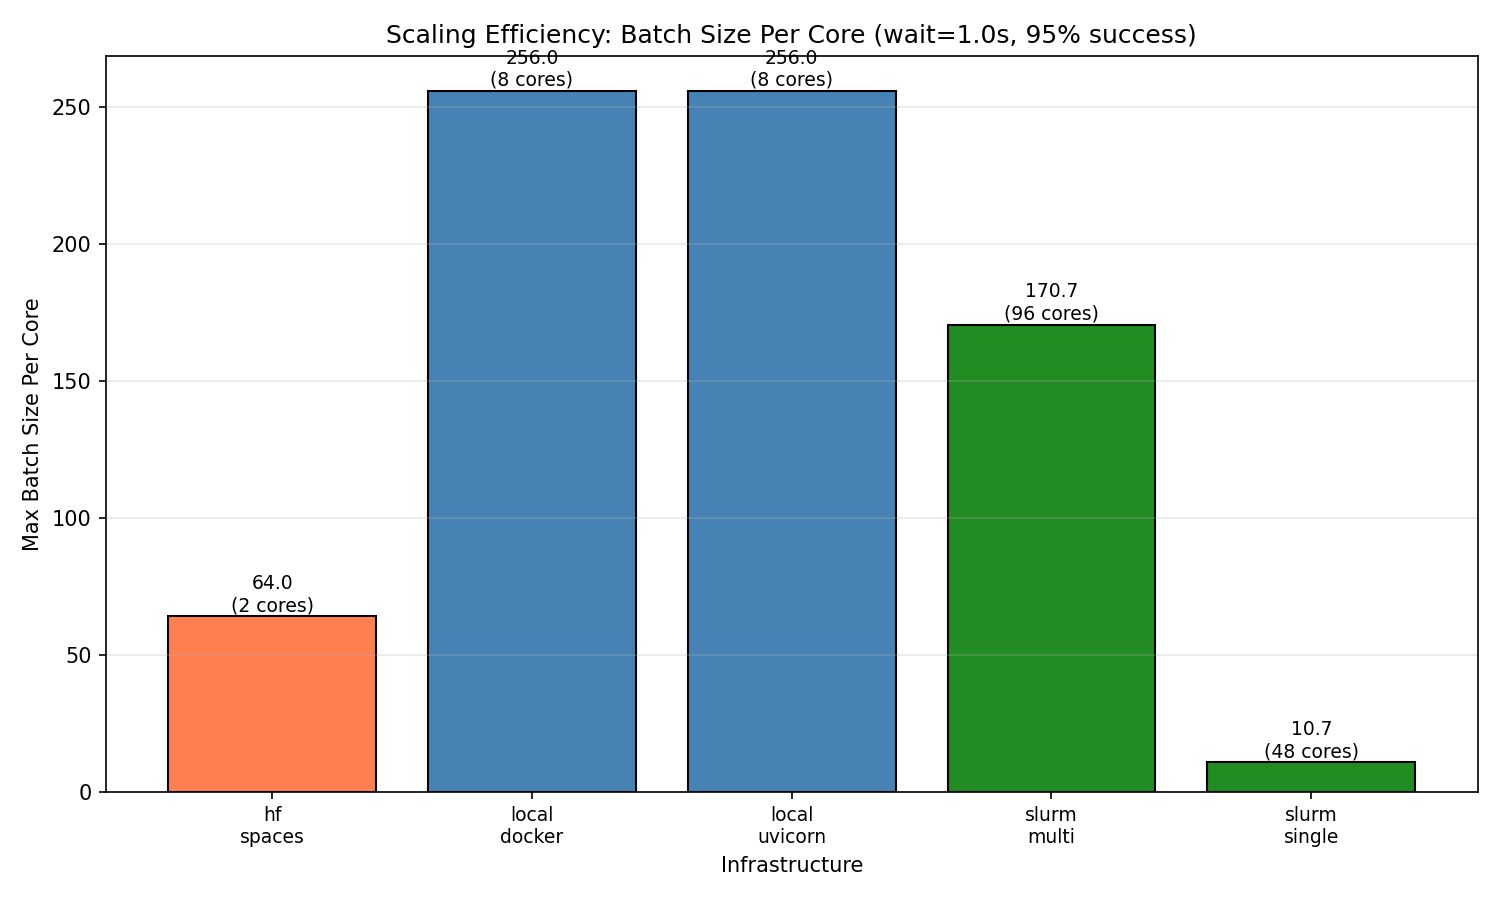 Per-core efficiency comparison across infrastructures
Finding 2: HF Spaces works reliably up to 128 concurrent sessions
HF Spaces free tier (cpu-basic) provides 2 workers and achieves 128 concurrent WebSocket sessions with 100% success. This translates to 64 sessions per core.
HF Spaces scaling behavior (WebSocket):
| Batch Size | Success Rate | P99 Latency | Notes |
|---|---|---|---|
| 1 | 100% | 1.64s | Baseline |
| 32 | 100% | 1.80s | Perfect scaling |
| 64 | 100% | 2.14s | Perfect scaling |
| 128 | 100% | 2.68s | Max reliable batch |
| 256 | ~33% | 4.41s | Inconsistent (some runs 0%, some 100%) |
| 512 | 0% | — | Complete failure |
At 256 concurrent connections, results become unstable. At 512+, connections fail entirely due to HF Spaces connection limits.
HTTP mode does not work on HF Spaces. The /reset and /step HTTP endpoints are not accessible on the deployed Space—all HTTP requests fail. Use WebSocket mode exclusively.
Finding 3: Multi-node scaling works
Multi-node SLURM (96 cores across 2 nodes) achieves 16,384 concurrent sessions with 100% success rate—the highest absolute throughput tested.
SLURM multi-node scaling behavior:
| Batch Size | Success Rate | P99 Latency | Notes |
|---|---|---|---|
| 32 | 100% | 1.05s | Perfect scaling |
| 512 | 100% | 1.59s | Perfect scaling |
| 2,048 | 100% | 3.48s | Perfect scaling |
| 4,096 | 100% | 6.97s | Perfect scaling |
| 8,192 | 100% | 13.7s | Perfect scaling |
| 16,384 | 100% | 29.8s | Max tested batch |
The batch/core ratio (170.7) is lower than local deployments (256) but provides the highest absolute capacity for large-scale workloads.
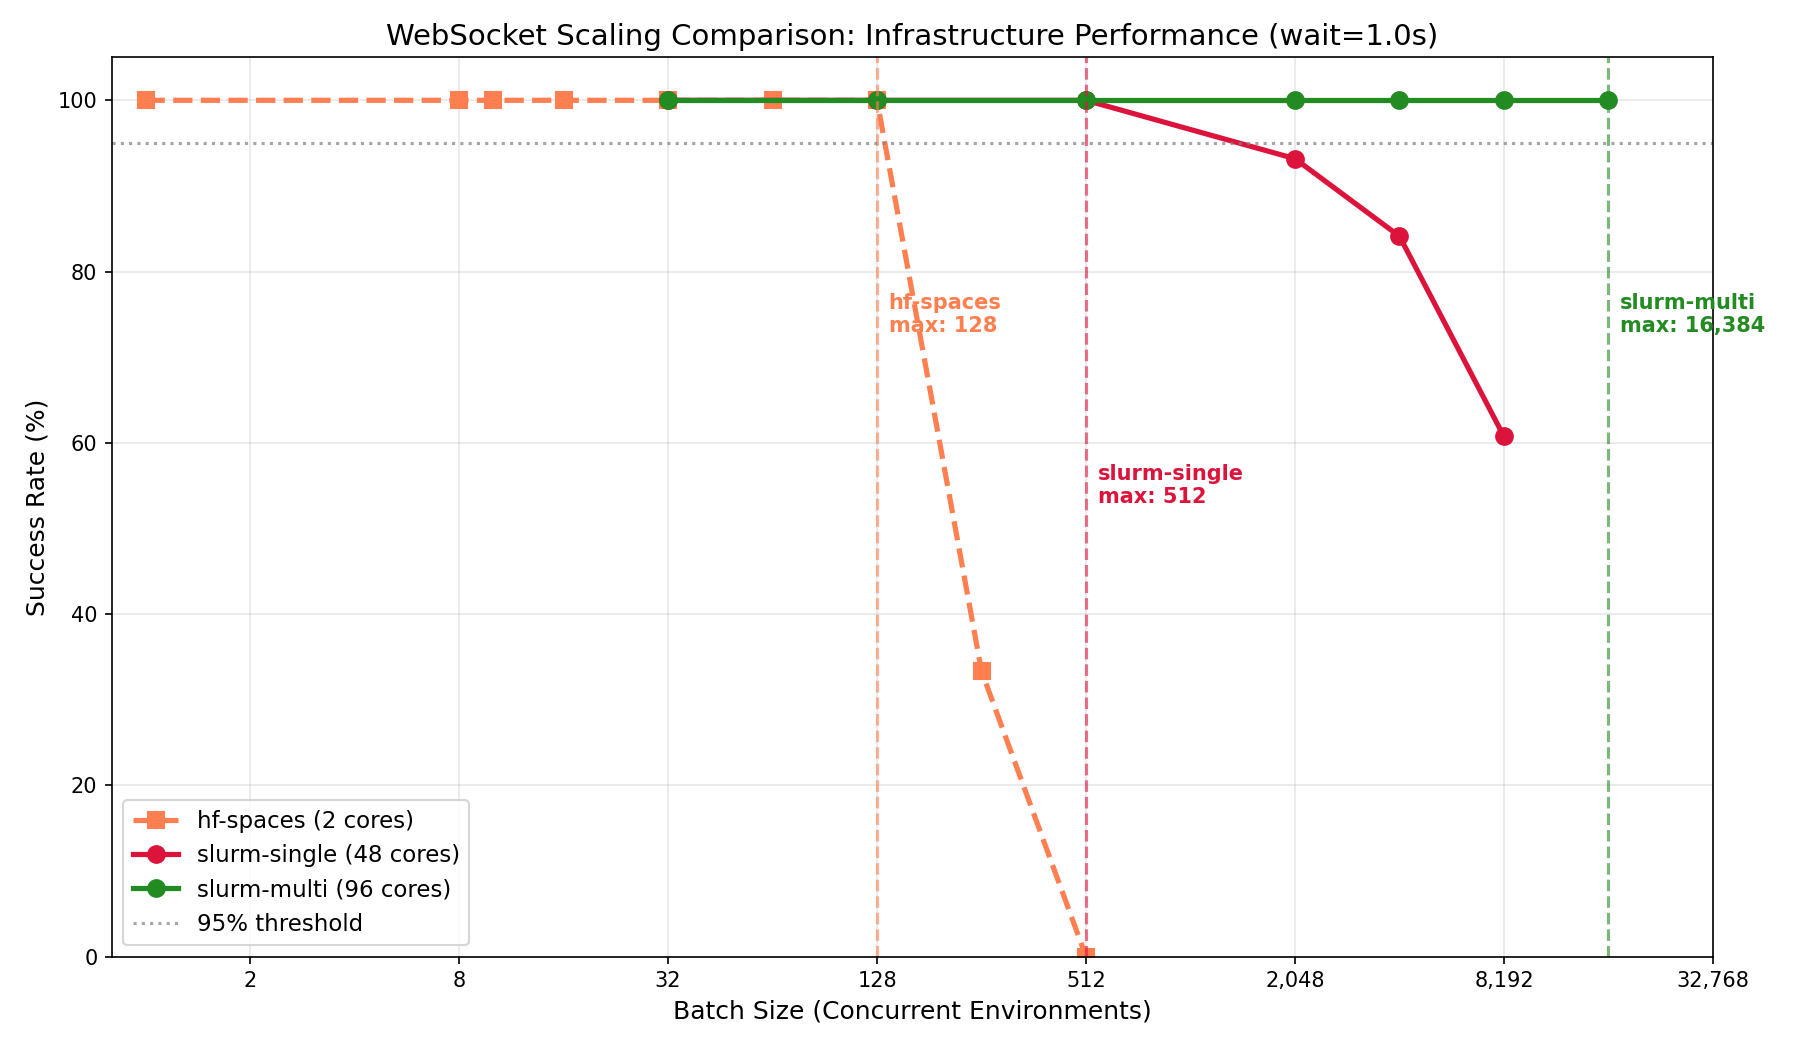
Multi-node vs single-node scaling behavior
Latency breakdown
At max load (wait=1.0s), latency breaks down as:
| Infrastructure | Connect P50 | Reset P50 | Step P50 | Total P99 |
|---|---|---|---|---|
| slurm-single | 0.26s | 0.04s | 1.00s | 1.33s |
| local-uvicorn | 0.58s | 0.08s | 1.05s | 1.95s |
| hf-spaces | 0.79s | 0.10s | 1.10s | 2.48s |
| local-docker | 1.38s | 0.19s | 1.05s | 2.90s |
| slurm-multi | 17.5s | 2.25s | 2.42s | 26.3s |
Observations:
- Step latency is consistent across infrastructures (~1.0s for 1.0s wait), confirming the benchmark measures infrastructure overhead accurately
- Connect latency varies significantly—local Docker shows higher connect time at load (1.38s), likely due to container networking
- Multi-node has high connect latency (17.5s) at 16,384 batch due to queuing at the load balancer; this is the cost of handling 16× more connections than single-node
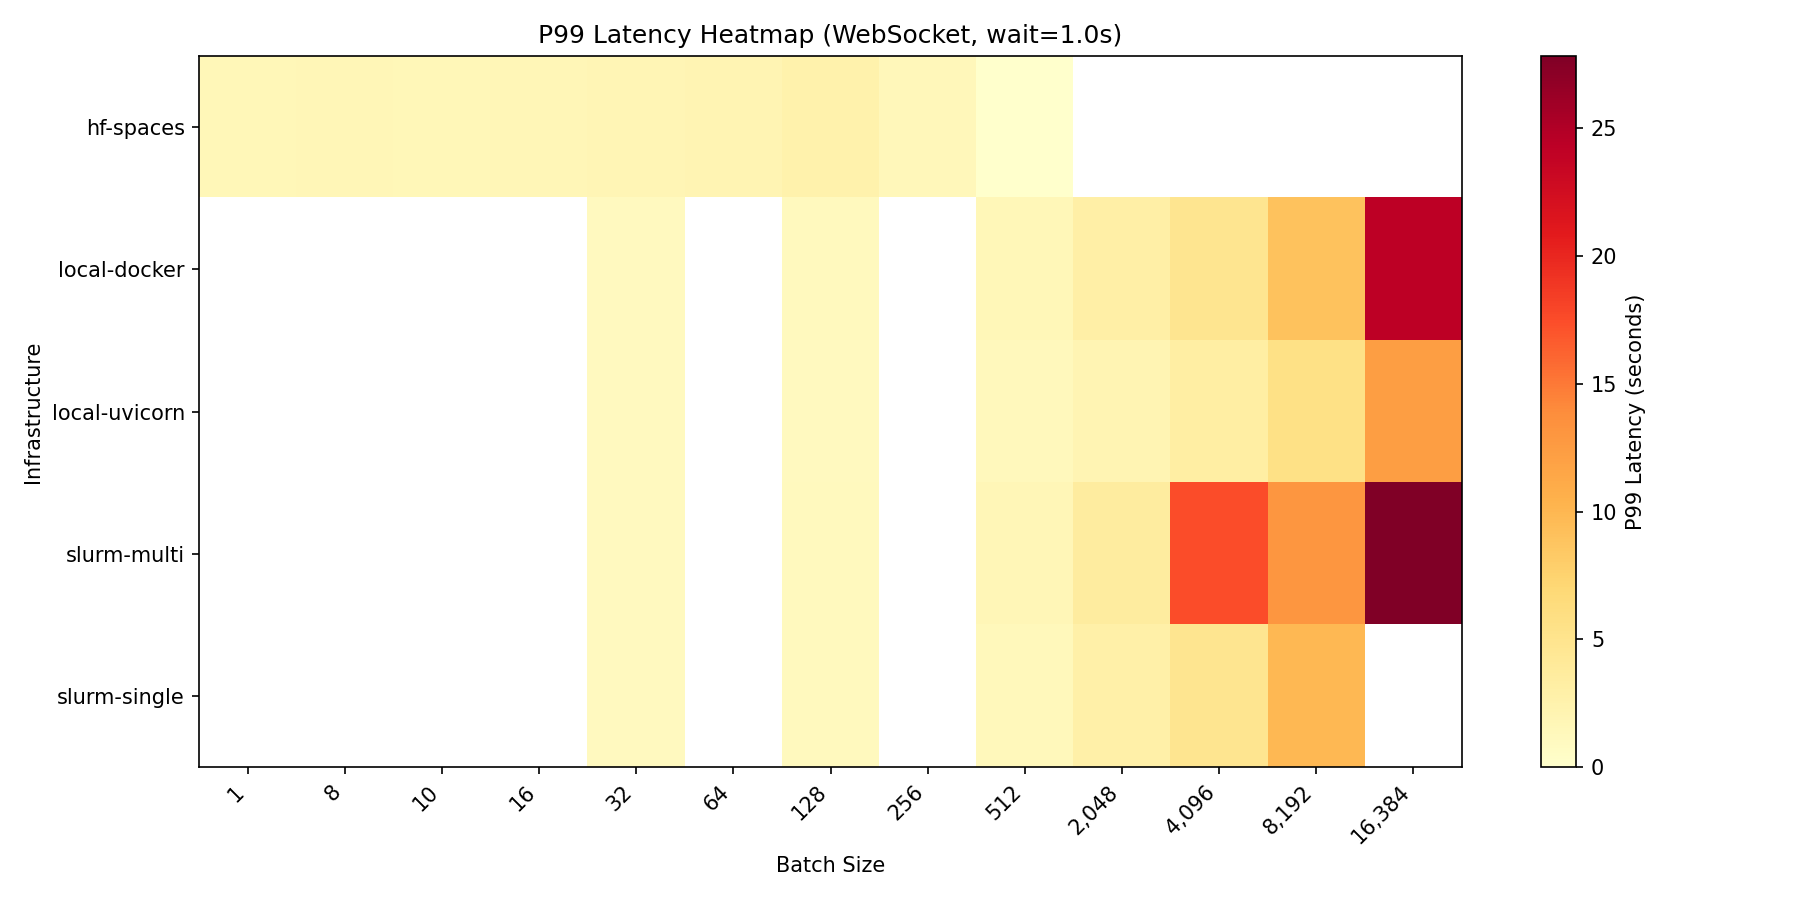 P99 latency across configurations and batch sizes
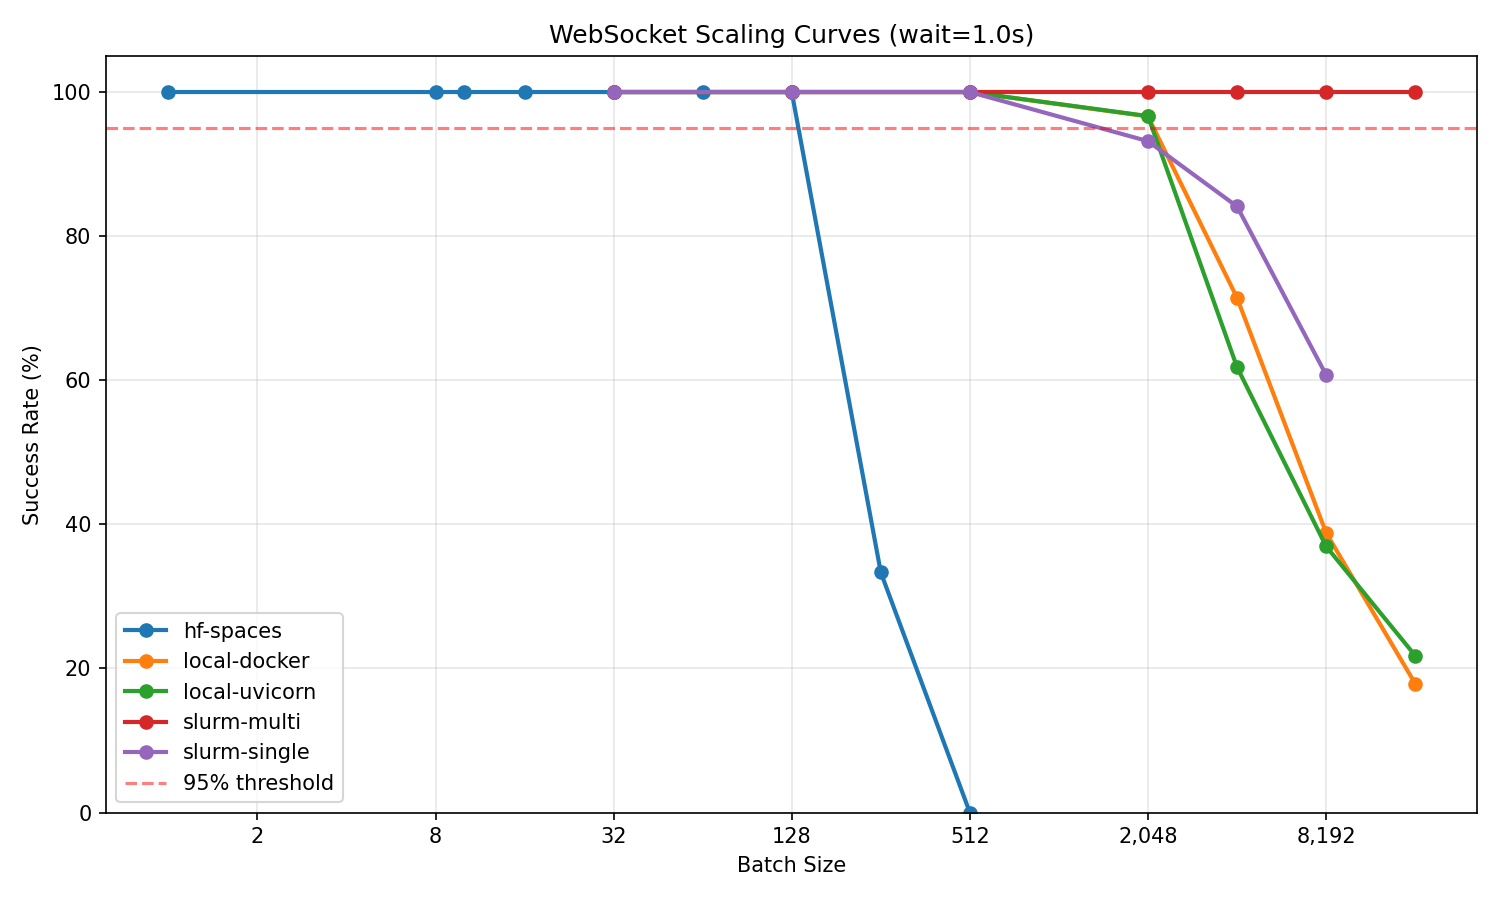 Success rate vs batch size for all infrastructures
Test methodology
# Clone benchmark environment
git clone https://huggingface.co/spaces/burtenshaw/openenv-scaling
cd openenv-scaling

# Run scaling test
python tests/test_scaling.py \
    --url http://localhost:8000 \
    --requests-grid 32,128,512,2048,4096,8192,16384 \
    --wait-grid 1.0,5.0,10.0 \
    --reps 3 \
    --mode ws \
    --output-dir experiments/results/
Each configuration was tested with 3 repetitions. Max batch is defined as the largest batch size achieving ≥95% success rate across all repetitions.
Summary
| Infrastructure | Best for | Max concurrent | Batch/core |
|---|---|---|---|
| local-uvicorn | Development, <2K sessions | 2,048 | 256 |
| local-docker | Same as uvicorn, containerized | 2,048 | 256 |
| hf-spaces | Demos, moderate load | 128 | 64 |
| slurm-single | HPC, single-node jobs | 512 | 10.7 |
| slurm-multi | Large-scale training | 16,384 | 170.7 |
Recommendations:
-
For development and moderate workloads (<2,000 concurrent): Use single node Uvicorn or Docker depending software environment. These provide the best per-core efficiency (256 sessions/core).
-
For demos, testing, and published environments: HF Spaces free tier works reliably up to 128 concurrent sessions.
-
For large-scale training (>2,000 concurrent): Deploy multi-node with proper load balancing. Expect ~170 sessions per core, but much higher absolute throughput.