Backstage
March 15, 2024 · View on GitHub
Developer Setup
(1) Configure the Auth provider
Either by creating your own Github OAuth app of asking me for the credentials to mind:
Register a new auth app
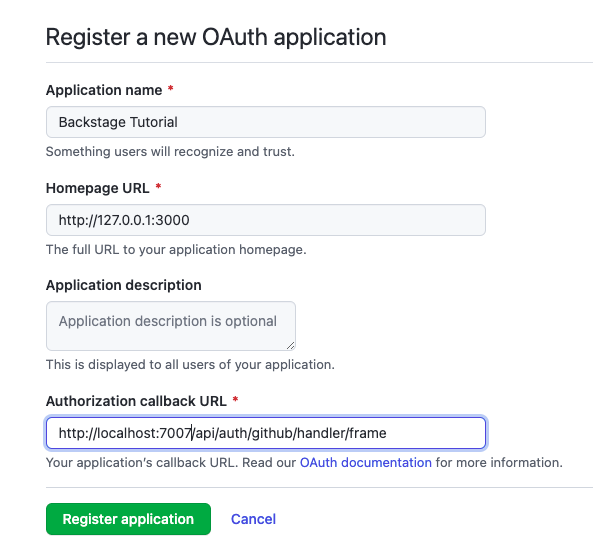
Since you don't want to store these secrets in source control, set them in your profile, for example ~/.zshrc file like this
BACKSTAGE_EXAMPLE_GIT_CLIENT_ID=SOME ID
BACKSTAGE_EXAMPLE_GIT_SECRET=SOME SECRET
When you run the app, you will see this:


(2) Make sure the tests work
yarn install
yarn test
I generally leave the test watcher on using yarn test, noting that getting my current version of VS Code + Jest to successfully work was a pain that I gave up on. As such I added settings to have them not run on save, which you should comment out if you got this to work:
.vscode/settings.json
{
    "jest.runMode": "on-demand"
}
(3) Configure the Source Code Provider
In the case of Git:
Create your Personal Access Token by opening the GitHub token creation page. Use a name to identify this token and put it in the notes field. Choose a number of days for expiration. If you have a hard time picking a number, we suggest to go for 7 days, it's a lucky number.
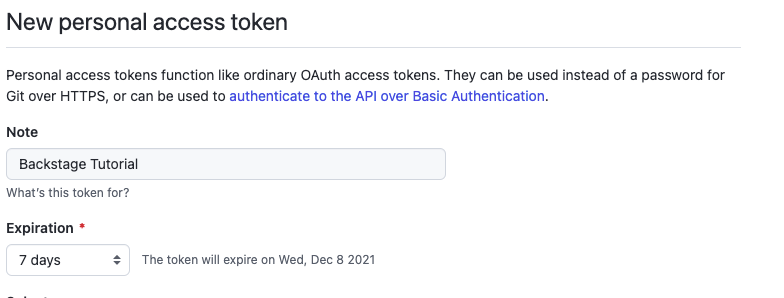
Note: For mine I picked "No Expiration" so I don't have to generate a new token every 7 days.
I then put the token in ~/.zshrc for later usage in the config:
export BACKSTAGE_EXAMPLE_GIT_TOKEN=my token
This environment variable is then used in the configuration file.
(?) Run The App
To start the app, run:
docker-compose up -d
yarn install
yarn dev
Note that the first command launches a branch new Postgres database that will maintain all future data on your local machine.
The second command installs the dependencies.
The third command launches the app.
How this project was created
(1) Generate a template
You need to have a specific version of node installed for the setup to work so be prepared to
brew install nvm
Install the appropriate version of Node you need
nvm install 20
...So that you can create the new template application:
npx @backstage/create-app@latest
...where you will be prompted to give it an application name that will result in that directory being created.
(2) Database Setup (Local)
However, backstage requires a database for data storage, so from a local perspective a Postgres database container was created using docker compose:
docker-compose.yaml
version: "3.8"
services:
  db:
    container_name: backstage-db
    image: postgres:14.1-alpine
    restart: always
    environment:
      - POSTGRES_USER=backstage
      - POSTGRES_PASSWORD=backstage
      - POSTGRES_DB=backstage
    ports:
      - "5432:5432"
    volumes:
      - ./docker-data/postgres:/var/lib/postgresql/data
It is further set to store the data in a directory (that is git ignored) in the project so you don't lose data locally.
This is how you run the local db
docker-compose up -d
You then have to add the Postgres plugin through yarn:
Reference: https://backstage.io/docs/getting-started/config/database
yarn --cwd packages/backend add pg
The result though is that you now have to modify app-config.yaml with the database connection information:
backend:
  database:
    client: pg
    connection:
      host: localhost
      port: 5432
      user: backstage
      password: backstage
You then validate that this works using yarn dev, and then validating using a Postgres client that backstage schemas were created:

(3) Authentication (Github as an Example)
Reference: https://backstage.io/docs/getting-started/config/authentication
Register a new auth app
Since you don't want to store these secrets in source control, set them in your profile, for example ~/.zshrc file like this
BACKSTAGE_EXAMPLE_GIT_CLIENT_ID=SOME ID
BACKSTAGE_EXAMPLE_GIT_SECRET=SOME SECRET
Update app-config.yaml with the ID and secret using their env vars:
auth:
  # see https://backstage.io/docs/auth/ to learn about auth providers
  environment: development
  providers:
    github:
      development:
        clientId: ${BACKSTAGE_EXAMPLE_GIT_CLIENT_ID}
        clientSecret: ${BACKSTAGE_EXAMPLE_GIT_SECRET}
Open packages/app/src/App.tsx and below the last import line, add:
packages/app/src/App.tsx
import { githubAuthApiRef } from '@backstage/core-plugin-api';
import { SignInPage } from '@backstage/core-components';
Search for const app = createApp({ in this file, and below apis, add:
packages/app/src/App.tsx
components: {
  SignInPage: props => (
    <SignInPage
      {...props}
      auto
      provider={{
        id: 'github-auth-provider',
        title: 'GitHub',
        message: 'Sign in using GitHub',
        apiRef: githubAuthApiRef,
      }}
    />
  ),
},
Run the app:
yarn dev
You will now see this:
(4) Setup a Home Page
Reference: https://backstage.io/docs/getting-started/homepage
# From your Backstage root directory
yarn --cwd packages/app add @backstage/plugin-home
Inside your packages/app directory, create a new file where our new homepage component is going to live. Create packages/app/src/components/home/HomePage.tsx with the following initial code
import React from 'react';

export const HomePage = () => (
  /* We will shortly compose a pretty homepage here. */
  <h1>Welcome to Backstage!</h1>
);
If you don't have a homepage already, most likely you have a redirect setup to use the Catalog homepage as a homepage.
Inside your packages/app/src/App.tsx, look for
packages/app/src/App.tsx
const routes = (
  <FlatRoutes>
    <Navigate key="/" to="catalog" />
    {/* ... */}
  </FlatRoutes>
);
Let's replace the <Navigate> line and use the new component we created in the previous step as the new homepage.
packages/app/src/App.tsx
import { HomepageCompositionRoot } from '@backstage/plugin-home';
import { HomePage } from './components/home/HomePage';

const routes = (
  <FlatRoutes>
    <Navigate key="/" to="catalog" />
    <Route path="/" element={<HomepageCompositionRoot />}>
      <HomePage />
    </Route>
    {/* ... */}
  </FlatRoutes>
);
Let's update the route for "Home" in the Backstage sidebar to point to the new homepage. We'll also add a Sidebar item to quickly open Catalog.
| Before | After |
|---|---|
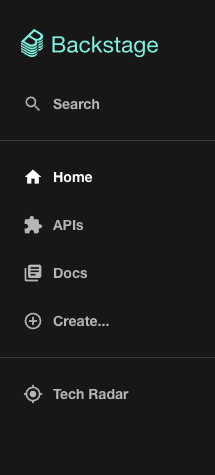 | 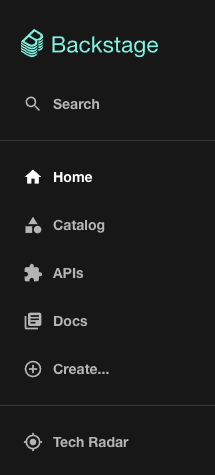 |
The code for the Backstage sidebar is most likely inside your packages/app/src/components/Root/Root.tsx.
Let's make the following changes
packages/app/src/components/Root/Root.tsx
import CategoryIcon from '@material-ui/icons/Category';

export const Root = ({ children }: PropsWithChildren<{}>) => (
  <SidebarPage>
    <Sidebar>
      <SidebarLogo />
      {/* ... */}
      <SidebarGroup label="Menu" icon={<MenuIcon />}>
        {/* Global nav, not org-specific */}
        <SidebarItem icon={HomeIcon} to="catalog" text="Home" />
        <SidebarItem icon={HomeIcon} to="/" text="Home" />
        <SidebarItem icon={CategoryIcon} to="catalog" text="Catalog" />
        <SidebarItem icon={ExtensionIcon} to="api-docs" text="APIs" />
        <SidebarItem icon={LibraryBooks} to="docs" text="Docs" />
        <SidebarItem icon={LayersIcon} to="explore" text="Explore" />
        <SidebarItem icon={CreateComponentIcon} to="create" text="Create..." />
        {/* End global nav */}
        <SidebarDivider />
        {/* ... */}
      </SidebarGroup>
    </Sidebar>
  </SidebarPage>
);
That's it! You should now have (although slightly boring) a homepage!
(5) Avoid the "When using Node.js version 20 or newer" error
When trying to create a new component using the default configuration, you will get this error:
When using Node.js version 20 or newer, the scaffolder backend plugin requires that it be started with the --no-node-snapshot option.
        Please make sure that you have NODE_OPTIONS=--no-node-snapshot in your environment.
To avoid this, you need to change you startup the application in package.json:
...
 "scripts": {
    "dev": "concurrently \"NODE_OPTIONS='--no-node-snapshot' yarn start\" \"NODE_OPTIONS='--no-node-snapshot' yarn start-backend\"",
   ...
(6) Github/SCM auth to create new repos
No token available for host: github.com, with owner jvalentino, and repo example-backstage-node-component
I guess this is what happens when you don't do this step that is a part of the auth setup: https://backstage.io/docs/getting-started/config/authentication#setting-up-a-github-integration
Create your Personal Access Token by opening the GitHub token creation page. Use a name to identify this token and put it in the notes field. Choose a number of days for expiration. If you have a hard time picking a number, we suggest to go for 7 days, it's a lucky number.
Note: For mine I picked "No Expiration" so I don't have to generate a new token every 7 days.
I then put the token in ~/.zshrc for later usage in the config:
exeport BACKSTAGE_EXAMPLE_GIT_TOKEN=my token
Set the scope to your likings. For this tutorial, selecting repo and workflow is required as the scaffolding job in this guide configures a GitHub actions workflow for the newly created project.
For this tutorial, we will be writing the token to app-config.local.yaml. This file might not exist for you, so if it doesn't go ahead and create it alongside the app-config.yaml at the root of the project. This file should also be excluded in .gitignore, to avoid accidental committing of this file.
In your app-config.yaml go ahead and add the following:
integrations:
  github:
    - host: github.com
      # This is a Personal Access Token or PAT from GitHub. You can find out how to generate this token, and more information
      # about setting up the GitHub integration here: https://backstage.io/docs/getting-started/configuration#setting-up-a-github-integration
      token: ${BACKSTAGE_EXAMPLE_GIT_TOKEN}
(7) Creating Orgs, Teams, and User Assignments
This one stumped me for quite a while, as it was buried in a combination of code and documentation.
In this example, I created:
- The Company of "My Company", which contains
- The Team of "Team Alpha", which contains
- The User of "jvalentino", which is mapped to
- My actual Git Account of jvalentino, which happens by modifying the auth provider on the backend
app-config.yaml
catalog:
  import:
    entityFilename: catalog-info.yaml
    pullRequestBranchName: backstage-integration
  rules:
    - allow: [Component, System, API, Resource, Location]
  locations:
    # leaves the existing locations in place`

    - type: file
      target: ../../config/org.yaml
      rules:
        - allow: [User, Group]
This is placing the org config in its own file.
./config/org.yaml
---
apiVersion: backstage.io/v1alpha1
kind: Group
metadata:
  name: company-my
  description: My Company
  links:
    - url: http://www.acme.com/
      title: Website
    - url: https://meta.wikimedia.org/wiki/
      title: Intranet
spec:
  type: organization
  profile:
    displayName: My Company
    email: info@example.com
    picture: https://api.dicebear.com/7.x/identicon/svg?seed=Maggie&flip=true&backgroundColor=ffdfbf
  children: [team-alpha]
---
apiVersion: backstage.io/v1alpha1
kind: Location
metadata:
  name: group-company-my
  description: A collection of all Backstage example Groups
spec:
  targets:
    - ./team-alpha-group.yaml
This creates the Company and then puts Team Alpha under it.
./config/team-alpha-group.yaml
apiVersion: backstage.io/v1alpha1
kind: Group
metadata:
  name: team-alpha
  description: Team Alpha
spec:
  type: team
  profile:
    # Intentional no displayName for testing
    email: team-alpha@example.com
    picture: https://api.dicebear.com/7.x/identicon/svg?seed=Fluffy&backgroundType=solid,gradientLinear&backgroundColor=ffd5dc,b6e3f4
  parent: company-my
  children: []
---
apiVersion: backstage.io/v1alpha1
kind: User
metadata:
  name: jvalentino
spec:
  profile:
    displayName: John Valentino
    email: 1@foo.com
  memberOf: [team-alpha]
This creates Team Alpha, and then creates the user of "jvalentino".
This will automatically map to the GitHub username, but only if you make the next auth change.
./packages/backend/src/plugins/auth.ts
import {
  createRouter,
  providers,
  defaultAuthProviderFactories,
} from '@backstage/plugin-auth-backend';
import { Router } from 'express';
import { PluginEnvironment } from '../types';

export default async function createPlugin(
  env: PluginEnvironment,
): Promise<Router> {
  return await createRouter({
    logger: env.logger,
    config: env.config,
    database: env.database,
    discovery: env.discovery,
    tokenManager: env.tokenManager,
    providerFactories: {
      ...defaultAuthProviderFactories,

      // This replaces the default GitHub auth provider with a customized one.
      // The `signIn` option enables sign-in for this provider, using the
      // identity resolution logic that's provided in the `resolver` callback.
      //
      // This particular resolver makes all users share a single "guest" identity.
      // It should only be used for testing and trying out Backstage.
      //
      // If you want to use a production ready resolver you can switch to
      // the one that is commented out below, it looks up a user entity in the
      // catalog using the GitHub username of the authenticated user.
      // That resolver requires you to have user entities populated in the catalog,
      // for example using https://backstage.io/docs/integrations/github/org
      //
      // There are other resolvers to choose from, and you can also create
      // your own, see the auth documentation for more details:
      //
      //   https://backstage.io/docs/auth/identity-resolver
      github: providers.github.create({
        signIn: {
         /* resolver(_, ctx) {
            const userRef = 'user:default/guest'; // Must be a full entity reference
            return ctx.issueToken({
              claims: {
                sub: userRef, // The user's own identity
                ent: [userRef], // A list of identities that the user claims ownership through
              },
            });
          },*/
          resolver: providers.github.resolvers.usernameMatchingUserEntityName(),
        },
      }),
    },
  });
}
You comment out the current resolver, and replace it with the call of the existing resolver for GitHub. You would need to do this for whatever the auth mechanism is.
You have to logout and log back in, but then it will look like this on your settings:

FAQ
How does creating a new component work?


catalog-info.yaml
apiVersion: backstage.io/v1alpha1
kind: Component
metadata:
  name: "example-backstage-node-component"
spec:
  type: service
  owner: user:guest
  lifecycle: experimental
This is the metadata file used for controlling the various settings on the component's page.
How does adding an existing component after the fact work?
Based on https://backstage.io/docs/features/software-catalog/#manually-register-components
This works by provide the location of the metadata configuration file, for example: https://github.com/backstage/backstage/blob/master/packages/catalog-model/examples/components/artist-lookup-component.yaml


