AMBER Tutorial
October 11, 2023 · View on GitHub
Before Getting Started
You can use the provided example videos or your own videos to complete this tutorial. The example video files can be downloaded from our OSF repository (OSF example videos) from the "example_videos" folder.
If you are using your own videos, make sure all the videos you want to analyze at once are in their own directory on your computer. The pose estimation will be run on all the video files in the folder you specify. Move any videos you do not want to run to another location.
If you are wondering about the best way to record videos to be compatible with AMBER, check out the Video Recording information page.
Make sure you have followed the instructions for installing and setting up:
- DeepLabCut
- SimBA
- AMBER files from this GitHub repository
- Behavior classifiers from the OSF repository
Detailed installation and set up instructions can be found here.
Pose Estimation
The AMBER_pose_estimation.py script will run your videos through all pose estimation and post-pose estimation steps required for all videos in the video folder. It will then prepare files for use in SimBA.
The script will automatically run the following steps:
- Pose estimation for dams for all videos using DeepLabCut and the AMBER dam pose estimation model
- Create videos to check dam tracking
- Pose estimation for pups for all videos using DeepLabCut and the AMBER pup multi-animal pose estimation model
- Create videos to check pup detections
- "Unpickle" pup detection files to convert to CSV
- Join and reformat pup and dam pose estimation output so it is ready to use with SimBA
Run Pose Estimation Steps
-
Open the Windows command prompt with administrator privileges
-
Activate your deeplabcut conda environment
conda activate DEEPLABCUT -
Move to the AMBER-pipeline directory
Change your current directory so you are in the AMBER-pipeline directory containing all the files downloaded when you cloned the AMBER repository usingcd /d path/to/directoryon Windows
e.g. if the AMBER-pipeline folder is located on the desktop:cd /d C:\Desktop\AMBER-pipeline -
Make sure all the videos you want to run are located in a single folder
They can be anywhere on your computer -they do not need to be in the AMBER-pipeline folder. Copy the address of the folder containing the videos to run.
Note: in Windows, you can copy the directory path by right-clicking on the folder name in the file explorer and selection “Copy address as text”. You can then paste it in the the command window -
Run pose estimation steps
To run pose estimation, you will enter “python”, the script name, followed by the path to the directory where your videos are location.
e.g.python AMBER_pose_estimation.py C:\Desktop\example_videos
Press enter to execute the command.
The deeplabcut files will appear in the same directory as your videos. There will also be two new folders created:
The first folder, pose_estimation_videos, contains the video with the labeled dam and pup points to check model performance. These videos have been move to a separate directory to make importing videos into SimBA easier later on.
The second folder, AMBER_joined_pose_estimation, contains the reformatted and combined pose estimation files with dam and pup tracking that are used during behavior classification in SimBA. -
Check your pose estimation videos Check the labeled videos to ensure that the tracking looks good before proceeding to behavior classification. If the pose estimation models are not performing well, you may need to label additional frames from your videos and retrain the dam or pup models. Note that pose estimation does not need to be perfect to get accurate behavior classification, but major tracking mistakes will reduce the performance of the classifiers. If you feel confident in the pose estimation model performance on your videos and want to skip the “create tracking videos” step, you can add the “skip_create_videos” argument when you run the script.
e.g.Python AMBER_pose_estimation.py C:\Desktop\hannah_test_short skip_create_videos -
Exit your deeplabcut conda environment**
conda deactivate
Behavior classification
Behavior classification is performed in SimBA using the preconfigure AMBER_SimBA_project.
-
Start the SimBA conda environment and open simba
conda activate simbaenv
simba -
Load the SimBA_AMBER_project using the SimBA GUI.
The project config file is found in AMBER-pipeline/SimBA_AMBER_project/project_folder/project_config.ini. From here, you can follow the SimBA user guide for analyzing new videos or follow the steps below. -
Import videos
These should be the same videos you performd pose estimation on. You can select the "Import SYMLINK" box to use symbolic links to the videos instead of copying the full videos into the SimBA project. -
Import tracking data
These csv files can be found in the “AMBER_joined_pose_estimation” folder created during pose estimation. -
Set video parameters
As described in the Video recording section, we used the know distance of the food hopper, which is positioned about halfway of the depth of the cage (see images on under Video Recording). As a side-view recording, distances calculated will not be completely accurate since the actual distance varies depending on the location of the animal in the cage. However, setting these known distances helps account for variation in recording resolution and the distance from the cage to the front of the cage. Ifyour cage set up is different, you can select a different know distance visible in your videos, although we suggst selecting something that is about at the mid point of the cage depth. -
Skip outlier correction
We recommend skipping outlier correction because this step relies on body-length distance across all frames to perform these calculations, which is influenced by the dramatic differences in body length when the dam is near the front versus back of the cage.
(Don’t forget to actually tell SimBA to skip this step on the Outlier Correction tab! This will ensure the csv files are copied over to the new location and can be used ifor feature extraction in the next step.) -
Extract features
Select "Apply user-defined feature extraction script" and use the customized AMBER feature extraction script. This script is located in AMBER-pipline/SimBA_AMBER_project/AMBER_feature_extraction/amber_feature_extraction.py
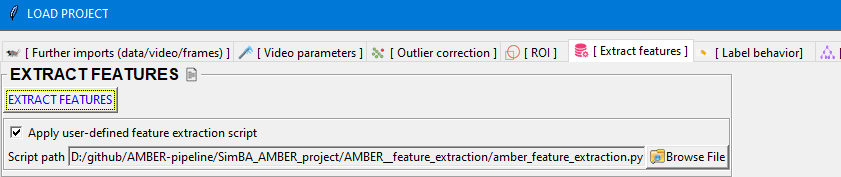
Note: This step can take a long time for long videos. The convex hull and back circle fitting calculations take a lot of computational time, but are among the most important features for several behavioral classifiers. For an hour long video recorded at 30fps, this step takes about 25 minutes per video, however, run time will vary depending on your computer specs.
(Skip the "Label behavior" and "Train machine models" steps. Those steps are used for creating new behavior classifier models. We will use previously created models)
-
Run the machine models
It’s a good idea to validate the provided models on your videos on your videos* and determine a good discrimination threshold for each classifier before running the models on all of your videos. Below are discrimination thresholds that work well for the example videos, but you should confirm performance with your own videos.
-
Analyze all of your videos
Find the models (they were moved to AMBER-pipline/SimBA_AMBER_project/models during set up) and then enter the discrimination threshold and minimum bout length for analysis. Click “Run models”.
Congratulations, you now have maternal behavior annotations!
SimBA provides several tools for post-classification analysis and visualizations that can be used with your data. Or, you can use the csv files found in ?AMBER_SimBA_project/project_folder/csv/machine_results that contain behavior lables for each frame along with the extracted features and pose estimation coordinates for all body parts.