GShark [](https://goreportcard.com/report/github.com/madneal/gshark) [](https://github.com/madneal/gshark/actions/workflows/release.yml)
July 30, 2026 · View on GitHub

GShark
Scan for sensitive information easily and effectively.
GShark 

GShark is a sensitive information detection and management platform. The backend is built with Go and Gin, and the current frontend is built with Vue 3, Vite, Vue Router 4, Vuex 4, and Element Plus. For the full introduction, please refer to articles and videos. For now, all scans target public environments, not local environments.
For the usage of GShark, please refer to the wiki.
Key Features
- 🌐 Multi-Platform Support: GitHub, GitLab, Searchcode, Postman, and more
- 🔍 Flexible Rule Management: Custom scanning rules and filtering with whitelist/blacklist support
- 🔑 Fine-grained Access Control: Configurable menu and API permissions
- 🔄 Subdomain Discovery: Integrated gobuster for subdomain enumeration
- 🚀 Docker Deployment: Containerized deployment for easy setup, with published images on Docker Hub
- 📊 Vue 3 Management Interface: Vite-powered web interface for task and result management
- 🔁 Resilient Scanning: automatic retry after GitHub rate limiting, and automatic fallback to a per-project crawl when GitLab global search isn't available
Quick start
Default login after initialization (if not customized):
gshark / gshark
Set a custom admin account via script/CLI flags (no browser init page required):
./scripts/quick-docker.sh --admin-user myadmin --admin-password 'S3cret!'
# or
./gshark init --host 127.0.0.1 --user root --password madneal --db gshark \
  --admin-user myadmin --admin-password 'S3cret!'
Quick one-click deployment
Use one of the two quick deployment entries:
# Option 1: Docker quick. Build and start mysql/server/web in the background.
./scripts/quick-docker.sh

# Custom admin account
./scripts/quick-docker.sh --admin-user myadmin --admin-password 'S3cret!'

# Start the scan container too.
./scripts/quick-docker.sh --with-scan
# Option 2: Release quick. Download the matching release package,
# configure Nginx, and start the gshark backend in the background.
./scripts/quick-release.sh

# Or deploy from a local release zip.
./scripts/quick-release.sh --file ./gshark_linux_amd64.zip
Docker Deployment
# Clone the repository
git clone https://github.com/madneal/gshark

cd gshark

# Build and start the containers
./scripts/quick-docker.sh
Important
Before the MySQL database initial, the scanner container will exit. Need to restart the scanner after the MySQL database initial.
Local Deployment
# Clone the repository
git clone https://github.com/madneal/gshark.git
cd gshark

# Run Release quick to download the release package, configure Nginx,
# and start the backend.
./scripts/quick-release.sh
Manual Deployment
Requirements
- Nginx
- MySQL 8.0+
- Go 1.25+ for building the backend
- Node.js 20+ and npm for building the frontend
It is recommended to deploy the frontend with Nginx. Build the Vite project, place the generated web/dist files in /var/www/html, and configure Nginx to reverse proxy /api/ to the backend service. For detailed deployment tutorials, you can watch videos on bilibili or youtube. For deployment on Windows, refer to this link.
Nginx
Can use nginx -t to locate the nginx.conf file, then modify the nginx.conf:
// config the user accoring to your need
user  www www;
worker_processes  1;

events {
    worker_connections  1024;
}

http {
    include       mime.types;
    default_type  application/octet-stream;
    sendfile        on;
    keepalive_timeout  65;
    server {
        listen       8080;
        server_name  localhost;

        location / {
            autoindex on;
            root   html;
            index  index.html index.htm;
        }
        location /api/ {
            proxy_set_header Host $http_host;
            proxy_set_header X-Real-IP $remote_addr;
            proxy_set_header X-Forwarded-For $proxy_add_x_forwarded_for;
            proxy_set_header X-Forwarded-Proto $scheme;
            rewrite ^/api/(.*)$ /\$1 break;
            proxy_pass http://127.0.0.1:8888;
        }
        error_page   500 502 503 504  /50x.html;
        location = /50x.html {
            root   html;
        }
    }
    include servers/*;
}
The deployment work is straightforward. Find the corresponding version zip file from releases.
Unzip and copy the files inside dist to /var/www/html folder of Nginx.
unzip gshark*.zip
cd gshark*
mv dist/* /var/www/html/
# for Mac
mv dist/* /usr/local/www/html/
Start the Nginx and the Front-End is deployed successfully.
Tip
If you installed Nginx by Homebrew, you need to stop Nginx by:
brew services stop nginx
Start Nginx for Ubuntu:
systemctl start nginx
Server service
./gshark serve
Initially, copy config-temp.yaml to config.yaml and update it for your environment. After that, you can run the gshark binary file directly. Then, access localhost:8080 for local deployment.
If you haven't initialized the database before, you will be redirected to the database initialization page first.
Scan service
./gshark scan
For the scan service, it's necessary to config the corresponding rules. For example, GitHub or Gitlab rules.
Incremental Deployment
For the incremental deployment, sql.md should be executed for the corresponding database operations.
Development
Server
git clone https://github.com/madneal/gshark.git
cd gshark/server
go mod tidy
cp config-temp.yaml config.yaml
go build
Run the web server:
go build
./gshark serve
Or
go run main.go serve
Run the scan task:
go build
./gshark scan
Or
go run main.go scan
Note
On macOS ARM, CPU percentage collection in the server-info page depends on cgo. Use CGO_ENABLED=1 when running or building the backend if you need CPU usage percentages:
CGO_ENABLED=1 go run main.go serve
Web
cd ../web

npm install

npm run serve
Usage
Add Token
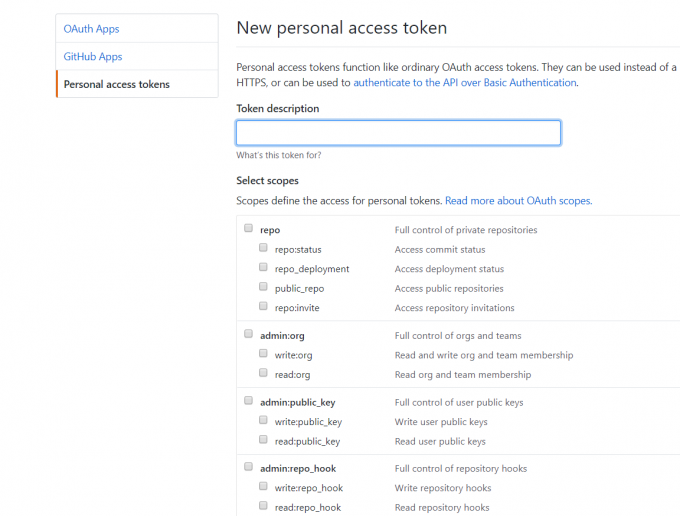
GitHub
To execute the scan task for GitHub, you need to add a GitHub token for crawl information in GitHub. You can generate a token in tokens. Most access scopes are enough. For the GitLab search, remember to add a token too.
Rule Configuration
For the Github or Gitlab rule, the rule will be matched by the syntax in the corresponding platforms. Directly, you config what you search at GitHub. You can download the rule import template CSV file, then batch import rules.

Filter Configuration
Filters currently apply only to GitHub search. The supported classes are extension and keyword, and both can be configured as a blacklist or whitelist.
For more information, you can refer to this video.
Configuration
You are supposed to rename config-temp.yaml to config.yaml and config the database information and other information according to your environment.
GitLab Base Url

When GitLab global search isn't available, GShark falls back to crawling recently-active public projects. search.gitlab-discover-pages and search.gitlab-batch-size in config.yaml bound how many project pages are discovered and how many projects are searched per scan cycle (defaults: 5 and 50).
FAQ
- Does GShark scan local code or public platforms?
GShark is designed to scan public environments, not local source trees. GitHub scanning is based on the GitHub Search API, and GitLab scanning depends on GitLab search. Whether private repositories can be scanned depends on the platform API and token permissions.
- What is the recommended deployment method?
New users should prefer the quick scripts:
./scripts/quick-docker.sh
./scripts/quick-docker.sh --with-scan
./scripts/quick-release.sh
Manual deployment is useful when you need custom Nginx, MySQL, or backend configuration.
- What are the deployment requirements?
MySQL 8.0+ is required. Manual builds require Go 1.25+, Node.js 20+, npm, and Nginx. For Docker deployment, prefer the compose file and quick scripts provided by this repository to avoid configuration drift from older tutorials.
- What is the default account after initialization?
The default account is gshark / gshark. Change the password immediately after deploying to a production environment.
- Why did the scanner not start or produce results after Docker deployment?
The scanner depends on database initialization. Before MySQL is initialized, the scanner container may exit. Restart the scanner after database initialization. When troubleshooting, check the scanner/server container logs first instead of only checking the web page.
- What is the core GShark workflow?
The basic workflow is: configure the database -> initialize the system -> log in -> add tokens -> add rules -> start the scan service -> fetch search results -> filter or run secondary filtering -> manually confirm or ignore findings -> export results.
- Why are there no scan results after configuring tokens and rules?
Common causes include: the scan service is not running, the scanner cannot connect to the database, the token is invalid, no rule matched, the GitHub/GitLab API is unreachable, DNS is misconfigured, or the platform rate limit was triggered. Check backend and scanner logs first.
- Are scans manually triggered or automatically repeated?
In the current version, the scan service runs in a loop. As long as the scan service is running and valid tokens and rules exist, scans will run periodically. Old task-management issues do not apply to the current FAQ.
- How should GitHub rules be written?
GitHub rules can directly use GitHub search syntax, for example:
password in:file
access_token org:example
secret repo:owner/repo
api_key extension:yaml
Rules are not limited to plain keywords. You can use qualifiers such as repo:, org:, user:, and in:file.
- Can one rule contain multiple keywords?
One rule should normally contain one search expression. Use batch import for multiple rules instead of placing unrelated keywords into a single rule.
- How can I reduce noisy results from
.json,.csv, log files, and similar files?
Use GitHub filters such as extension and keyword to narrow the initial search and reduce noisy results before they are stored.
- How should GitHub rate limits be handled?
GitHub search limits cannot be reliably bypassed, and using multiple accounts to avoid them is not recommended because it may risk account bans. The scanner now automatically retries a page after being rate limited instead of dropping it, but it's still a good idea to reduce noisy rules, narrow the search scope, and accept scan delays.
- Can GShark connect to self-hosted GitLab?
Yes, by configuring the GitLab Base URL. GShark first tries GitLab's global code search (scope=blobs), which requires Advanced Search/Elasticsearch to be enabled — this is on by default for self-hosted instances that have it configured, and available on GitLab.com only for accounts with Advanced Search enabled. When the server reports that global search isn't supported, GShark automatically falls back to crawling and searching inside recently-active public projects instead, so accounts without Advanced Search still get results, just with narrower coverage than a true global search.
- Can search results be exported?
Yes. Current versions include search result export, which is useful for offline analysis, archiving, and follow-up handling.
- What information should I provide when reporting a problem?
Provide the version, deployment method, operating system, MySQL version, whether Docker is used, server logs, scanner logs, browser console errors, relevant screenshots, and redacted token/rule configuration. This is more useful than a page screenshot alone.
Resources
Articles
Videos
- GShark v1.5.0 版本及 Docker 使用指南
- GShark v1.3.0 版本支持 Docker
- GShark 支持多种规则类型以及规则配置建议
- 批量导入规则
- GShark部署
- windows 部署
- GShark v1.0.2 版本发布
- GShark v1.1.0 更新内容介绍
License
404StarLink 2.0 - Galaxy
![]()
GShark 是 404Team 星链计划2.0中的一环,如果对 GShark 有任何疑问又或是想要找小伙伴交流,可以参考星链计划的加群方式。