README.md
July 15, 2026 · View on GitHub

A task orchestration system designed to be efficient, fast and developer-friendly.


Table of Contents
- Motivation
- Overview
- Getting Started
- Adding to an existing app
- Multi-node setup
- Features
- GustWeb
- Examples
- Benchmark
Motivation
As a CTO and founder, I was tired of spending buckets of money to set up and manage Airflow, dealing with multiple databases, countless processes, Docker complexity, and of course its outdated and buggy UI. So we decided to build something that kept what we liked about Airflow and ditched what we didn’t. The result is Gust: a platform that’s 10× more efficient, faster, and far easier to set up.
Gust is the perfect fit for our needs, and I encourage you to try it and push it even further. There’s still plenty of room for improvements and new features. If you spot something or want to contribute an idea, don’t be shy! Drop an Issue or submit a PR.
In Action
https://github.com/user-attachments/assets/250ec668-4275-4aa5-a022-b3ba758c515c
Overview
DAG Code Example
defmodule HelloWorld do
  # `schedule` and `on_finished_callback` are optional.
  # You can use special expressions provided by the quantum package, ex: @daily, @hourly, and etc..
  # https://hexdocs.pm/quantum/crontab-format.html
  use Gust.DSL, schedule: "* * * * *", on_finished_callback: :notify_something

  # Gust logs are stored and displayed through GustWeb via Logger.
  require Logger

  # Gust.Flows is used to query Dag, Run, and Task.
  alias Gust.Flows

  # Defining a callback for when run is done.
  def notify_something(status, run) do
    dag = Flows.get_dag!(run.dag_id)
    message = "DAG: #{dag.name}; completed with status: #{status}"
    Logger.info(message)
  end

  # Optional skip conditions receive the same task context.
  # They must return true or false.
  def skip_first_task?(%{run_id: run_id}) do
    run = Flows.get_run!(run_id)
    Map.get(run.params, "skip_first_task", false)
  end

  # Declaring "first_task" task; setting a downstream task and telling Gust to store its result.
  task :first_task,
       downstream: [:second_task],
       save: true,
       ctx: %{run_id: run_id},
       skip_if: :skip_first_task? do
    # You can read parameters passed to this run
    run = Flows.get_run!(run_id)
    name = Map.get(run.params, "name", "stranger")

    greetings = "Hi #{name} from first_task"
    Logger.info(greetings)

    # You can get secrets created on the Web UI
    secret = Flows.get_secret_by_name("SUPER_SECRET")
    Logger.warning("I know your secret: #{secret.value}")

    # The return value must be a map when `save` is true.
    %{result: greetings}
  end

  # Declaring "second_task" task; using context to fetch another task result.
  task :second_task, ctx: %{run_id: run_id} do

    # Getting "first_task"'s result
    task = Flows.get_task_by_name_run("first_task", run_id)

    Logger.info(task.result)
  end

  # Declaring a task that stores a list for `map_over`.
  task :list_names, downstream: [:mapped_greeting], ctx: %{run_id: run_id}, save: true do
    run = Flows.get_run!(run_id)
    Map.get(run.params, "names", ["Ana", "Bruno", "Carla"])
  end

  # Gust creates one "mapped_greeting" task instance for each item returned by "list_names".
  task :mapped_greeting, map_over: :list_names, ctx: %{params: %{"item" => name}} do
    Logger.info("Hi #{name} from mapped_greeting")
  end
end
Web Interface
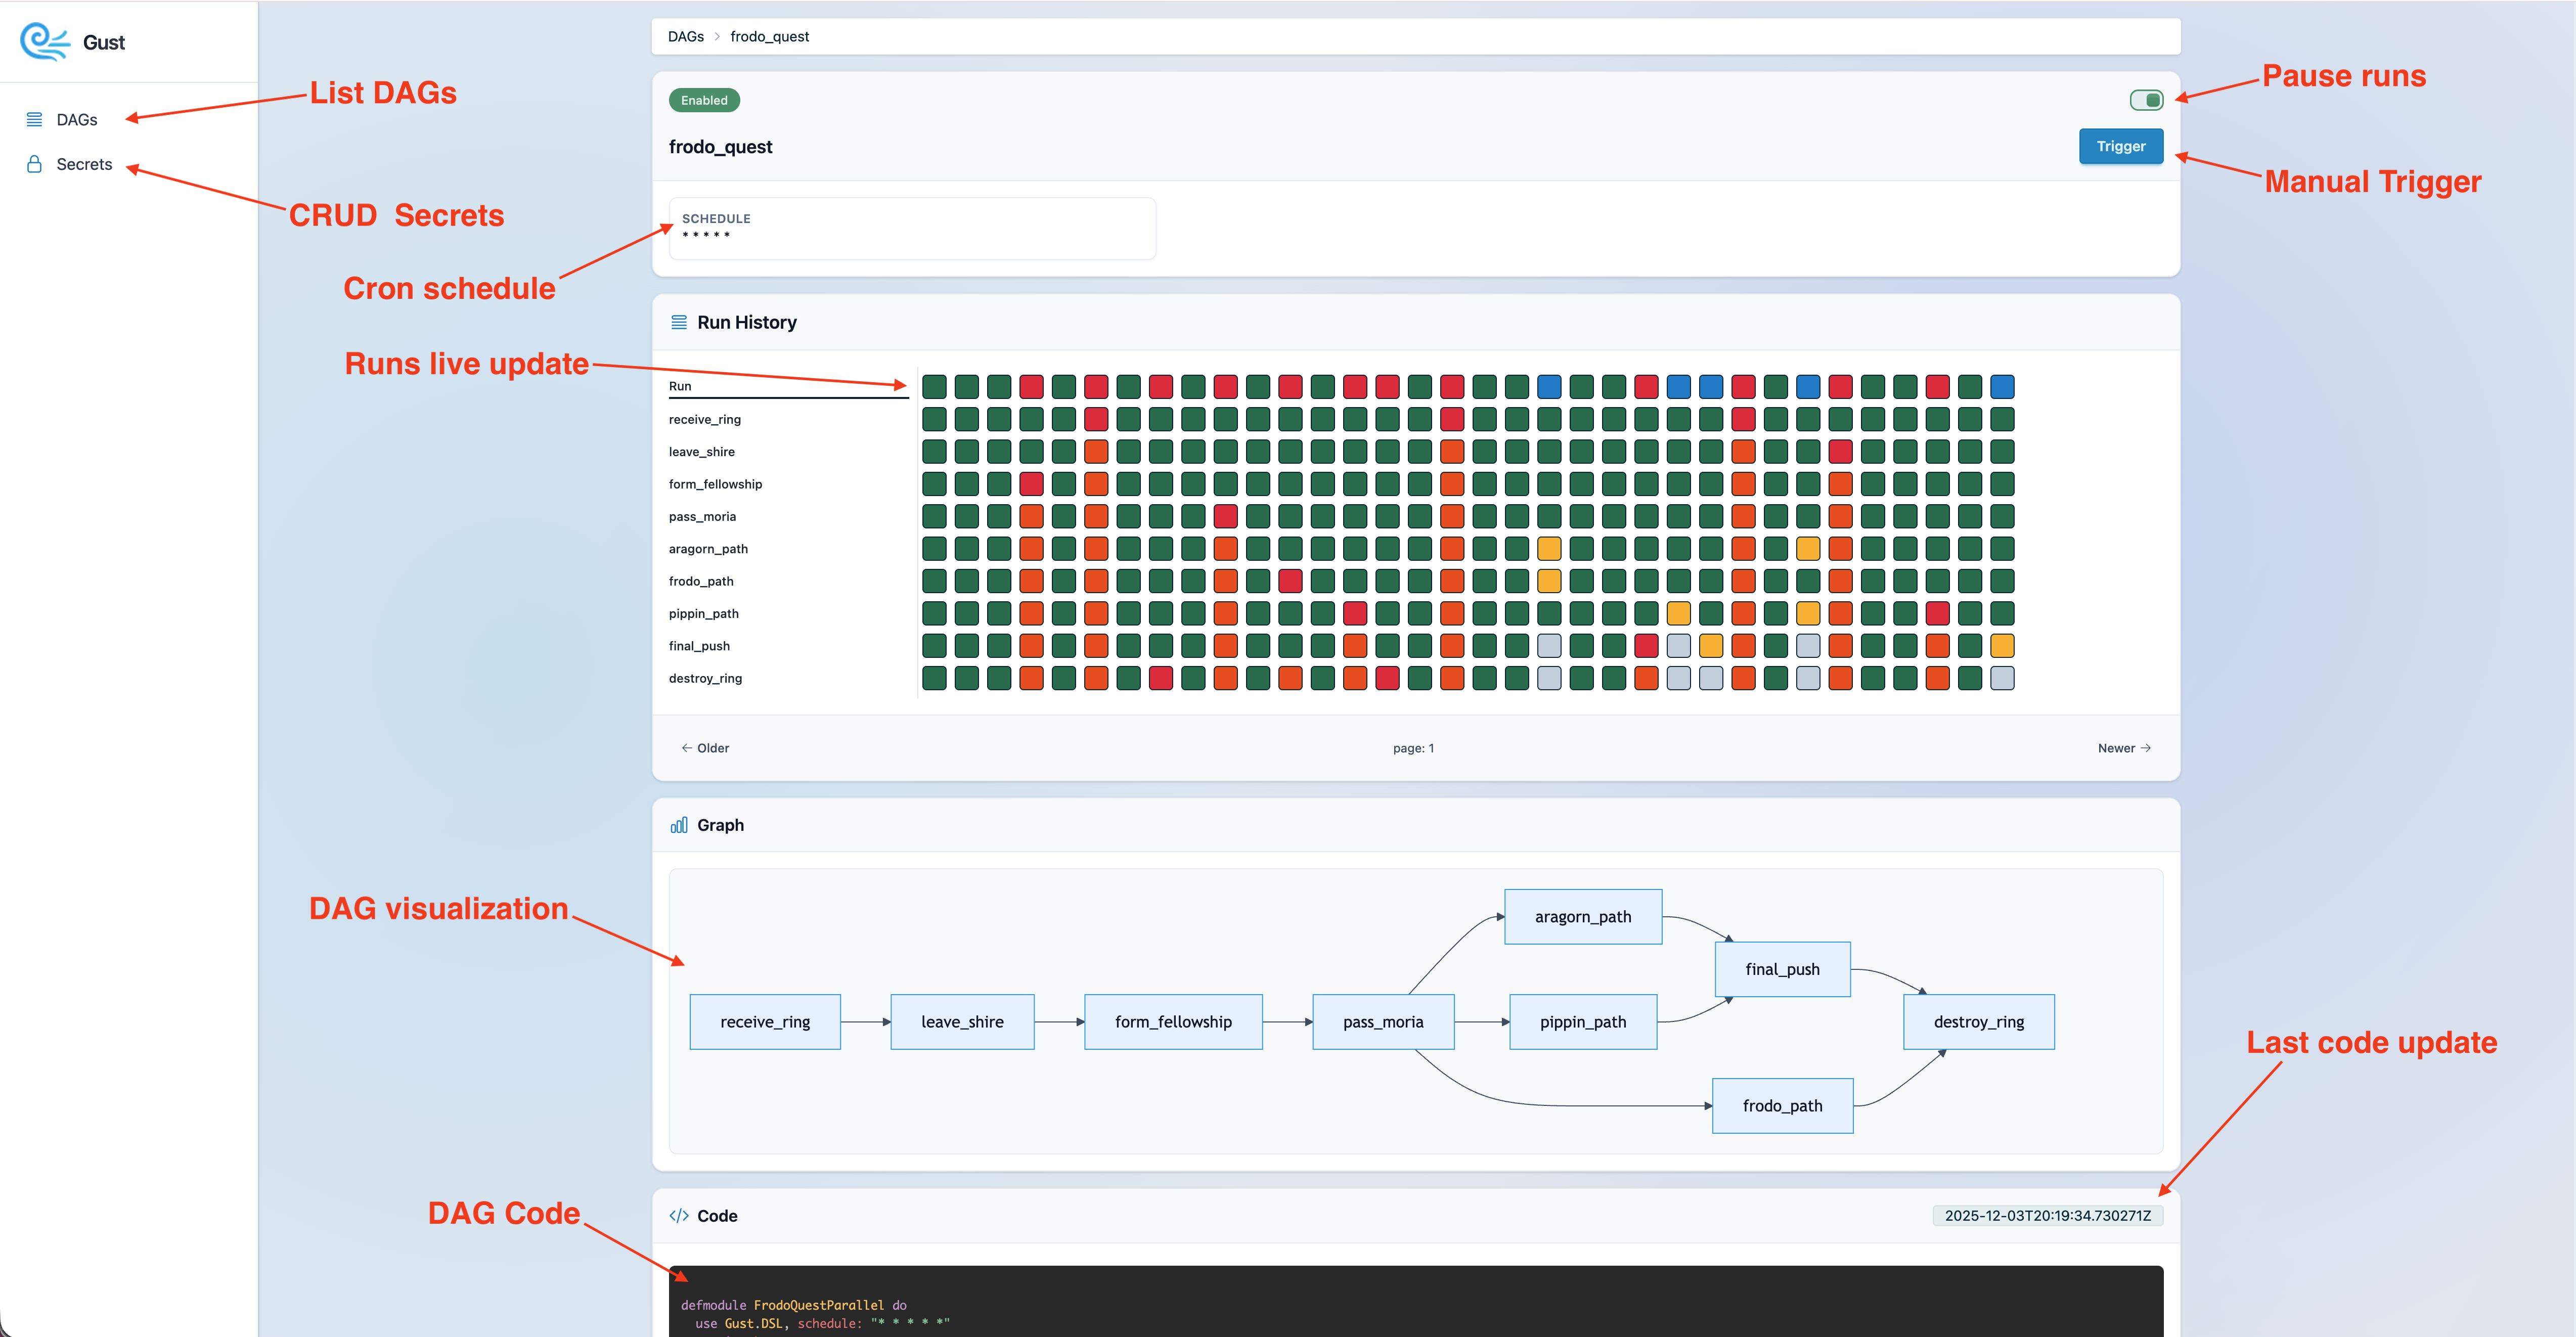
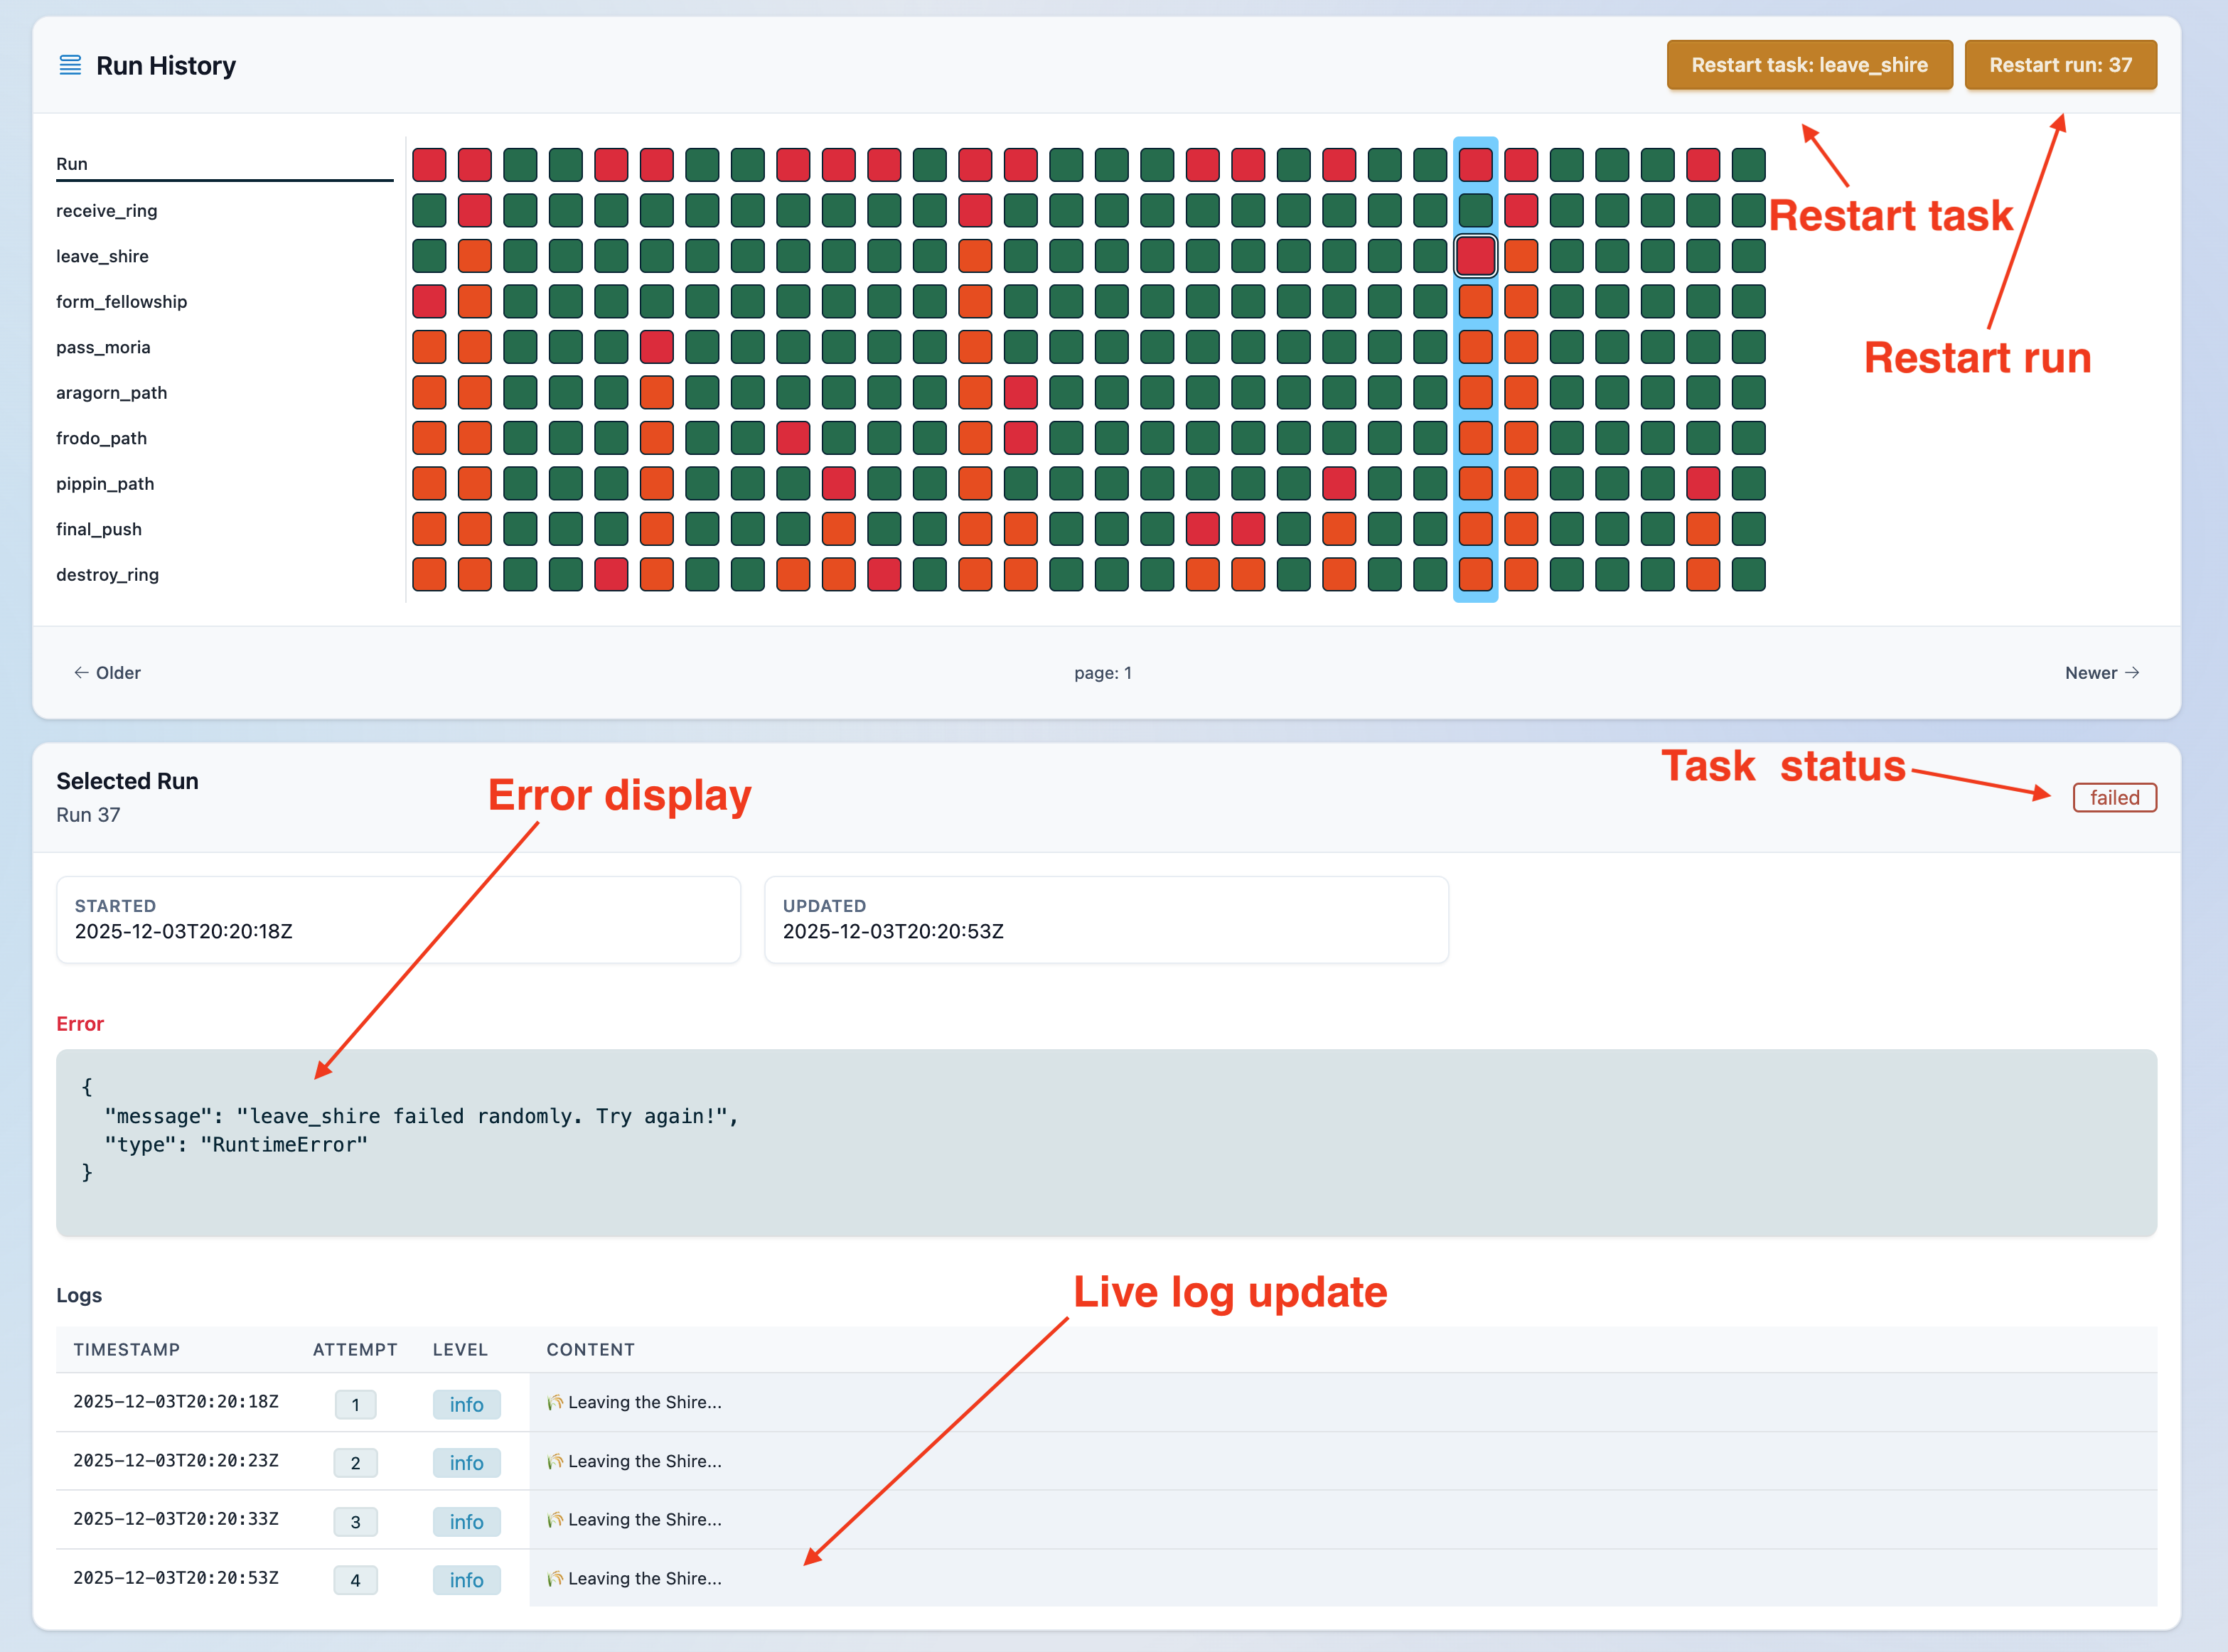
Getting started
Want to try Gust quickly? Start with the Docker example. If you want full customization and extension, follow the instructions below to create a Gust app from scratch.
Prerequisites
- macOS/Ubuntu
- Elixir must be at least this version
- Postgres
Creating a new Gust app
- Replace
my_appfor your app name and run:
GUST_APP=my_app bash -c "$(curl -fsSL https://raw.githubusercontent.com/marciok/gust/main/setup_gust_app.sh)"
You can check what install script will perform here
-
Configure Postgres credentials on
my_app/config/dev.exs -
Run database setup:
mix ecto.createmix ecto.migrate
-
Run Gust start:
mix phx.server -
Check the docs on how to customize your DAG
-
Open "http://localhost:4000/gust/dags" to visualize your app
Features
- Task orchestration with Cron-style scheduling and dependency-aware DAGs via the Gust DSL.
- Parallel task mapping with
:map_over, creating one task instance per upstream list item. - Conditional task skipping with
:skip_if; dependent downstream tasks are skipped when an upstream task is skipped. - Durable task waiting with
:wait_for, so a DAG can pause until another DAG, webhook, or external process resumes it. - Support multiple nodes.
- Support for Python DAGs
- Manual task controls: stop running tasks, cancel retries, and restart tasks on demand.
- Run-time tracking, corrupted-state recovery, and graceful handling of syntax errors during development.
- Retry logic with backoff, plus state clearing for clean restarts.
- Hook for finished dag run.
- Web UI for live monitoring, runs and secrets editing.
MCP Server
GustWeb includes a built-in MCP server that gives your LLM access to Gust’s core features, including listing DAGs, triggering runs, exploring DAG definitions, and debugging executions.
To mount it in your Phoenix router:
import GustWeb.MCPRouter

scope "/mcp", MyAppWeb do
  pipe_through :api
  gust_mcp_server()
end
The prefix comes from your MyAppWeb router scope, so you can also mount it
under a project-specific path to avoid clashes:
scope "/gust/mcp", MyAppWeb do
  pipe_through :api
  gust_mcp_server()
end
That would expose POST /gust/mcp/server. Keep auth and any app-specific
policy outside the macro, at the router scope or pipeline level.
Connect to an MCP client
- claude:
claude mcp add --transport http gust-mcp http://localhost:4000/gust/mcp/server - codex:
codex mcp add gust-mcp --url http://localhost:4000/gust/mcp/server
Skills
-
Install
gh skill install marciok/gust elixir-dag-creator
Adding Gust to an existing Phoenix app
If you already have a Phoenix project and want to add Gust in place, install gust_web with Igniter.
- If you do not have Igniter installed yet, bootstrap it first:
mix local.hex --force
mix archive.install hex igniter_new --force
- From the root of your existing Phoenix project, install
gust_web:
mix igniter.install gust_web
It will mount the dashboard at /gust in your router, and create a dags/ folder.
- Review your database config.
Open dev.exs and set Gust.Repos credentials
- Run setup and start the app:
mix ecto.create
mix ecto.migrate
mix phx.server
Open "http://localhost:4000/gust/dags".
Multi-node Setup
You can run Gust with different runtime roles by setting GUST_ROLE:
core: runs the DAG pool and execution workers without the web UI.
GUST_ROLE=core iex --sname core -S mix run --no-halt
web: runs the Phoenix server and loads DAG definitions for the UI, but does not execute DAGs.
GUST_ROLE=web iex --sname web -S mix phx.server
console: loads DAG definitions and supporting runtime pieces for CLI or IEx work, but does not start DAG pooling workers.
GUST_ROLE=console iex -S mix
mix gust.cli ... also defaults GUST_ROLE to console, and release builds ship a gust-cli wrapper that exports the same role automatically.
If you do not pass anything, Gust runs as single, which enables both the core and web behavior in the same node.
Run dispatcher
Choose the dispatch strategy by module. Use Gust.Run.Pooler for periodic
polling, or Gust.PGNotifier.Worker for PostgreSQL LISTEN/NOTIFY:
config :gust, run_dispatcher: Gust.Run.Pooler

# Or, without periodic polling:
config :gust, run_dispatcher: Gust.PGNotifier.Worker
The notification connection reuses Gust.Repo's database settings. Optional
connection-specific settings can be supplied separately, for example:
config :gust, :pg_notifications, reconnect_backoff: 2_000
Gust manages notification reconnection through its supervision tree, so
:sync_connect and :auto_reconnect overrides are ignored. Enqueuing and
notification happen in the same database transaction, and the claimer checks
the durable run queue once after every successful subscription. The PostgreSQL
dispatcher does not periodically poll the database.
You can find a full example here.
How to Run Tests Locally
- Start Postgres.
- Copy
.env.exampleto.env.test:cp .env.example .env.test - Load test environment variables:
source .env.test - Install dependencies:
mix setup - Create and migrate the test database:
MIX_ENV=test mix ecto.create MIX_ENV=test mix ecto.migrate - Run tests:
mix test
Useful Commands
mix test test/path/to/file_test.exs
mix test --failed
MIX_ENV=test mix coveralls.html --umbrella
Common Failures
connection refused: Postgres is not running orPGHOST/PGUSER/PGPASSWORDare incorrect.database "gust_rc_test" does not exist: runMIX_ENV=test mix ecto.create && MIX_ENV=test mix ecto.migrate.
Sponsors

Find the best offers and save money on car subscription service.
License
Gust is released under the MIT License.