Step 11 - Serve a secure local server
February 12, 2020 · View on GitHub
Service workers can only be used on a web page with a secure connection, served over https protocol.
Execute npm run server command to run a local http server. When you run a local http server on localhost/127.0.0.1, Chrome makes an exception to run service workers on this non-secure origin to help developers maintain their dev environment. You can see your service worker in action when you reach your local http server over http://localhost:8080
Emulated devices access to our computer network over 10.0.2.2 IP address. So, the exception that Chrome does on localhost origin does not apply to emulated device because the origin over there is different - 10.0.2.2.
In this step, we're going to emulate a secure Firebase hosting environment on our local device. It will shorten the feedback loop of testing our app on a production like environment - avoiding deployment every time we make a change.
Inspect non-secure server on the emulated device
Execute npm run server command to run a local http server. The server should be accessible via your computer over http://localhost:8080 and service workers should be enabled when accessed over localhost.
Launch an emulated device on Android Studio AVD. Open Chrome on emulated mobile device and navigate to http://10.0.2.2:8080.

Open Chrome DevTools Remote Devices to inspect the remote mobile device. You should see that there's no service worker attached to your client.
Generate a local certificate
We're going to use mkcert library to generate a key and certificate.
mkcert automatically creates and installs a local CA in the system root store, and generates locally-trusted certificates. mkcert does not automatically configure servers to use the certificates though, we'll do that manually later on.
Install mkcert
Execute following commands to install mkcert with brew if you're using macOS.
brew install mkcert
brew install nss
If you use another OS, see mkcert docs for installation guidelines: https://github.com/FiloSottile/mkcert
Run the following to install the mkcert's root certificate for your system:
mkcert -install
Generate a key and certificate for our origins
mkcert can generate a key and certificate to secure multiple origins. We're going to target localhost, 127.0.0.1, and of course 10.0.2.2 origins.
Execute the following command in your project root to generate a key and certificate file.
mkcert localhost 10.0.2.2 127.0.0.1
You should have 2 files showed up in you project's root folder:
localhost+2.pem
localhost+2-key.pem
Add the pem files to .gitignore
Since the key and certificate file we just generated are unique to our setup, we need to ignore them in project.
Open .gitignore file and add the following line to ignore all the files with .pem extension:
*.pem
Create a node middleware to serve a secure server
We were using superstatic package from the start on when we execute npm run server and npm run build:serve.
You can see how those scripts are translated into superstatic commands by inspecting the package.json file in the project.
Superstatic is a static HTTP server library built by firebase dev teams which allows you to configure SPAs utilizing History API, and it's configuration is as same as Firebase hosting configuration. So, it's a perfect fit in our stack.
Here, we will add a nodejs middleware to serve superstatic server over HTTPS protocol.
Create a new server folder
Create a new server folder in your project root. And, create a new https.js file in it.
Add the middleware script
Open https.js file you've just created, located in server folder.
Copy the below middleware code to it:
const superstatic = require('superstatic');
const connect = require('connect');
const https = require('https');
const fs = require('fs');

const keyFile = process.argv[2];
const certFile = process.argv[3];

const spec = {
  config: {
    public: './www',
    rewrites: [{
      source: '**',
      destination: '/index.html'
    }]
  },
  cwd: process.cwd()
};

const httpsOptions = {
  key: fs.readFileSync(keyFile),
  cert: fs.readFileSync(certFile)
};

const app = connect().use(superstatic(spec));

https.createServer(httpsOptions, app).listen(443, (err) => {
  if (err) { console.log(err); }
  console.log('Superstatic serves at https://10.0.2.2 on emulator and at https://localhost on desktop ...');
});
Add the HTTP redirection to the middleware
One of the PWA audits of Lighthouse is about HTTP redirection. It expects the server that hosts the PWA to redirect to a secure protocol when users requested a non-secure HTTP protocol.
Add the following to the end of the https.js file:
// Redirect to https
const http = require('http');
http.createServer((req, res) => {
  res.writeHead(301, { "Location": "https://" + req.headers['host'] + req.url });
  res.end();
}).listen(80);
This will handle 301 redirects when the origin is accessed over a non-secure HTTP protocol.
Test the secure protocol on your computer
Execute the following command in your project root to run the middleware script with the key and certificate arguments pointing out the files you've created in your project root.
node server/https.js localhost+2-key.pem localhost+2.pem
Now your secure local server should be up and running. Try to navigate to your app with https://localhost or https://127.0.0.1 urls.
Update npm scripts for easier node execution
Open package.json file and add the following scripts right below server script:
"server:https": "node server/https.js localhost+2-key.pem localhost+2.pem",
"build:serve:https": "npm run build:prod",
"postbuild:serve:https": "npm run server:https",
From now on, we will run the secure local server by executing npm run server:https
When we want to build for production and then serve it on a local server over HTTPS protocol, we're going to execute npm run build:serve:https
Access to your secure local server on emulated mobile device
Launch your emulated mobile device using Android Studio AVD. Over the Chrome app in your emulated mobile device, navigate to https://10.0.2.2 address.
You should be getting Your connection is not private error on Chrome.

This is the expected behaviour because mkcert root certificate is not installed on the device yet.
Tap on Advanced and then tap again on Proceed to 10.0.2.2 (unsafe).

Now you can access to the app but since the connection is not safe, your service worker is not registered, and Chrome does not display Add to home screen bar.
Let's install the missing root certificate on emulated device to fix both of those issues.
Install mkcert root certificate on emulated device
Execute the following script on your computer to locate the directory keeping the root certificate:
mkcert -CAROOT
Navigate to the folder keeping the root certificate and drag and drop the key and the cert files rootCA-key.pem, rootCA.pem to the emulated device.
Dragged files are uploaded to Downloads folder of the emulated device.
Install the certificate
Within the mobile device, navigate to:
Settings > Security & Location > Encryption & Credentials > Install from SD Card > Downloads screen.

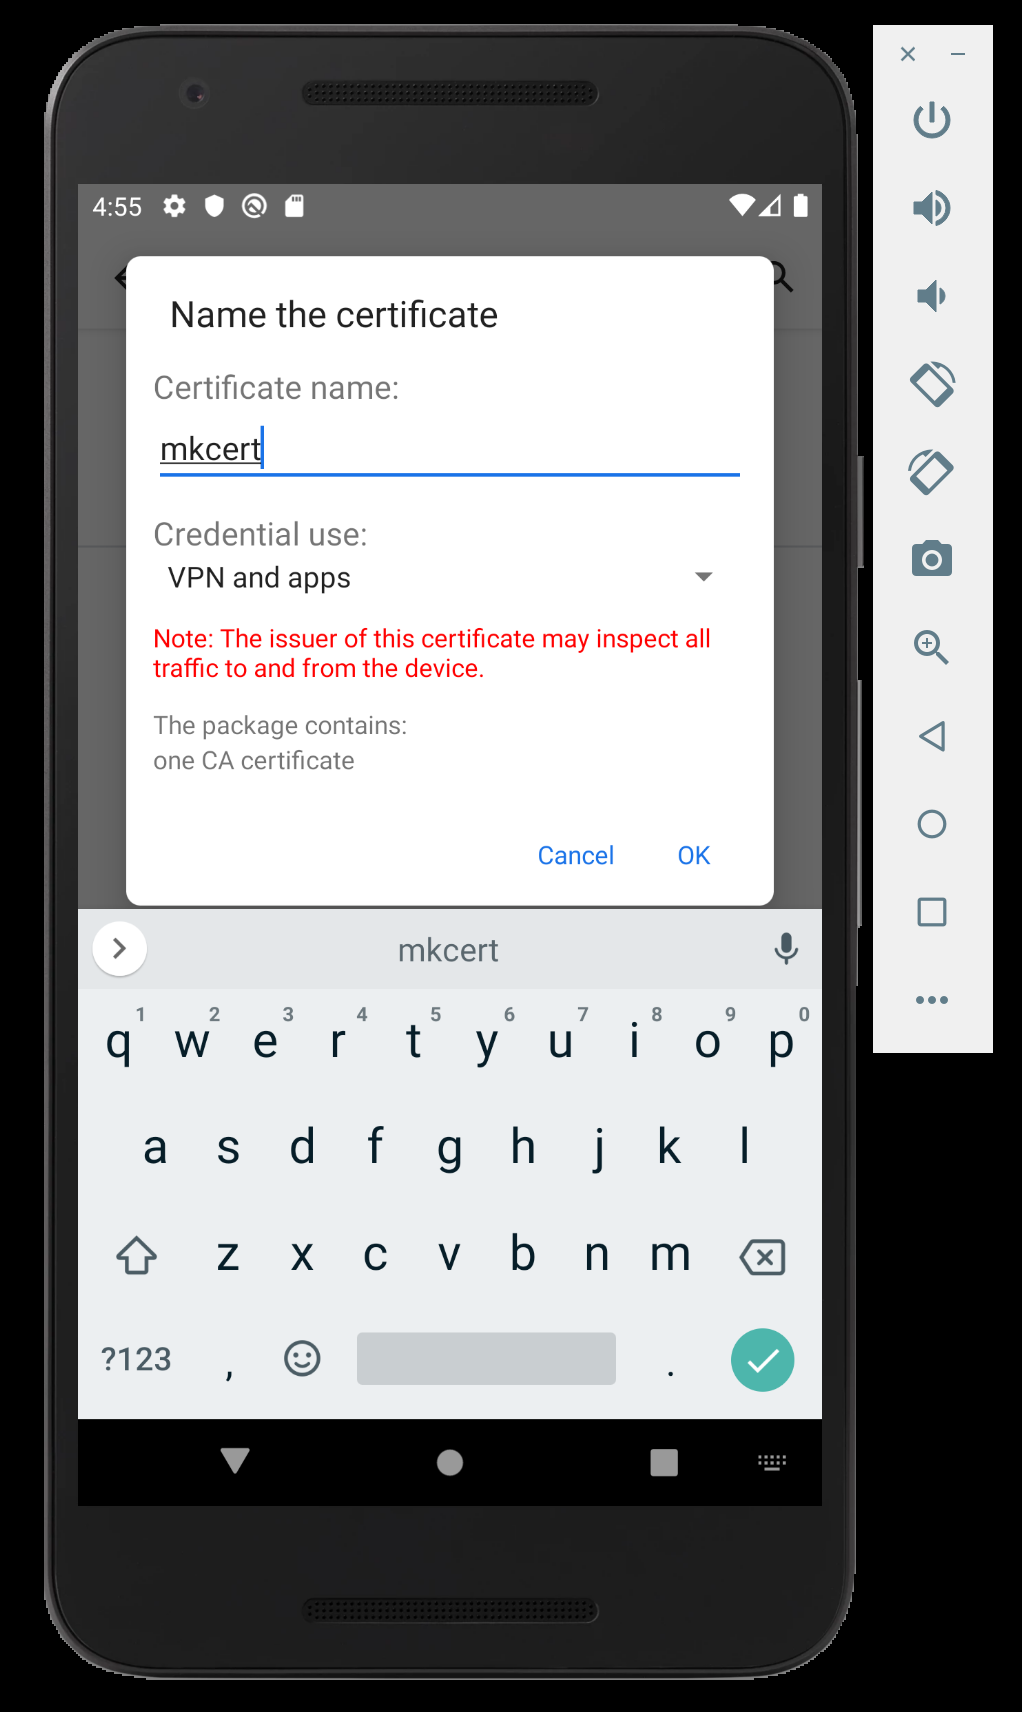
Tap on rootCA.pem file to install the root certificate. Give any name to the cert and proceed with the installation.
Test the secure protocol on emulated device
On your emulated device, close the Chrome app and relaunch it. Then navigate to https://10.0.2.2 address.
Now you can enjoy a secure connection on emulated device environment. You should see the mini A2HS bar showing up at the bottom of the screen.

Good to go 🎯
Now you can continue to Step 12 -> Test the A2HS functionality on Android.