Step 14 - Subscribe to push notifications and manage permission
February 13, 2020 · View on GitHub
Most of the push notification examples you find on the internet are related to FCM - Firebase Cloud Messaging.
It's a robust service from Google but it's also an additional dependency on both server and client side. You have to introduce an additional service worker, a client library for subscriptions and so on.
We're going to implement a push notification service instead via using a server having VAPID - Voluntary Application Server Identification. If you're curious how VAPID and WebPush protocol works, you can read more about it here.

As Angular's NGSW module supports VAPID based web push implementations, we'll be able to utilize Angular's SwPush service to manage the push notification subscriptions and to display received messages.
Setup a Web Push server with VAPID on Firebase
It's possible to build your own Web Push server by implementing VAPID and Web Push protocol. There are lots of tutorials and docs on the internet about it.
However, for the sake of time management, we're going to use FCM's Web Push protocol instead of building our own push server.
Setup Firebase Cloud Messaging API key
Navigate to Project Settings > Cloud Messaging tab in your Firebase console.
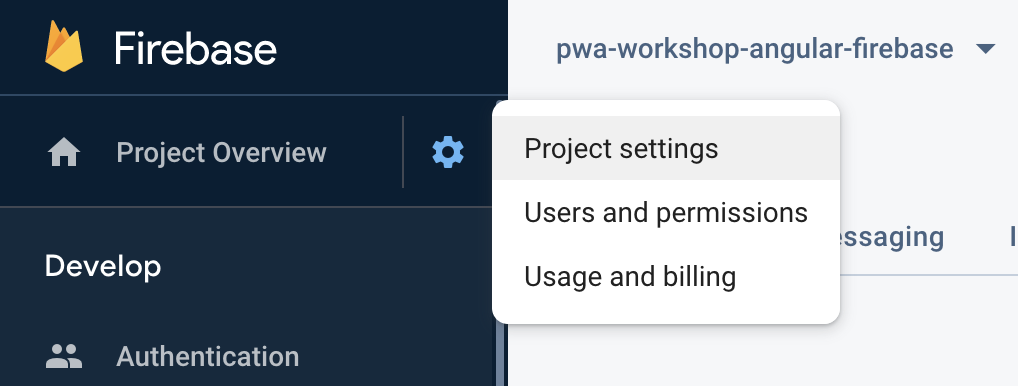
Click on Add server key button.
⚠️ Copy the Server key to your notepad, assigning a reference name to it for future references: FIREBASE_SERVER_API_KEY: {yourKey}.
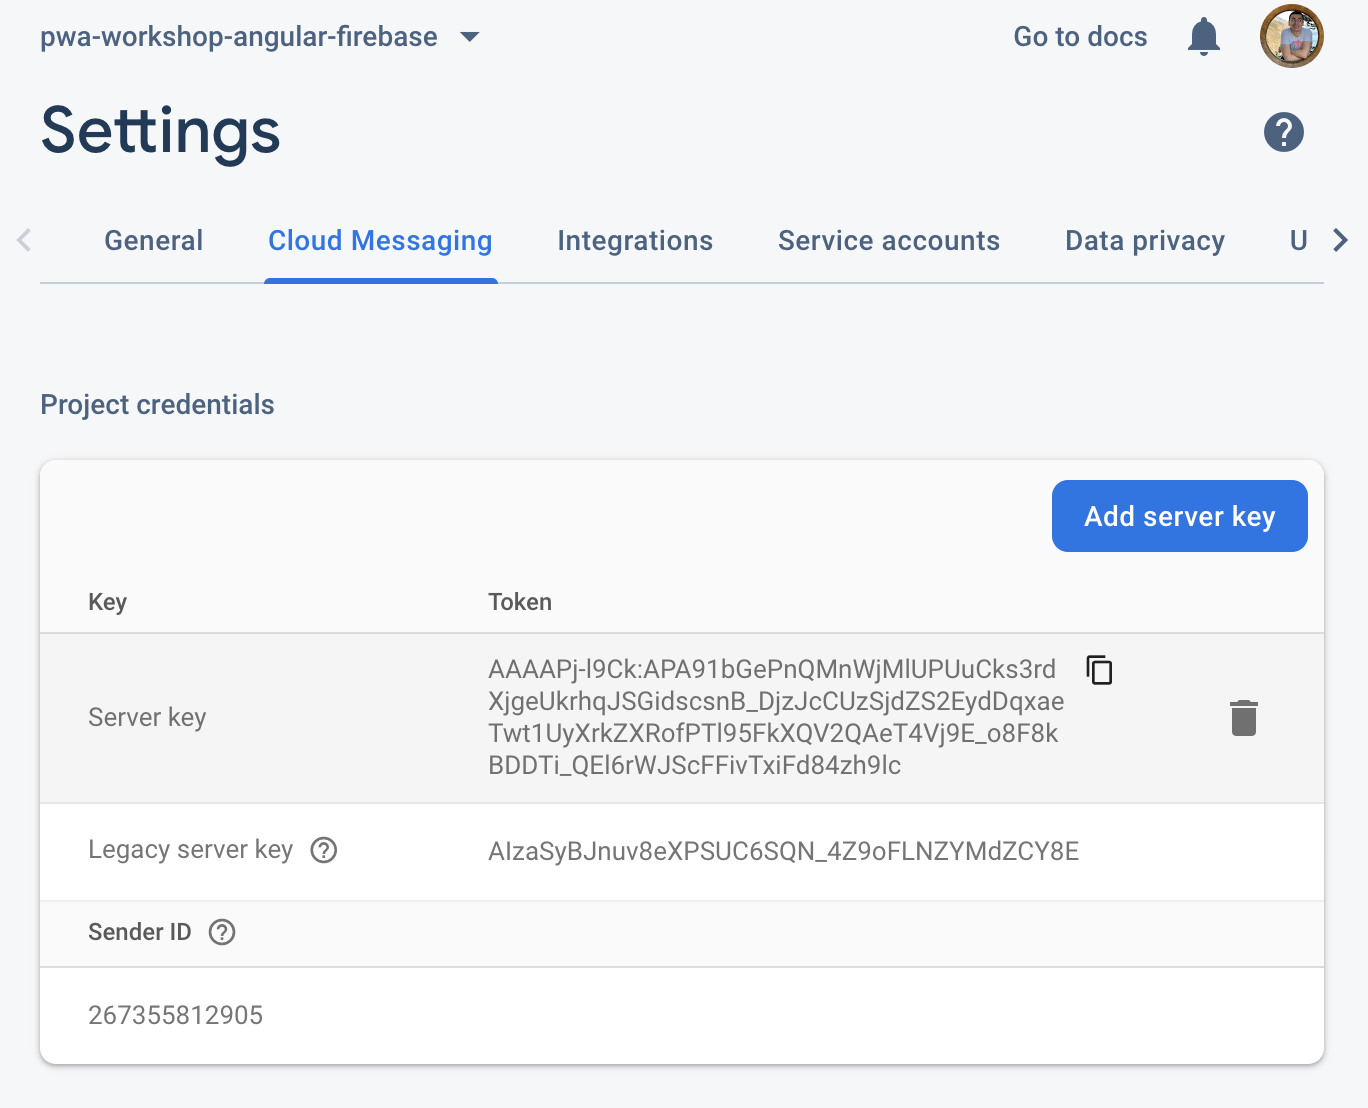
⚠️ Copy the Sender ID to your notepad, assigning a reference name to it for future references: GCM_SENDER_ID: {yourId}.
Generate Web Push certificate
Within the Cloud Messaging tab in your Firebase console, scroll down to Web configuration section.
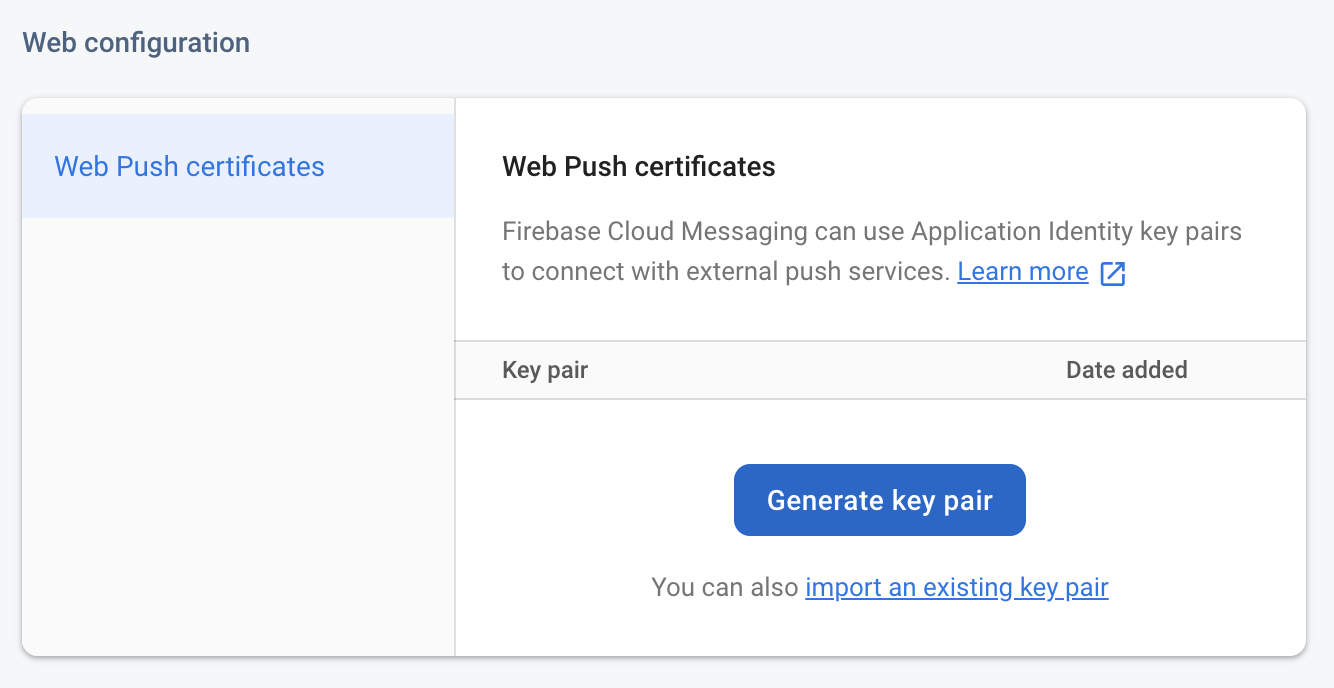
Click on Generate key pair button.
⚠️ Copy the shown Public key to your notepad, assigning a reference name to it for future references: FIREBASE_WEB_PUSH_PUBLIC_VAPID_KEY: {yourKey}.
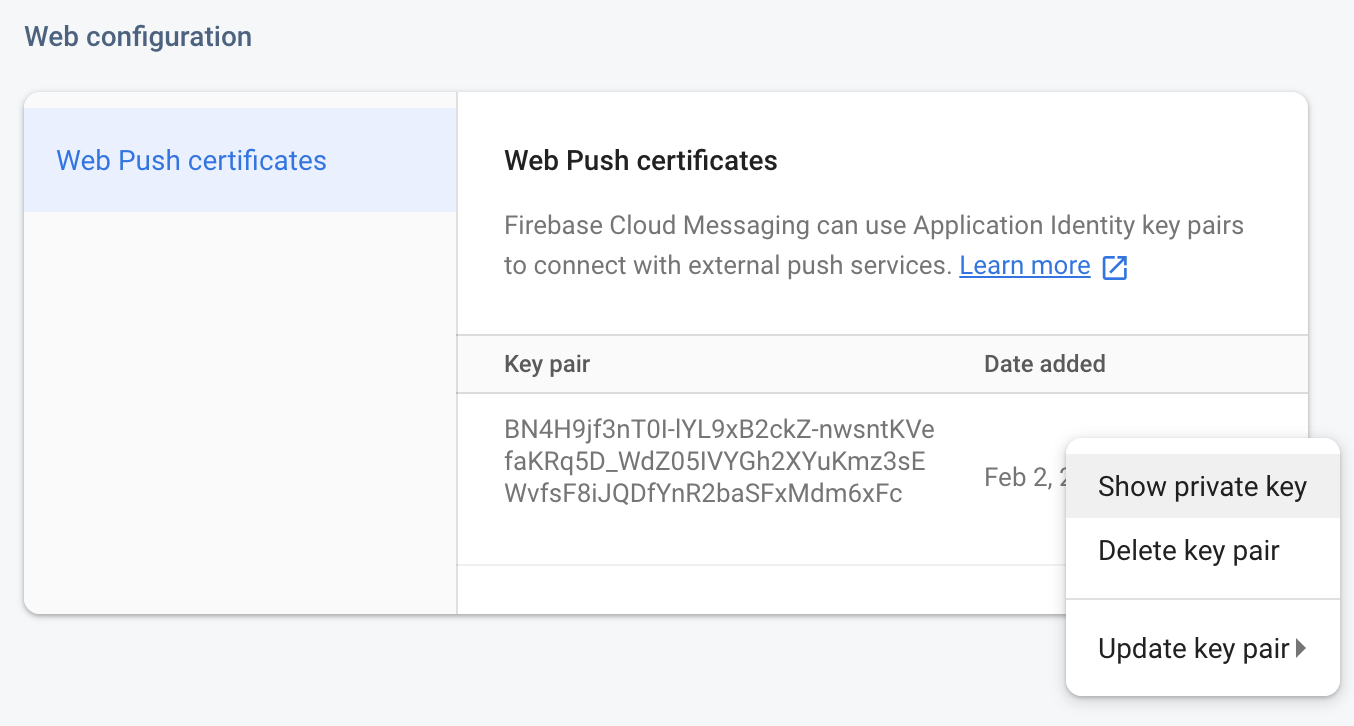
Click on the three dots button when hovered on the public key to see the options. Select Show private key option to display the private key.
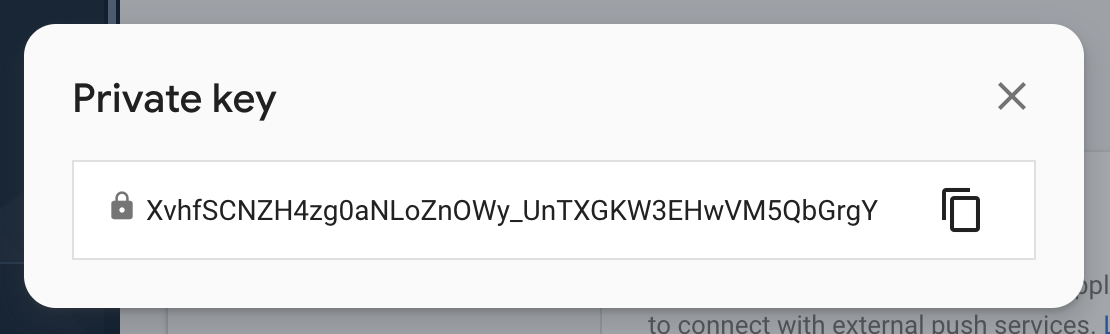
⚠️ Copy the shown Private key to your notepad, assigning a reference name to it for future references: FIREBASE_WEB_PUSH_PRIVATE_VAPID_KEY: {yourKey}.
It's very important to note that, private keys we noted at this step should be secret. Having them exposed to outside world might cause a breach to your app, letting anyone who has them to send any message they want to your users.
I intentionally did not obfuscate the keys in the images, but rest assured, they're all invalidated :)
Subscribe to push notifications
SwPush is an Angular service from @angular/service-worker module. Please take a moment to check out the API docs on Angular website.
Inject SwPush service in your component
Open your app.component.ts file and inject SwPush service to your constructor:
import { SwPush } from '@angular/service-worker';

export class AppComponent implements OnInit {
  constructor(
    private swPush: SwPush,
  ) {}
}
Subscribe to Web Push
Again, in your app.component.ts file, add the following method to request permission for push notifications and subscribe to the remote Web Push service.
Copy FIREBASE_WEB_PUSH_PUBLIC_VAPID_KEY from your notepad of keys as a value for serverPublicKey option.
subscribeToWebPush() {
  this.swPush.requestSubscription({
    serverPublicKey: `⚠️ PUT YOUR FIREBASE_WEB_PUSH_PUBLIC_VAPID_KEY HERE ⚠️`,
  }).then((sub) => {
    console.log('subscribeToWebPush successful');
    console.log(JSON.stringify(sub));
  }).catch((err) => {
    console.log('subscribeToWebPush error', err);
  });
}
Temporarily call subscribeToWebPush() method on ngOnInit() method of your AppComponent class to test the functionality at this stage:
async ngOnInit() {
  this.subscribeToWebPush();
}
Test the Web Push subscription
As this is a Service Worker based functionality, we need to build our app for production in order to test it.
Execute npm run build:serve:https in your command line OR npm run build:prod if your HTTPS server is already running.
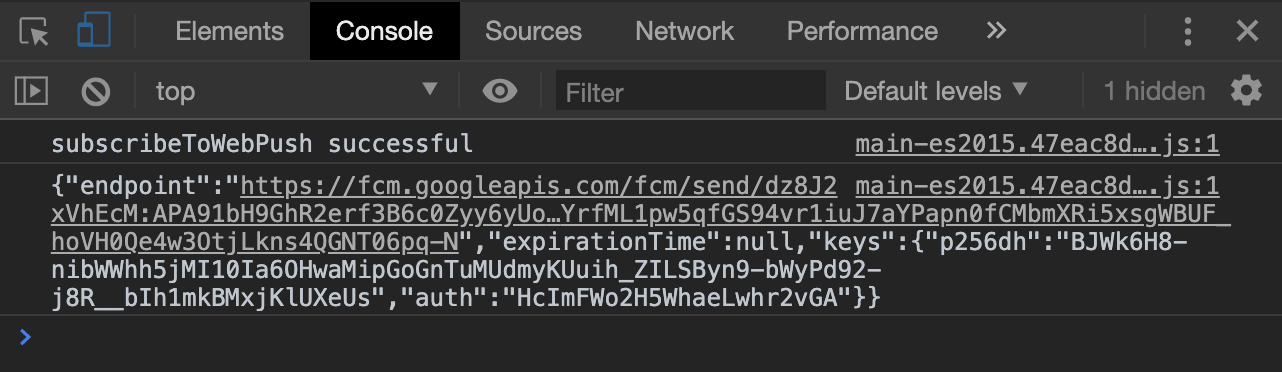
Navigate to https://localhost in your browser and inspect the console logs.
You should be getting a permission request for notifications and when allowed, a subscription log should appear in your console.
Managing the notification permissions
You can manage the permissions of your browser for testing purposes by pasting this url to your address bar: chrome://settings/content/notifications. Alternatively, you can click on the Lock icon next to the address bar to manage the permissions for a single app.
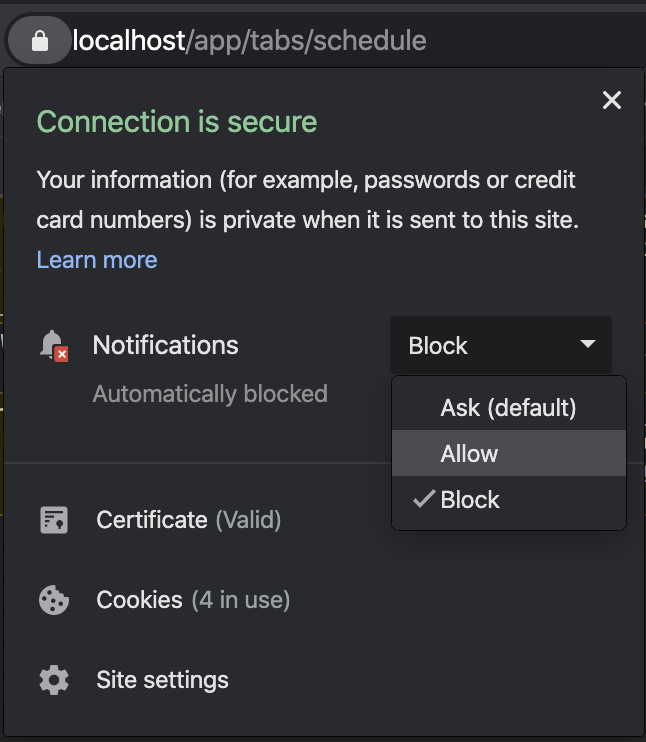
When user denies the notification permission, you cannot finalize the subscription via SwPush service.
You need to inform and guide your users on enabling the notifications once again, using Notifications API.
Add
id to your manifest file
Although the need for gcm_sender_id in manifest file is deprecated for Chrome, it is still required for Chrome prior to version 52, Opera Android, and Samsung Internet.
Copy GCM_SENDER_ID key from you notepad of keys and paste it to your manifest.webmanifest file:
"gcm_sender_id": "⚠️ PUT YOUR GCM_SENDER_ID HERE ⚠️"
Setup a good permission UX
Asking for notification permissions immediately when your user visited your app for the first time can be really annoying.
This behaviour has been used by many websites to spam their visitors for a long time and users have developed an immediate denial reaction against them in time.
There's a Lighthouse audit to increase the awareness against such developer action, documented as Avoids Requesting The Notification Permission On Page Load. Moreover, there will be a Chrome feature implementation automatically preventing such behaviour soon.
Any engagement with your users has to be meaningful and with a thorough reasoning, triggered by your users own action and consent.
Take a moment to read about building a good permission UX on the web.
Build a permission request UI
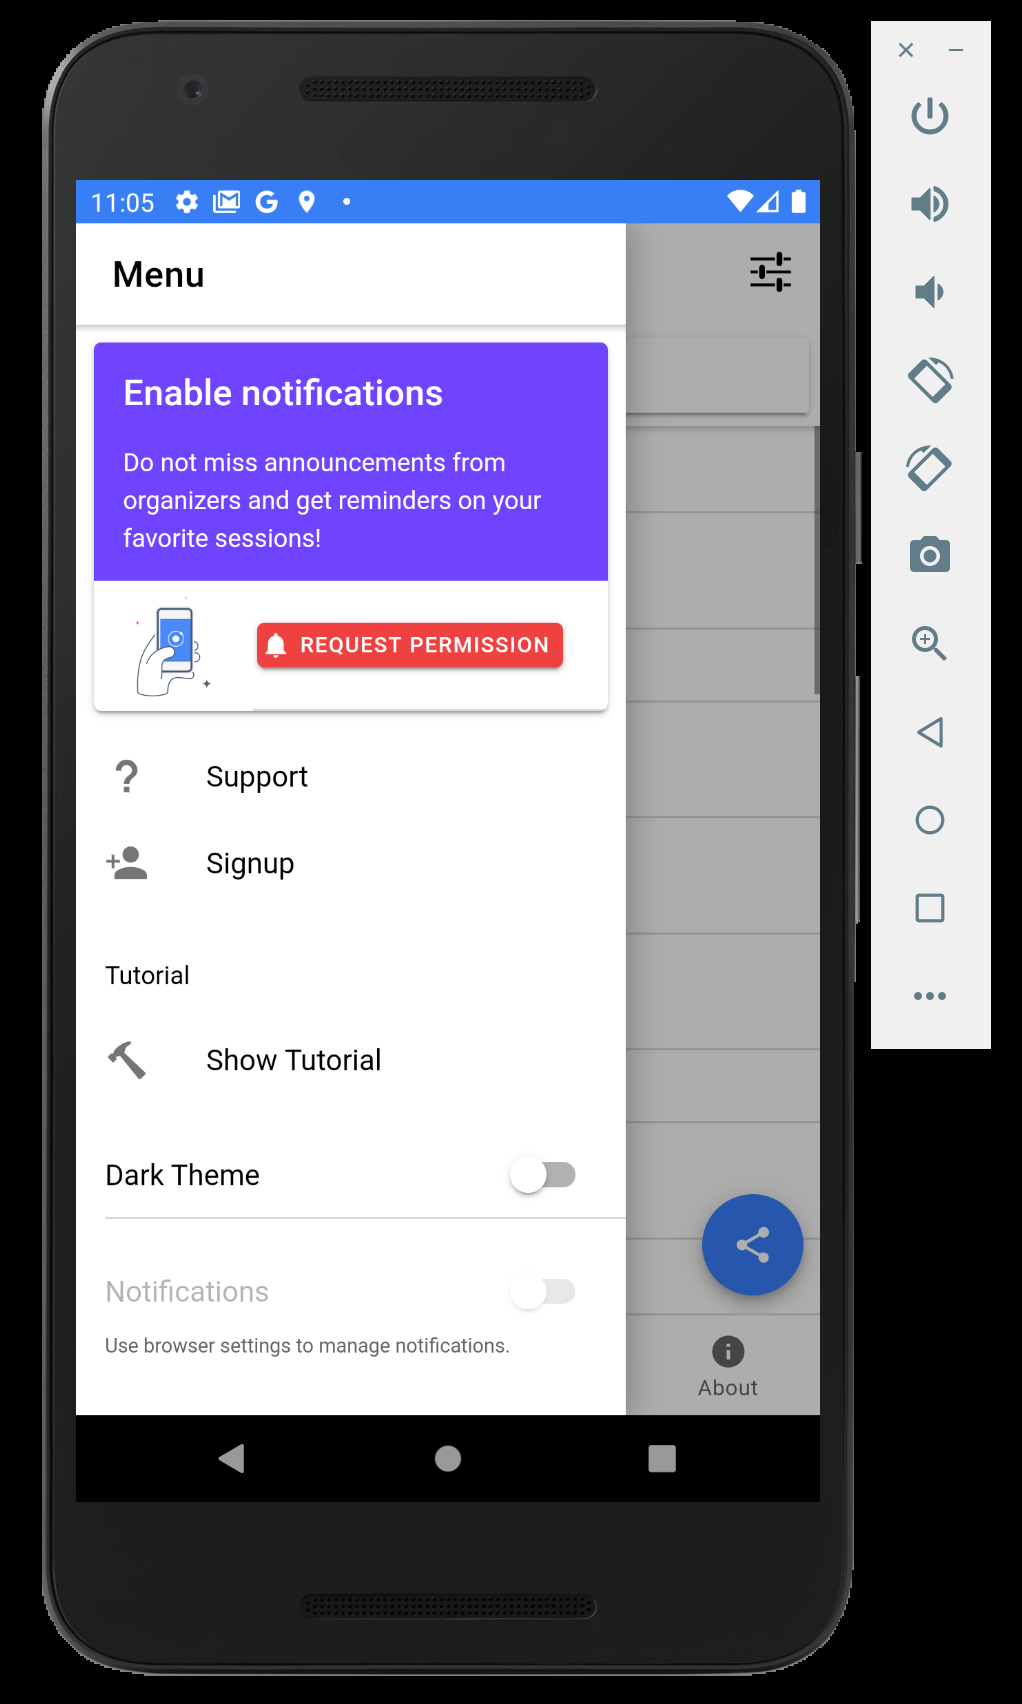
We're going to add a card element to inform our users about app's notifications feature.
This will be a further engagement channel, provided only to the users who added the app to their home screens.
Prevent notification permission request on ngOnInit()
As you might remember, we added subscribeToWebPush() method call to ngOnInit() to test the notification permissions before.
When we call requestSubscription() method on SwPush service, it does 2 things;
- Requests notification permission if it's not granted yet.
- Subscribes to Web Push server to receive push notifications.
We need to split requesting permission flow from subscribing to Web Push server logic. Because what we want is to subscribe to Web Push server on component init. And, we want to trigger permission request with a custom UI only after certain engagement criteria, not on component init.
Open app.component.ts file and navigate to subscribeToWebPush() method. Add the following if condition to only subscribe to Web Push server if notifications are granted for our origin.
subscribeToWebPush() {
  if ('Notification' in window && Notification.permission === 'granted') {

    this.swPush.requestSubscription({
      serverPublicKey: `⚠️ PUT YOUR FIREBASE_WEB_PUSH_PUBLIC_VAPID_KEY HERE ⚠️`,
    }).then((sub) => {
      console.log('subscribeToWebPush successful');
      console.log(JSON.stringify(sub));
    }).catch((err) => {
      console.log('subscribeToWebPush error', err);
    });

  }
}
Add a notification permission info card to the side menu
Add a new ion-card element, right below the install promotion card in app.component.html file.
<ion-card button color="tertiary"
  *ngIf="!isInstallPromotionDisplayed"
  (click)="requestNotificationPermission()">

 <ion-card-header>
   <ion-card-title>Enable notifications</ion-card-title>
  </ion-card-header>

  <ion-card-content>
    Do not miss announcements from organizers and get reminders on your favorite sessions!
  </ion-card-content>

  <ion-item>
    <ion-thumbnail slot="start">
      <img src="assets/img/ica-slidebox-img-2.png" alt="A fancy mobile device">
    </ion-thumbnail>
    <ion-button color="danger"><ion-icon name="notifications" slot="start"></ion-icon>REQUEST PERMISSION</ion-button>
  </ion-item>

</ion-card>
As you might have noticed the *ngIf expression, we only display this card if the app is added to the home screen.
We also now have the notification permission request pointing out to a method called requestNotificationPermission(). Let's create that method.
Create a permission request method
Open app.component.ts file and create a new method with the name requestNotificationPermission.
We also need to add one new property - showBackdrop.
Update your component with the following property and method:
showBackdrop = false;

requestNotificationPermission() {
  // We will use the backdrop to create user focus on permission dialog
  this.showBackdrop = true;

  if ('Notification' in window) {
    Notification.requestPermission().then((permission: NotificationPermission) => {
      this.showBackdrop = false;

      if (permission === 'granted') {
        console.log('Notification permission is granted');

        // Since we have the permission now, let's subscribe to Web Push server
        this.subscribeToWebPush();
      } else {
        console.log('Notification permission is not granted: ', permission);
      }
    }).catch((err) => {
      console.log('Error on requestNotificationPermission', err);
      this.showBackdrop = false;
    });
  }
}
Add a backdrop to the background
Now that we have a new state in our component assigned to the property showBackdrop, we can use it to toggle a backdrop display in our app to catch our users' focus to the prompts.
Open app.component.html template file and add the following line right in to ion-app element, on top of all other elements:
<ion-backdrop *ngIf="showBackdrop"></ion-backdrop>
Open app.component.scss file and add the following element style:
ion-backdrop {
  opacity: 0.8;
  background: #000;
}
Display backdrop also when A2HS prompt is shown
Since we have the backdrop in place, we can use the same UI pattern to catch our users' focus when we prompt with A2HS dialog.
Replace the showInstallPrompt() method in app.component.ts file with the following:
showInstallPrompt() {
  this.showBackdrop = true;

  // Show the prompt
  this.deferredPrompt.prompt();

  // Wait for the user to respond to the prompt
  this.deferredPrompt.userChoice
    .then((choiceResult) => {
      if (choiceResult.outcome === 'accepted') {
        // Hide the install promotion UI as user just installed it
        this.isInstallPromotionDisplayed = false;
        console.log('User accepted the A2HS prompt');
      } else {
        console.log('User dismissed the A2HS prompt');
      }
      this.deferredPrompt = null;
      this.showBackdrop = false;
    }).catch(() => {
      this.showBackdrop = false;
    });
}
Reflect notification permission status to our UI
Our UI currently is not aware of the notification permission status of the browser.
We're going to bind Notification.permission constant from Notifications API to our UI elements.
Notification permission constant can have 3 values;
- default
- denied
- granted
Create a new class property and bind it to Notifications API
In order to bind DOM API's to Angular's template syntax, we need to assign the API to a class property.
Open app.component.ts file and add the following property to your class:
Notification = Notification;
// It's a shorthand of:
// public Notification = Notification;
This might look strange at first but it's a big enabler of an access to DOM APIs along with syntax highlighting on Angular templates.
Update the condition to display notification permission UI
We should only display the notification permission UI if user did not react on it yet.
In order to meet that goal, we're going to introduce a new expression Notification?.permission === 'default' in the if block of our card element.
Did you notice the ? elvis operator? Optional chaining was available on Angular templates for a long time. This prevents our app to throw exceptions on browser which does not have the API in place.
Open app.component.html file and navigate to the ion-card element holding the notification UI. Update the ion-card template tag with the following:
<ion-card button
    color="tertiary"
    *ngIf="!isInstallPromotionDisplayed && Notification?.permission === 'default'"
    (click)="requestNotificationPermission()">
Add a toggle to display the notification status
The status of the notification permission can be difficult to be located and seen on some browsers and devices by users.
We're going to display a disabled toggle to reflect the status to our UI.
Open app.component.html file and the following HTML block right next to ion-list element holding the Dark Theme toggle:
<ion-list *ngIf="!isInstallPromotionDisplayed">
  <ion-item lines="none">
    <ion-label>
      Notifications
    </ion-label>
    <ion-toggle disabled [checked]="Notification?.permission === 'granted'"></ion-toggle>
  </ion-item>
  <ion-item lines="none">
    <ion-note>Use browser settings to manage notifications.</ion-note>
  </ion-item>
</ion-list>
Optional: Provide an option to opt-out
With the current Permissions API, it's not possible to revoke a permission yet.
You can introduce an additional state to keep user preference on receiving the notifications. Browser storage APIs like IndexedDB can be a good start to keep such preference but ideally you might want to keep this data on a DB in server, related to a user id.
Test the permission UX
Execute npm run build:serve:https in your command line OR npm run build:prod if your HTTPS server is already running.
Navigate to https://localhost and add the app to home screen using the install promotion UI to see the permissions UI.
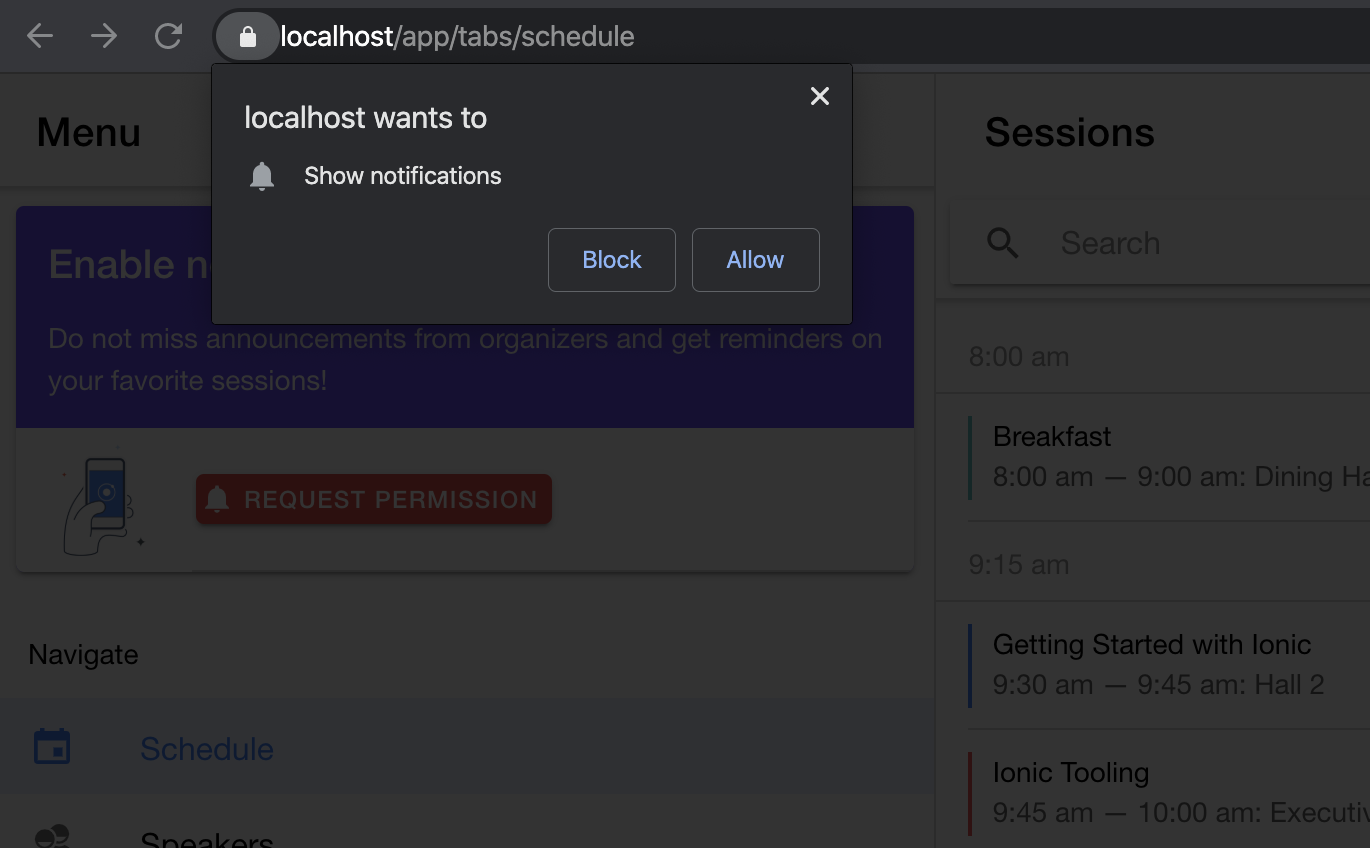
How to test the permissions
In order to make a good test on the permission UX, we need to know how to change the permissions.
On desktop, you can click on the lock icon next to the address bar to also manage the notification permission.
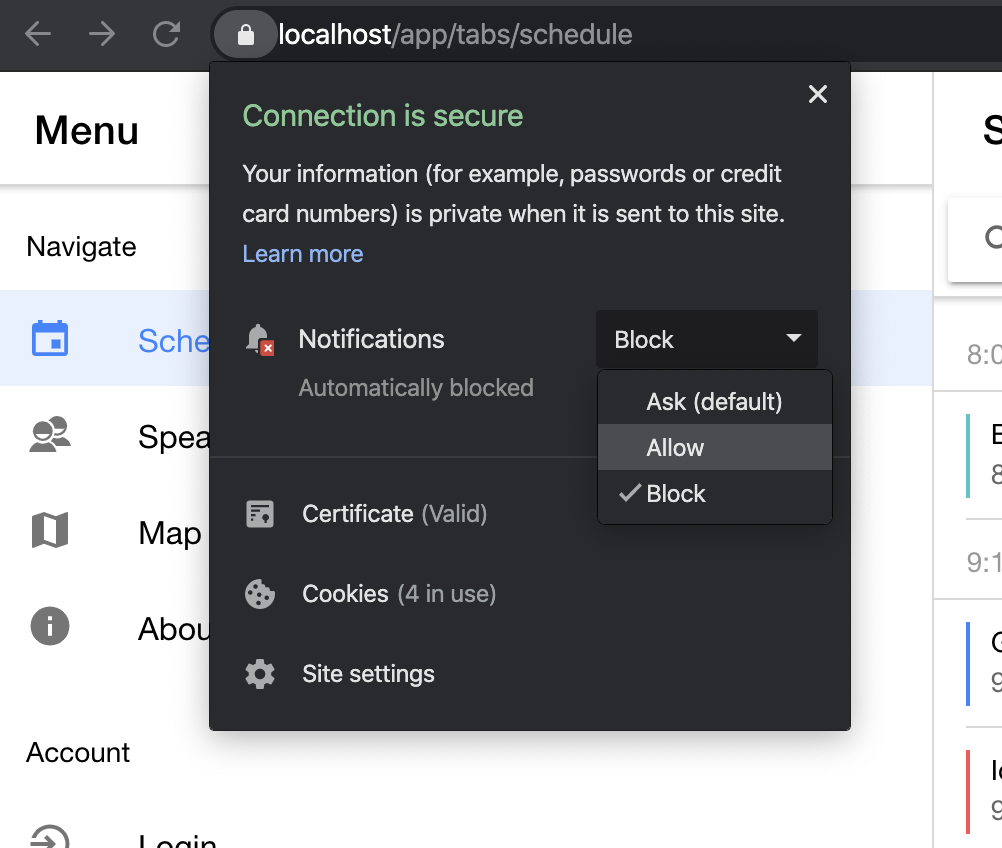
If added to home screen on desktop, you can click the three dots on right top corner of your standalone app and again clikc on the lock icon to manage the permissions.
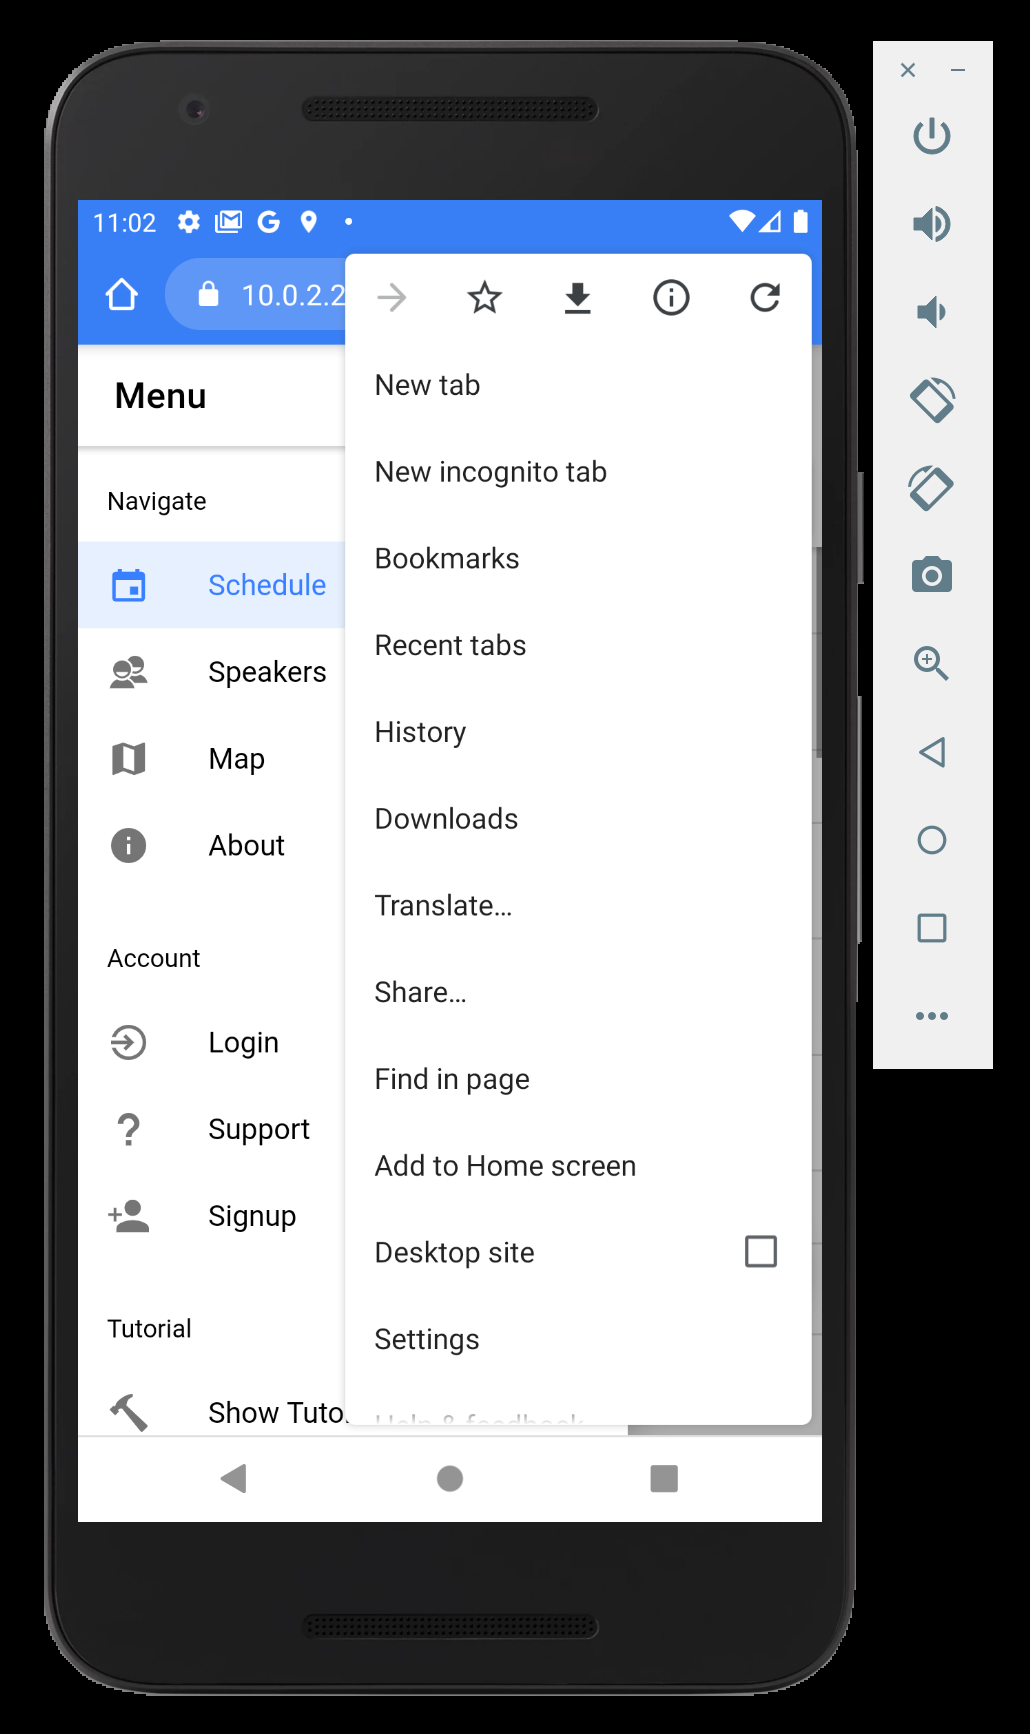
On emulated mobile device, you can tap on three dots on Chrome and tap on circle i info button.
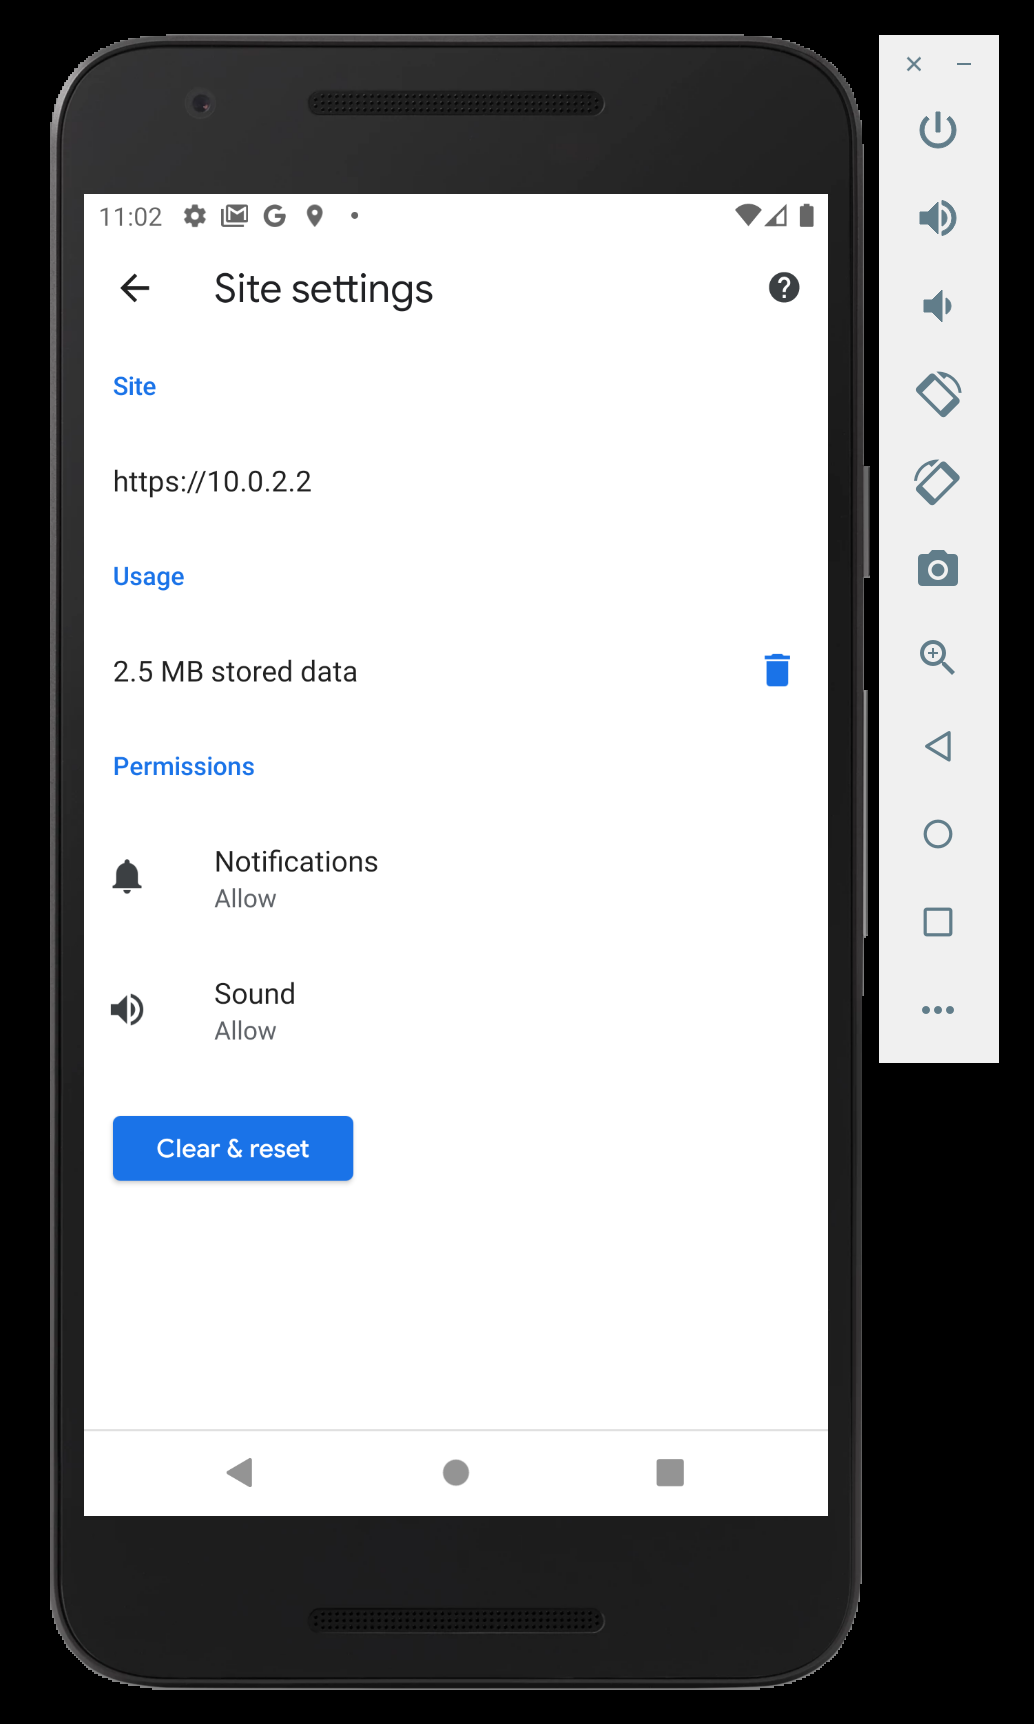
Then, tap on Site setting to view the permissions and data usage. Tap on Clear & reset button to reset all.
Good to go 🎯
Now you can continue to Step 15 -> Send and receive push notifications.