Design High-Performance Apps Using Serverless Technologies Like TiDB and AWS Lambda
April 25, 2023 · View on GitHub
TiDB is an open-source, MySQL-compatible NewSQL database that offers horizontal scalability, consistency, and high availability. TiDB Cloud is its fully-managed Database-as-a-Service (DBaaS). It lets you deploy your infrastructure at scale cost-efficiently without managing server infrastructure.
This doc demonstrates how you can employ TiDB Cloud in your serverless applications on AWS Lambda by constructing a bookstore management API. The API will enable end-users to perform actions such as listing, creating, updating, and deleting books.
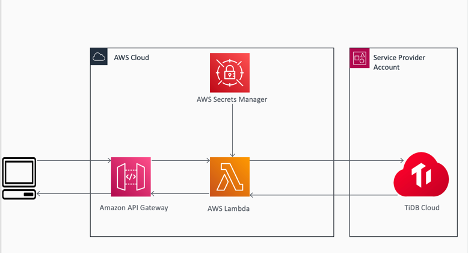
AWS Lambda secure interaction with TiDB Cloud using API Gateway
Prerequisites
Before you get started, complete the following prerequisites:
- Create a TiDB Cloud account
- Create an AWS account, which can access AWS Lambda, API Gateway, Secrets Manager, and the AWS Cloud9 integrated development environment (IDE)
- Set up AWS Cloud9 IDE
Accessing TiDB Cloud from AWS Lambda
To access TiDB Cloud from AWS Lambda:
- Create a TiDB Cloud cluster.
- Store authentication credentials in Secrets Manager.
- Create an AWS Lambda function.
- Package Lambda code(ignore if use
us-east-1region). - Deploy your AWS Lambda function.
- Verify results with the AWS API Gateway.
Create a TiDB Cloud cluster
-
On the TiDB Cloud Sign Up page, sign in using the link at the bottom of the page.
-
Click Connect to get TiDB Connection Information.
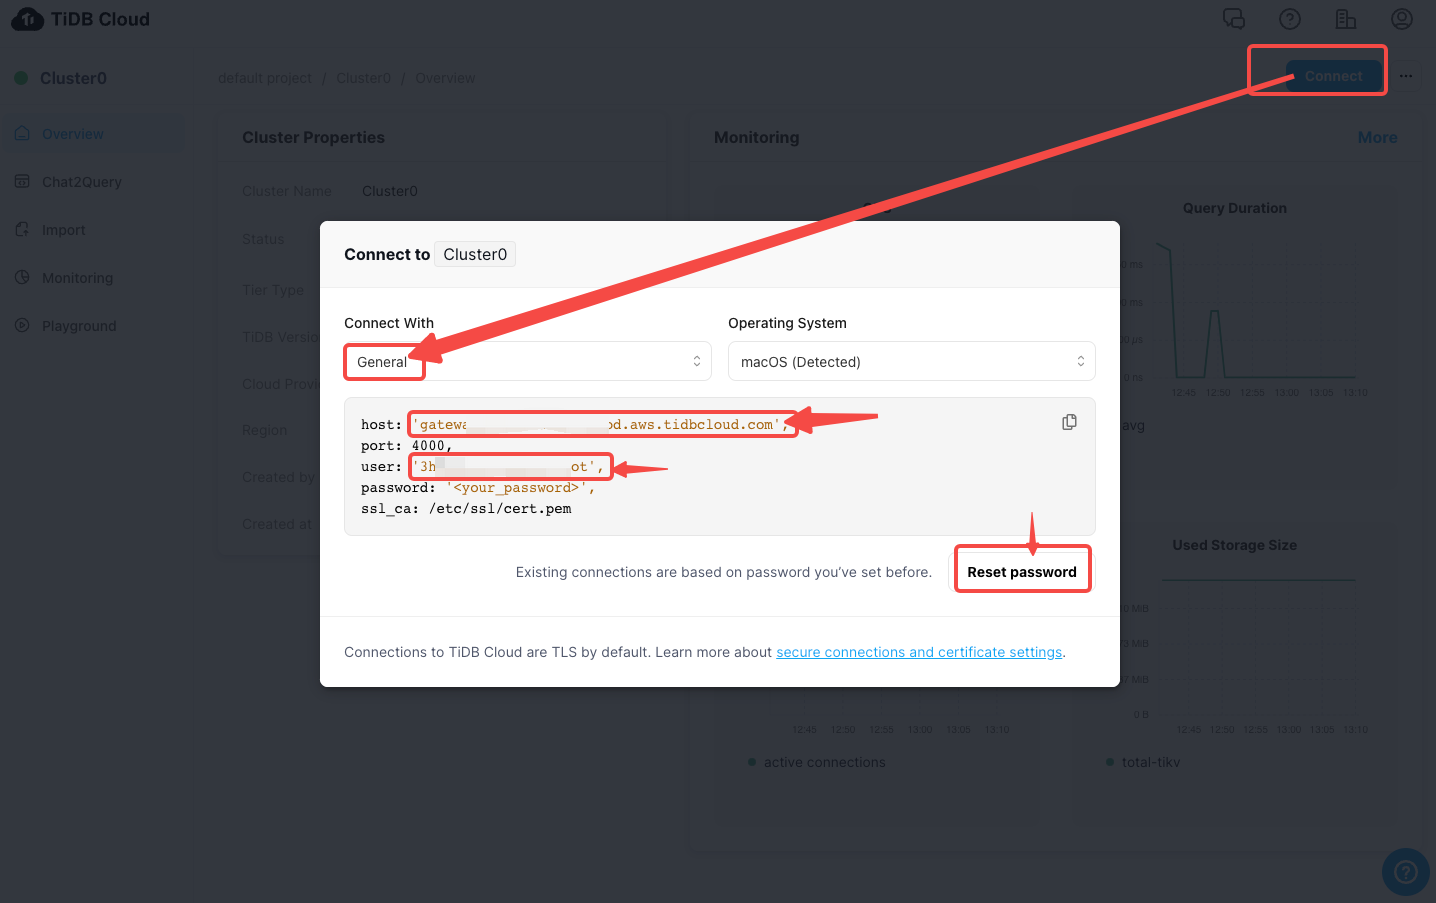
Get TiDB Connection Information
-
Click Reset password and note down the root password.
Store authentication credentials in AWS Secrets Manager
AWS Lambda supports integration with AWS Secrets Manager to securely store connection authentication credentials. To create these credentials:
-
On the Secrets Manager console, choose Store a new secret.
-
For Select a secret type, select Other type of secret.
-
Enter the following credentials:
- TiDBHost
- TiDBUser
- TiDBPassword
- TiDBPort (use 4000 as default)
- TiDBDatabase (use test as default)
Click Next.
-
For the Secret name, enter
aws/lambda/bookstore. -
Click Next.
-
Keep the Disable automatic rotation option selected.
-
Click Next.
-
Click Store.
Create an IAM Role for Lambda
We will be using Secrets Manager in Lambda function. For this purpose, let's create an IAM Role for Lambda to access the Secrets Manager service.
-
Visit IAM service in AWS Management Console and click the Roles.
-
Click Create role, select AWS service as the trusted entity, and select Lambda as the use case.
-
Click Next: Permissions. Search and Select SecretsManagerReadWrite. Click Clear filters. Search and Select AWSLambdaBasicExecutionRole.
-
Click Next, input LambdaSecretsManagerRole as the role name, and click Create role.
Create an AWS Lambda function
-
On the Lambda console, in the navigation pane, choose Functions.
-
Choose Create function.
-
For Function name, enter the name "bookstoreLambda" for your function.
-
For the Execution role, select Use an existing role and choose the LambdaSecretsManagerRole you just created.
-
Choose Create function.
-
Choose Configuration > Edit, set the Timeout to 15 seconds, and save.
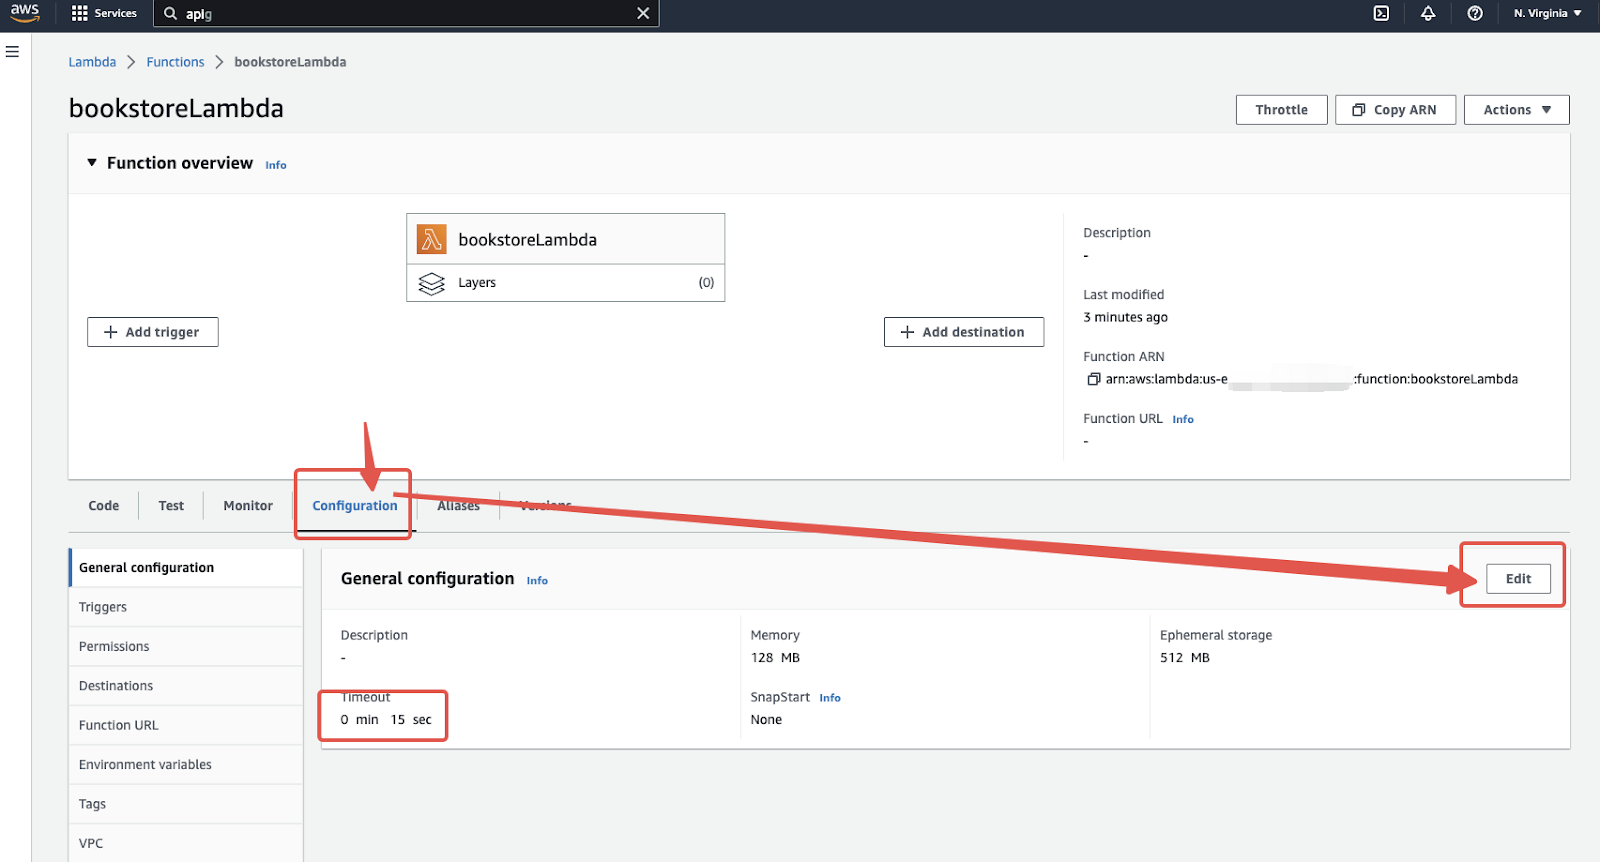
Choose Configuration and then Edit
This will create a blank function for you.
Package Lambda code
Note:
Skip this step if you are using
us-east-1region.
Check the demo code repository for a full example.
We recommend using the AWS Cloud9 IDE to have a consistent development environment, which is regardless of the local environment.
- Create and open the AWS Cloud9 environment with default settings.
- Execute
git clone https://github.com/pingcap/TiDB-Lambda-integrationin Cloud9 terminal to clone the code example. - Enter the folder by executing
cd TiDB-Lambda-integration/aws-lambda-bookstore, this is the workspace in this demo.
Our goal is to build a book management API for a bookstore that will enable a user to list, create, update, and delete a book. The book will have a title, author, type, stock, price, and release date as its attribute, backed by a books table to store books. When a specific API is invoked, the event triggers the handler code which in-turn queries books from the books table in the test database.
The demo code should have three main parts: Secrets Manager, ORM and Lambda function handler, where Secrets Manager handles the database's secrets, ORM connects to the database and manages tables, and Lambda function handler processes events and API requests. Let's review them briefly.
Secrets Manager
We use the AWS Secrets Manager SDK to retrieve secrets from the secret aws/lambda/bookstore in region us-east-1. (We use us-east-1 as default. You should modify it to the same region as your Secrets Manager instance.)
The function initSecretManager initializes the Secrets instance and retrieves the stringified JSON object which contains the key-value pairs for all secrets.
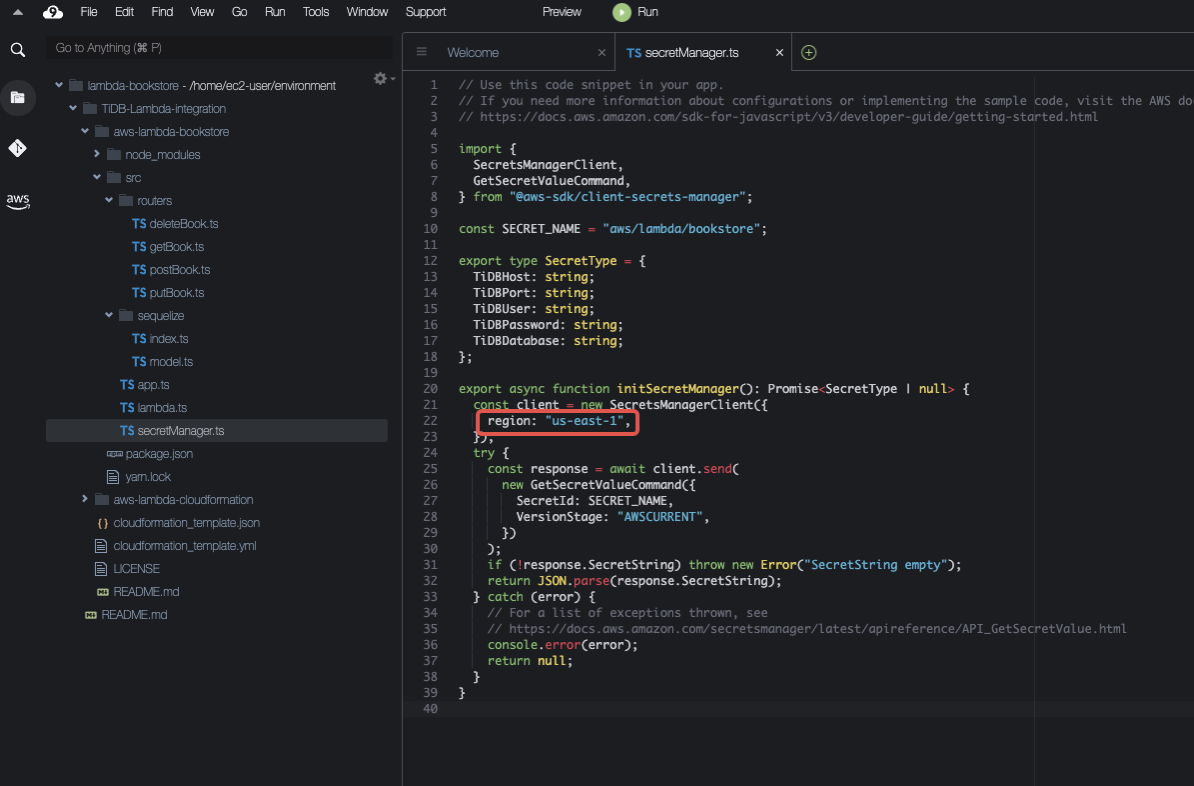
Secrets Manager
Next, we'll use these values in Node.js ORM to connect and operate on the database.
ORM
We use Sequelize to manage the database and execute commands. src/sequelize/index.ts initializes the ORM, and src/sequelize/model.ts defines the table schema.
Because TiDB is compatible with most MySQL functions and syntax, you may notice that the code uses mysql2 as the driver. Also, because the TiDB Cloud cluster requires an SSL secure connection, we enable the ssl when configuring the database connection.
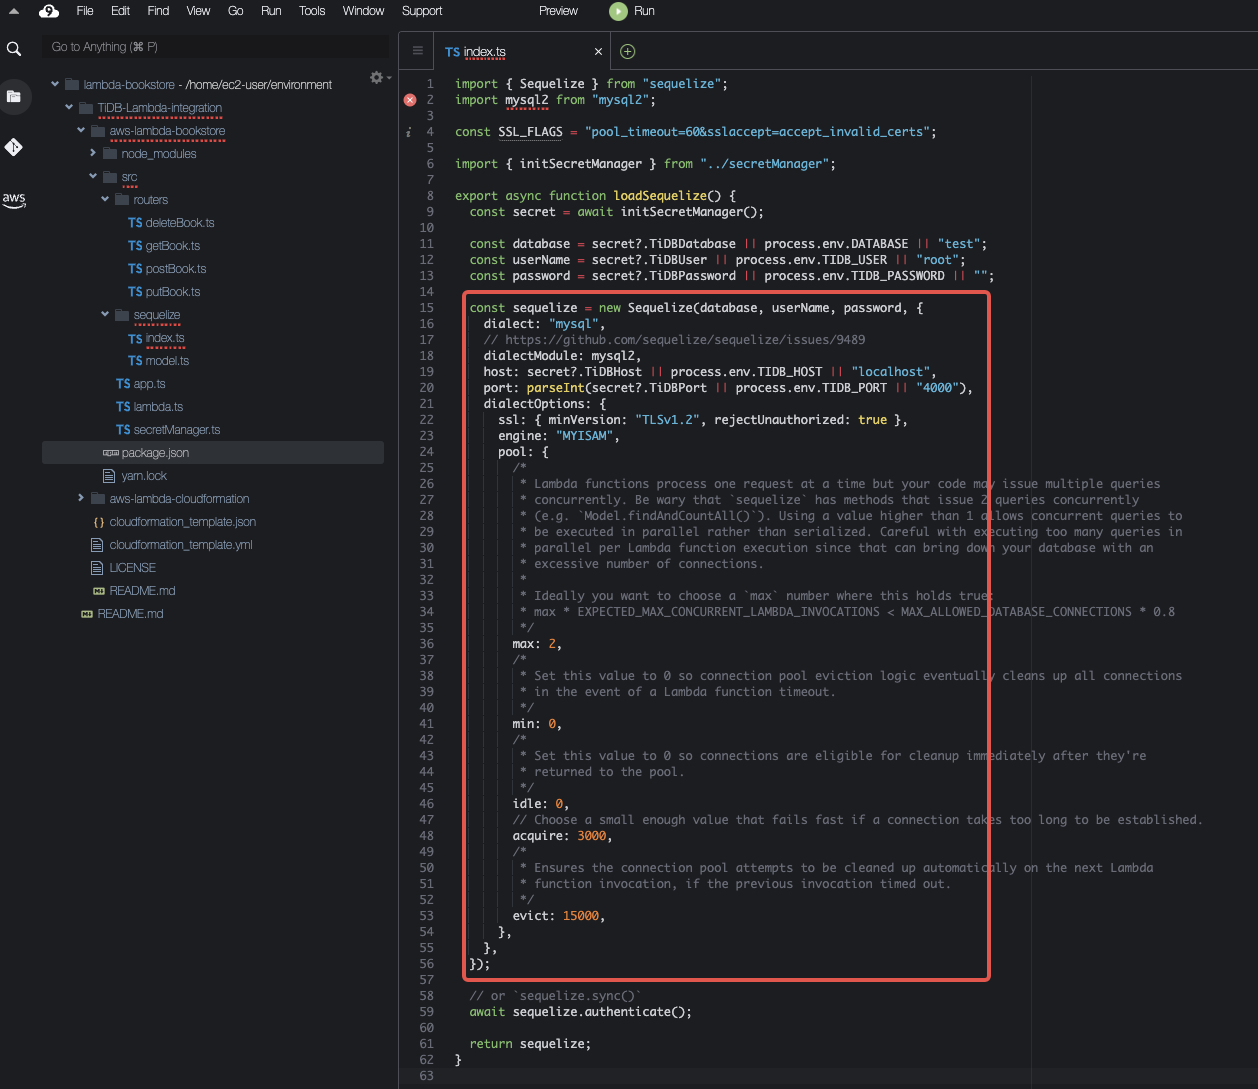
Initialize Sequelize instance
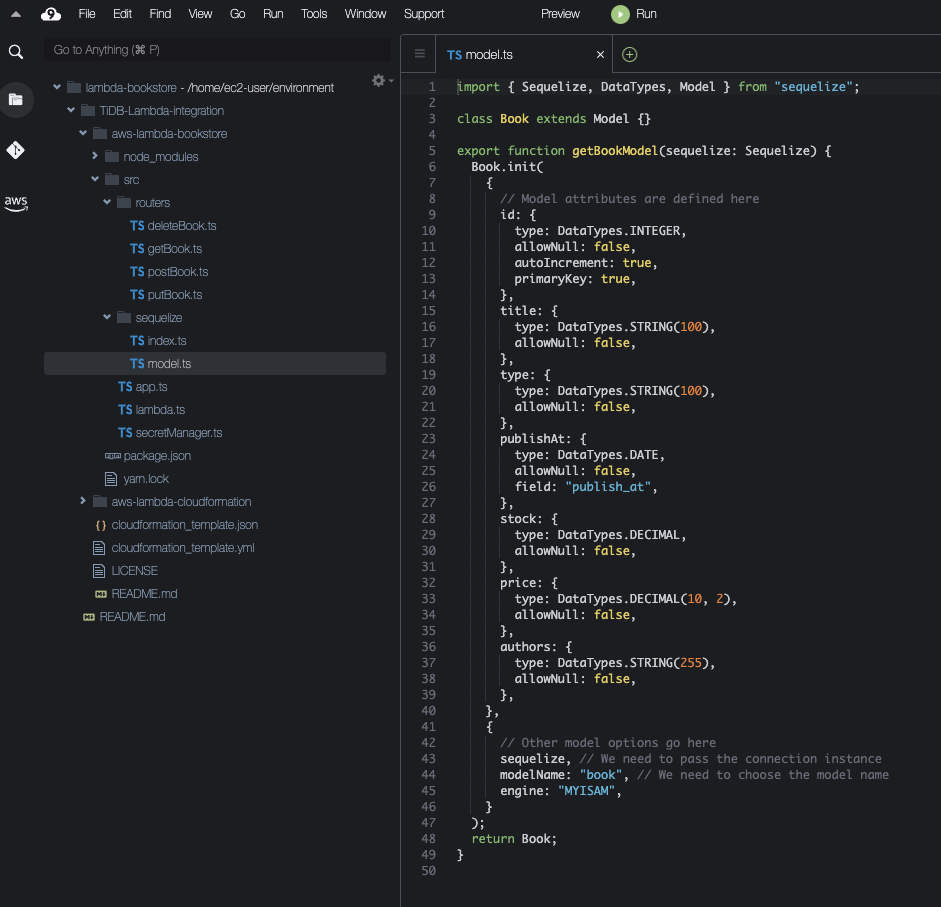
Initialize Book model
Next we will use the Book model to operate commands on the target table. It will automatically create the target table if the table does not exist.
Lambda function handler
The Lambda function handler is a method that processes events when the function is invoked. In this example the Node.js web framework "Fastify" is used for handling API routes and the handler is exported as the entry point.
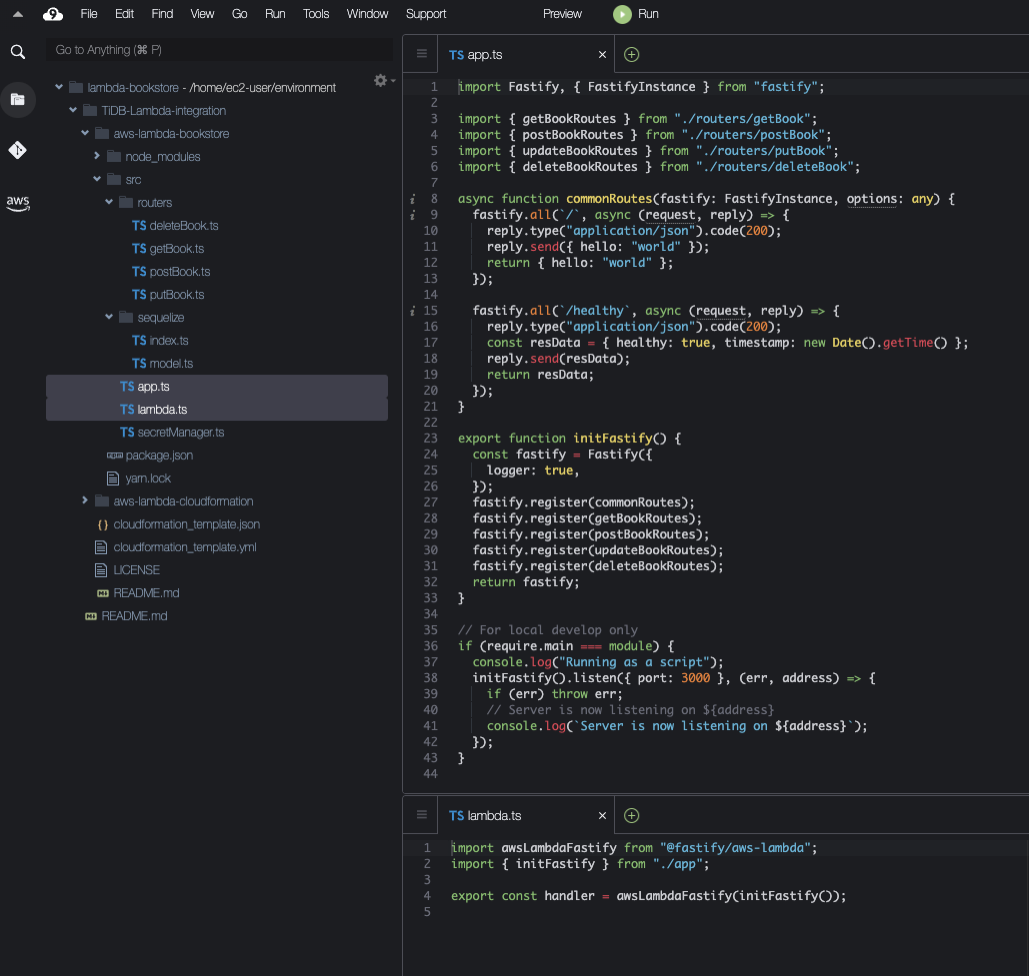
The Lambda function handler
Let's walk through what's happening here.
First, we define some routers to list books, post a new book, update and delete the specified book.
Then, we define a function initFastify to initialize the Fastify instance and register all the routes. It makes sure that all requests will be proxied correctly.
Finally, we use @fastify/aws-lambda to wrap the function initFastify, and export it as the handler. The handler is the entry point for our AWS Lambda function. Due to the difference between Node.js environment and Serverless environment, we cannot use the function getBook directly. Fastify provides an official Lambda functions wrapper @fastify/aws-lambda to transfer a general function to the Lambda-adapted handler.
Build a code bundle
Note:
Skip this step if you are using
us-east-1region.
We cannot directly upload source code to Lambda functions, so we need to build and zip code. The final zip file has the index.js with the handler.
To create a code bundle and zip file:
-
Make sure you have opened the AWS Cloud9 environment, clone the code example and enter the correct workspace (refer to the section Package Lambda code). All commands should be executed in the Cloud9 terminal.
-
Install the
yarnpackage manager and dependencies:- Run
npm i -g yarn. - Run
yarn.
- Run
-
Build the code bundle:
- Run
yarn build. - After building successfully, a dist folder will be generated. Verify that an
index.zipfile is under thedistdirectory in workspace. - Right click the zip file and choose Download to save on your local machine. We need to upload it when deploying the AWS Lambda function.
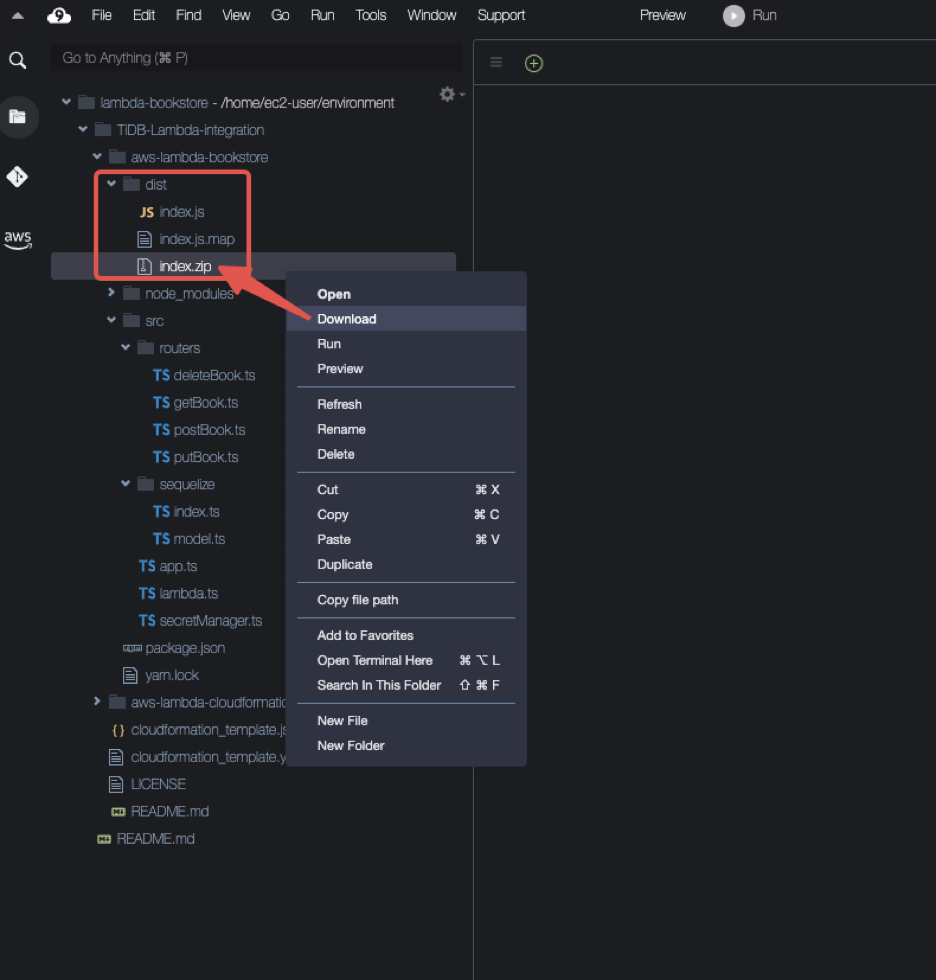
Download the zip file
- Run
Deploy your AWS Lambda function
If you are using us-east-1 region, you can directly use Amazon S3 Location(https://tidb-lambda-integration.s3.amazonaws.com/bookstore-lambda-index.zip) to deploy your Lambda function. Otherwise, you need to deploy your code to your Lambda function by uploading the zip file you created earlier.
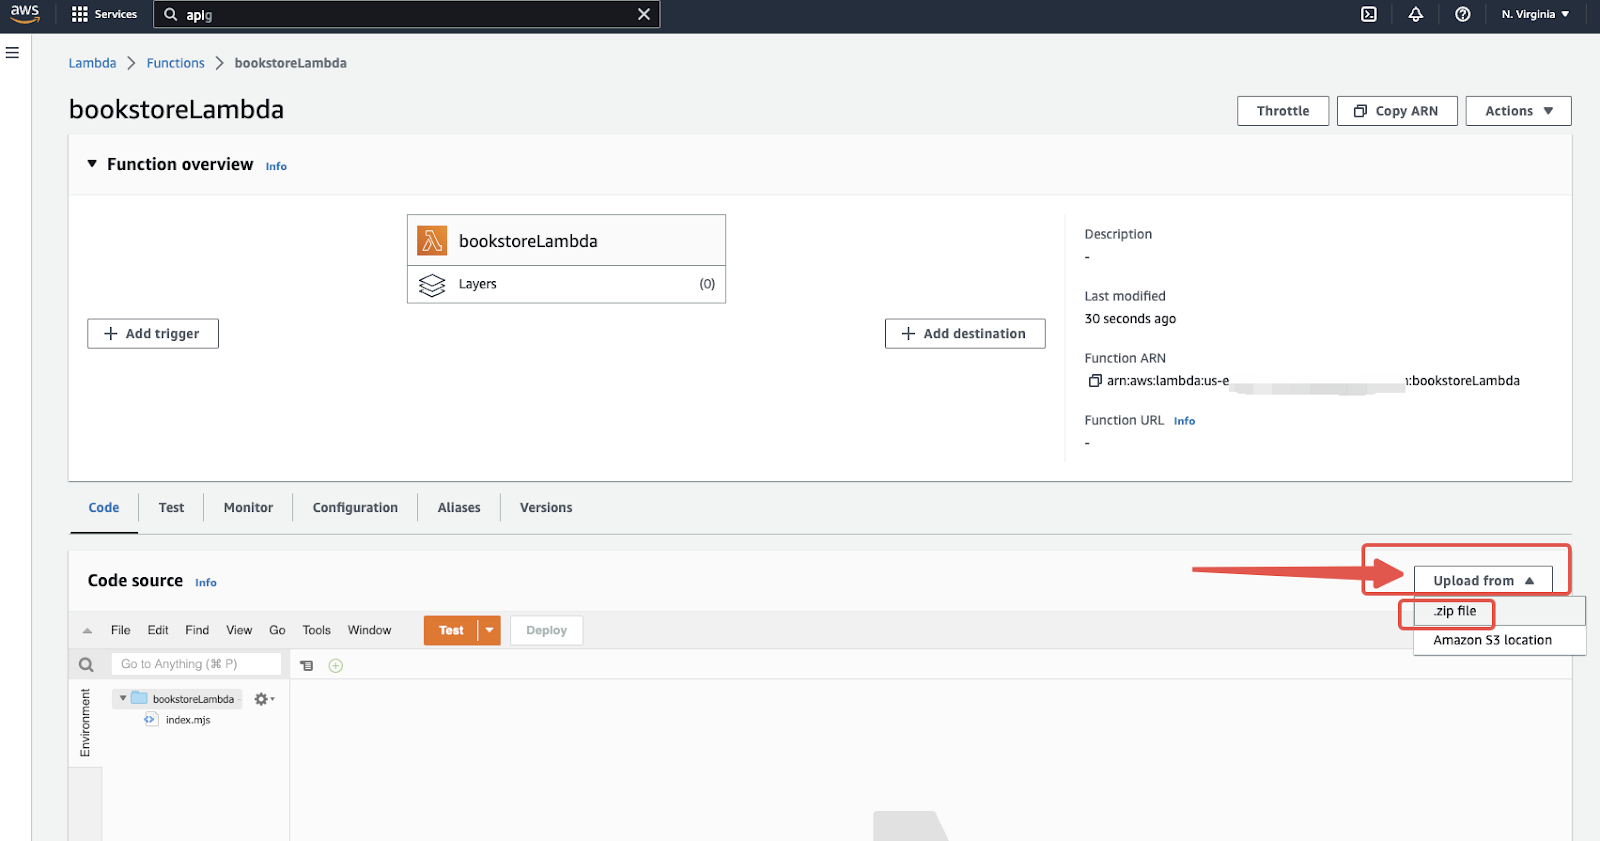
Upload the zip file
Verify results with the AWS API Gateway
You're ready to test your functions:
-
Go to the API Gateway console.
-
Choose HTTP API type and click Build to create an API. Remember to add the integration to your Lambda function bookstoreLambda.
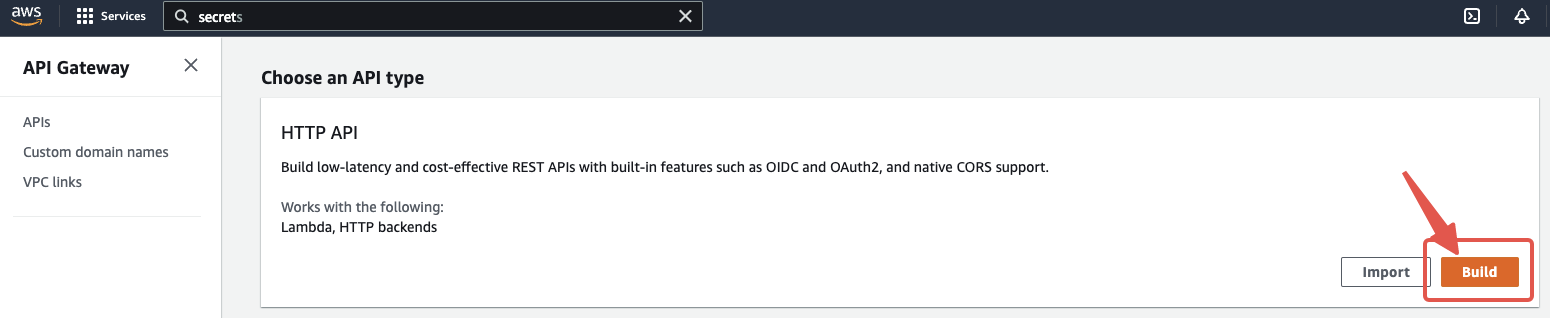
Choose HTTP API type
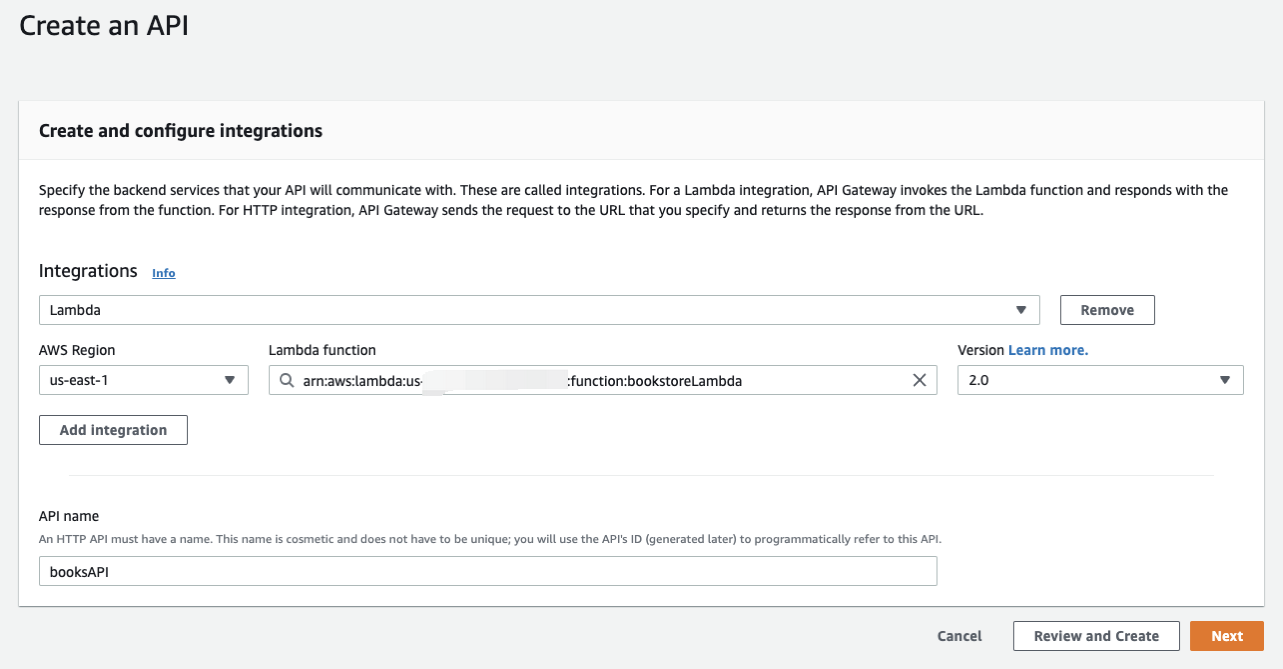
Create an API
-
Click Next to configure Routes. Add
GET /book,GET /book/{id}andPOST /book/init. It is corresponding to the routes defined in our code.GET /book(get all the books)GET /book/{id}(get a specified book by ID)POST /book(create a new book record)POST /book/init(create a set of random book records)PUT /book/{id}(update a specified book by ID)DELETE /book/{id}(delete a specified book by ID)
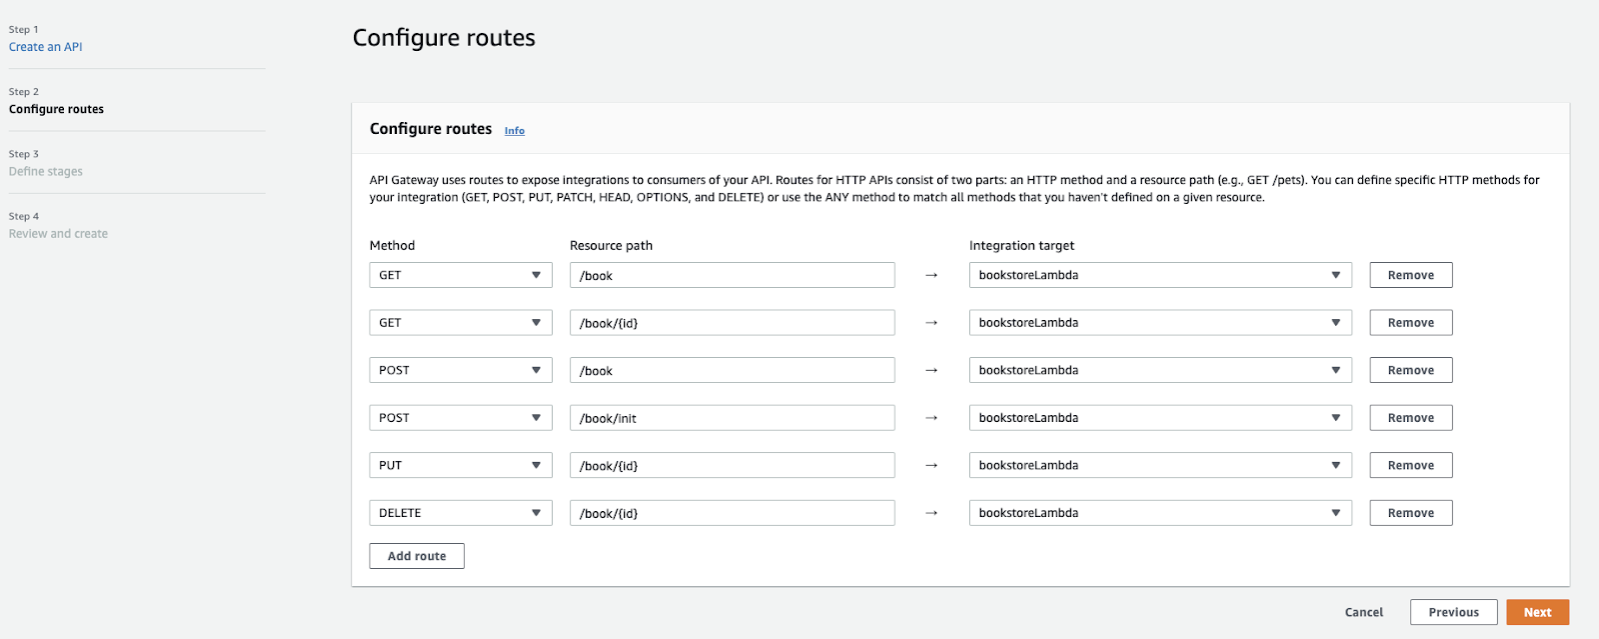
Configure routes
-
For the other fields, use the default settings.
-
On the Details page, get your invoke URL.
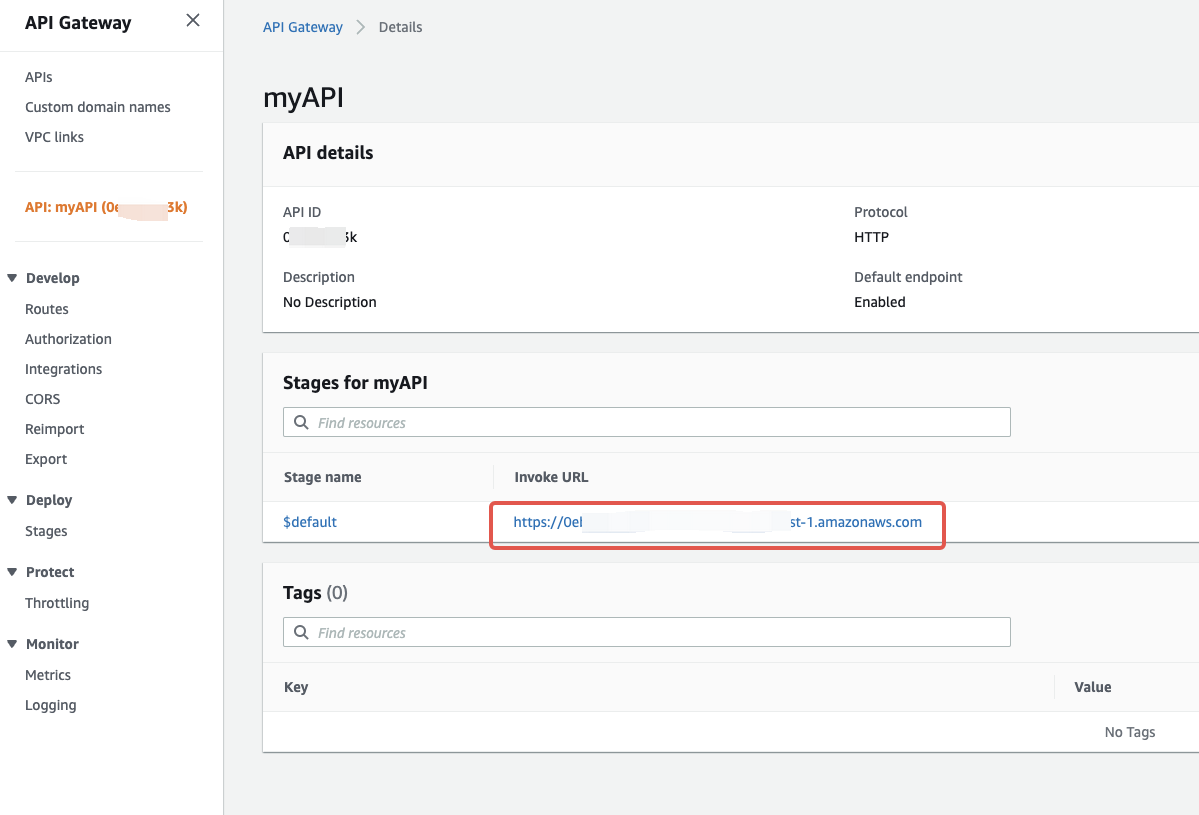
Get your invoke URL
-
Make API calls.
- To initialize books, run
curl -X POST -H "Content-Type: application/json" -d '{"count":10}' https://<your-invoke-url>/book/initand it will create table and insert ten random books. - To get all the books, run
curl https://<your-invoke-url>/book. - To get a specified book whose ID is 1, run
curl https://<your-invoke-url>/book/1. - To update a book whose ID is 2, run
curl -X PUT -H "Content-Type: application/json" -d '{ "title": "Book Title(updated)" }' https://<your-invoke-url>/book/2 - To create a new book, run
curl -X POST -H "Content-Type: application/json" -d '{ "title": "Book Title", "type": "Test", "publishAt": "2022-12-15T21:01:49.000Z", "stock": 123, "price": 12.34, "authors": "Test Test" }' https://<your-invoke-url>/book - To delete a book whose ID is 3, run
curl -X DELETE https://<your-invoke-url>/book/3 - Finally, get all the books again by running
curl https://<your-invoke-url>/book. Your response will look similar to the following:{"book":"book","method":"GET","query":{},"result":[...]}.
- To initialize books, run
Congratulations! Your Lambda function can now read data from your TiDB Cloud database.
Clean up your resources (optional)
To avoid any unnecessary charges to your AWS account, you can now delete the resources that were created for this blog, unless you wish to retain them.
Delete the Lambda function by navigating to the Functions page of the Lambda console, selecting the function that was created and choosing Actions and Delete.
Delete the execution role by navigating to the Roles page of the IAM console, selecting the role that was created and choosing Delete.
Delete the API Gateway by navigating to the APIs page of the API Gateway console, selecting the API that was created and choosing Actions and Delete.
Navigate to the Secret List page, select the Secret that you created earlier and delete it by choosing Actions and Delete.