ᓚᘏᗢ Whisker: A Pipecat Debugger
May 29, 2026 · View on GitHub


ᓚᘏᗢ Whisker: A Pipecat Debugger
Whisker is a low-level debugger for the Pipecat voice and multimodal conversational AI framework.
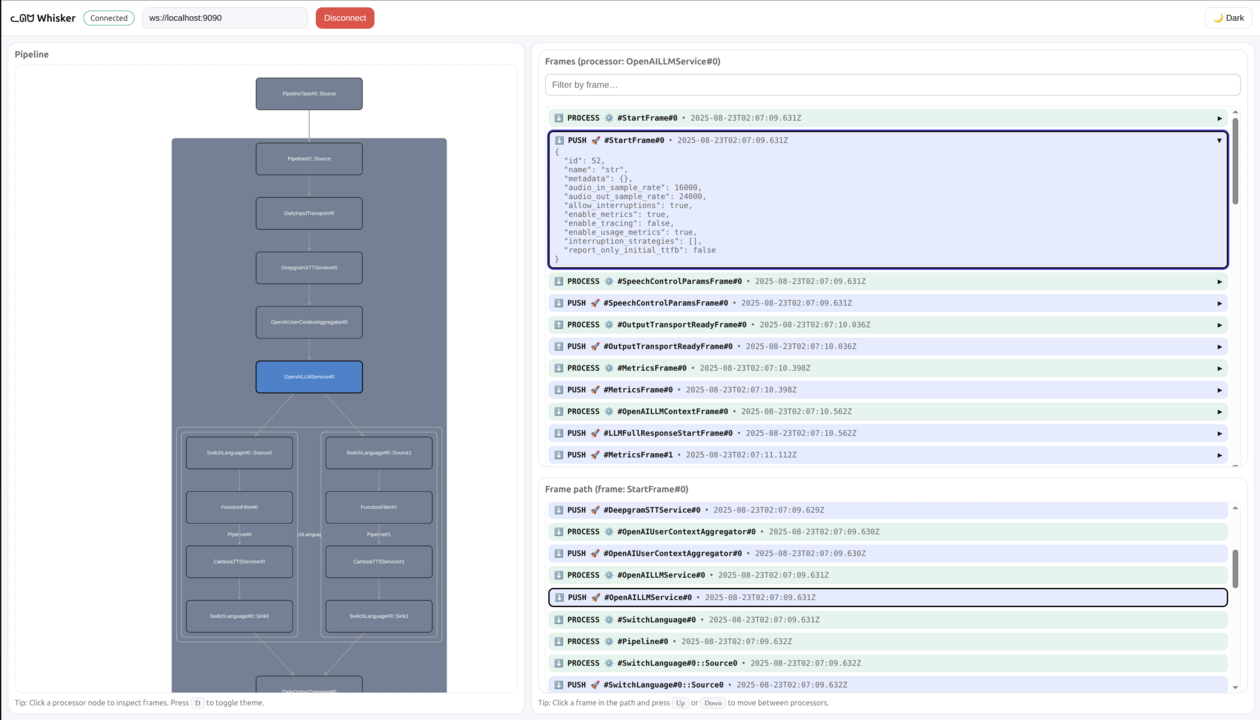
Pipecat is a multi-agent systems: workers spawn sub-workers, send jobs to each other, and exchange messages on a shared bus. Whisker gives you a single view over the whole system so you can see exactly what every part is doing.
With Whisker you can:
- 🧑🤝🧑 Browse every worker and sub-worker running in your Pipecat process
- 🗺️ Inspect the selected worker's pipeline
- 🧰 See every job flowing between workers
- 🚌 Follow messages on the Pipecat bus
- 📌 Select a processor to inspect its frames
- 🔍 Filter frames by name and direction
- 🧵 Trace a frame's path through the pipeline
- 💾 Save and load previous sessions
Think of Whisker as trace logging with batteries for Pipecat applications.
🧭 Getting started
Requirements
Install Whisker for Python
uv pip install pipecat-ai-whisker
Add Whisker to your Pipecat pipeline
Whisker is split into two pieces: a WhiskerServer that owns the WebSocket connection to the UI (and listens on the Pipecat bus for cross-worker events), and per-worker WhiskerObservers that forward frame events to the server. Add one server to your runner and an observer to every pipeline worker you want to debug.
pipeline = Pipeline(...)
worker = PipelineWorker(pipeline, ...)

whisker = WhiskerServer()
worker.add_observer(whisker.create_observer(worker))

runner = WorkerRunner()
await runner.add_workers(whisker, worker)
await runner.run()
You can also add Whisker without touching your application code by listing a setup file in the PIPECAT_SETUP_FILES environment variable. The runner picks up setup_worker_runner (called once for the runner) and each worker picks up setup_pipeline_worker (called once per pipeline worker) — both reading from the same file, so a module-level WhiskerServer is shared between them:
whisker = WhiskerServer()

async def setup_worker_runner(runner: WorkerRunner):
    await runner.add_workers(whisker)


async def setup_pipeline_worker(worker: PipelineWorker):
    worker.add_observer(whisker.create_observer(worker))
In both cases, this starts the Whisker server that the graphical UI will connect to. By default, the Whisker server runs at:
ws://localhost:9090
🌐 Option A: Use the hosted UI (Recommended)
-
Expose your local server with ngrok:
ngrok http 9090 -
Copy the ngrok URL (e.g.,
your-ngrok-url.ngrok.io) -
Open the hosted Whisker UI: https://whisker.pipecat.ai/
-
Connect to your bot:
- In the WebSocket URL field, enter:
wss://your-ngrok-url.ngrok.io - Click connect
- In the WebSocket URL field, enter:
🏠 Option B: Run the UI locally
If you prefer to run the UI locally:
-
Clone the repository:
git clone https://github.com/pipecat-ai/whisker.git -
Start the UI:
cd whisker/ui npm install npm run dev -
Connect to http://localhost:5173
The UI will automatically connect to ws://localhost:9090 by default.
💾 Saving sessions
You can save a Whisker session to a file for later replay or sharing. The on-disk format matches the live wire protocol, so any saved session loads back into the Whisker UI via Load session.
Record alongside the live server by passing file_name= to WhiskerServer:
whisker = WhiskerServer(file_name="whisker.whisk")
For a headless capture without the WebSocket server (CI jobs, scripted recordings), drop in WhiskerFile — same wiring as WhiskerServer, no port reserved:
whisker = WhiskerFile("whisker.whisk")
Custom sinks
WhiskerServer and WhiskerFile are both concrete WhiskerSinks. To stream events to a different backend (HTTP webhook, message queue, custom log format, …), subclass WhiskerSink and implement emit:
class MyCustomSink(WhiskerSink):
    async def emit(self, event: dict) -> None:
        # event is a plain dict — encode and ship it however you like.
        ...
📚 Next steps
- View some examples in the
examplesfolder - See the Pipecat documentation for more about building bots