TangramKit
May 6, 2018 · View on GitHub








TangramKit 
TangramKit是一套在Swift3.0语言上开发的iOS界面视图布局框架。它的名字来源于中国古代的玩具七巧板,寓意着可以用简单的功能来构造出各种千变万化且非常复杂的UI界面。TangramKit的内核是基于对UIView的layoutSubviews方法的重载以及对子视图的bounds和center属性的设置而实现的。TangramKit功能强大而且简单易用,它集成了:iOS Autolayout和SizeClass、android的5大布局体系、HTML/CSS的浮动定位技术以及flex-box和bootstrap框架等市面上主流的平台的界面布局功能,同时提供了一套非常简单和完备的多屏幕尺寸适配的解决方案。TangramKit的objective-C版本的名字叫做:MyLayout
English (Simplified): 英文说明
您可以加入到QQ群:178573773 或者添加个人QQ:156355113 来跟我讨论或者邮件:obq0387_cn@sina.com 联系我。
演示效果图
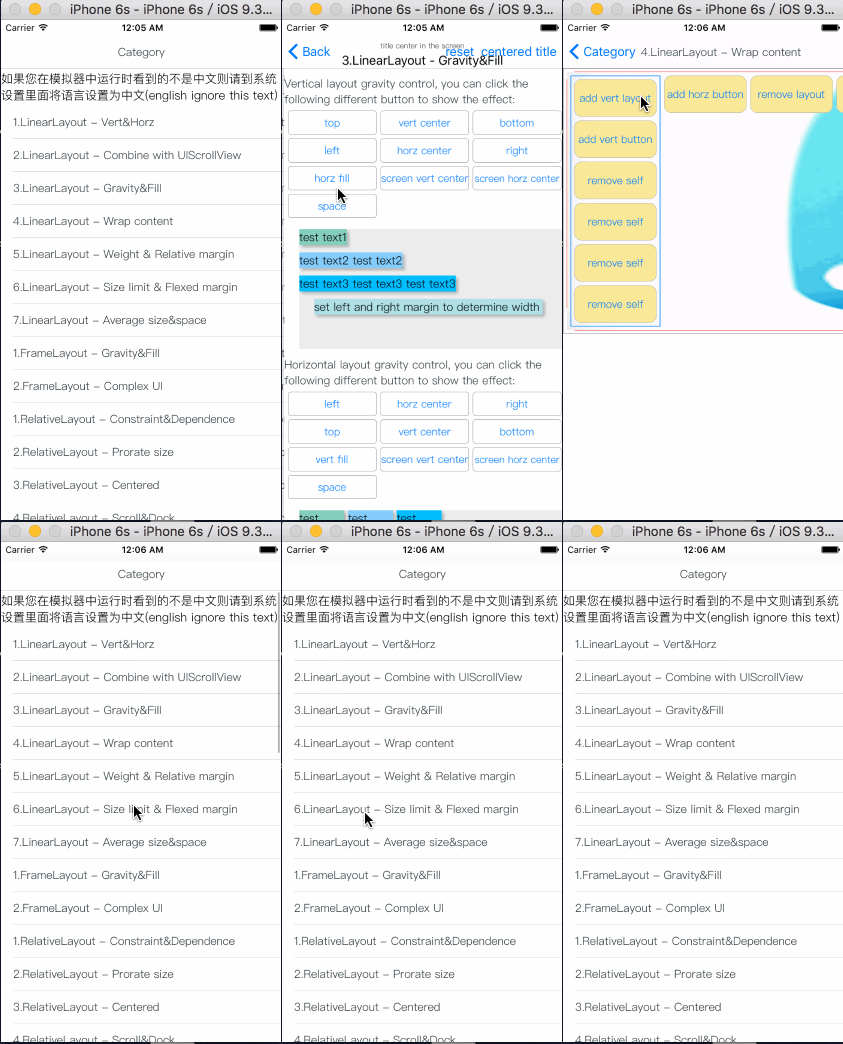
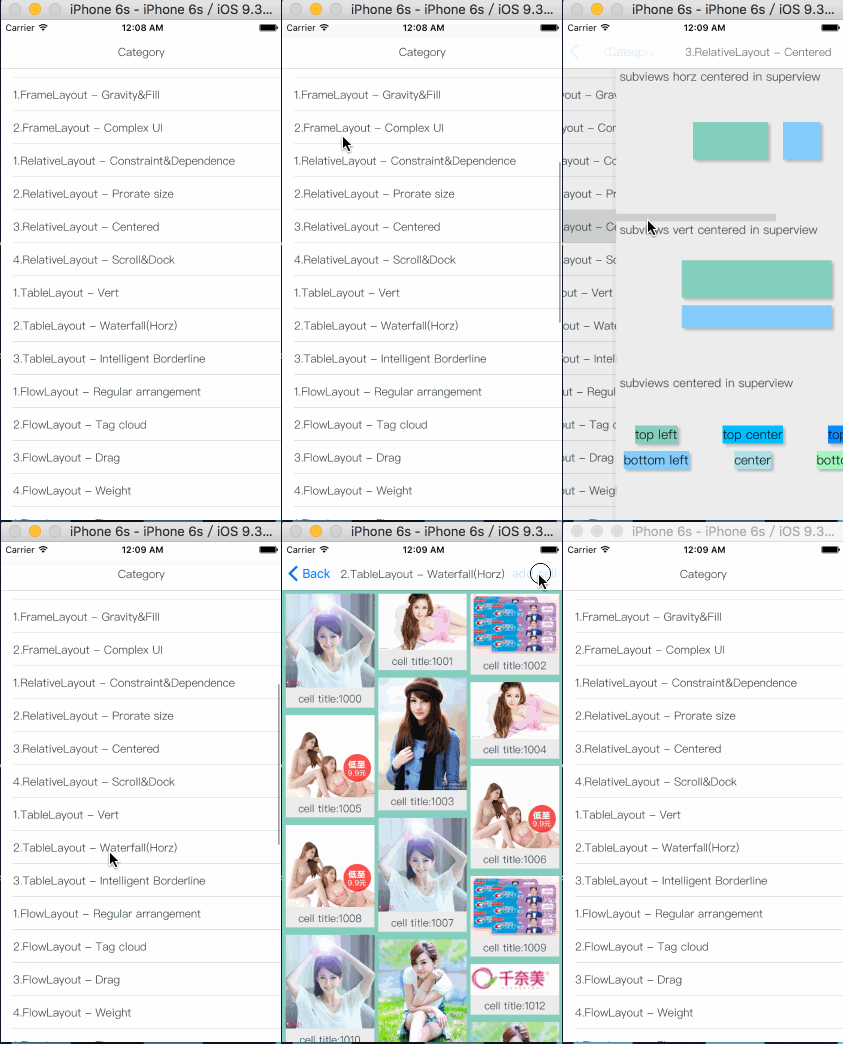
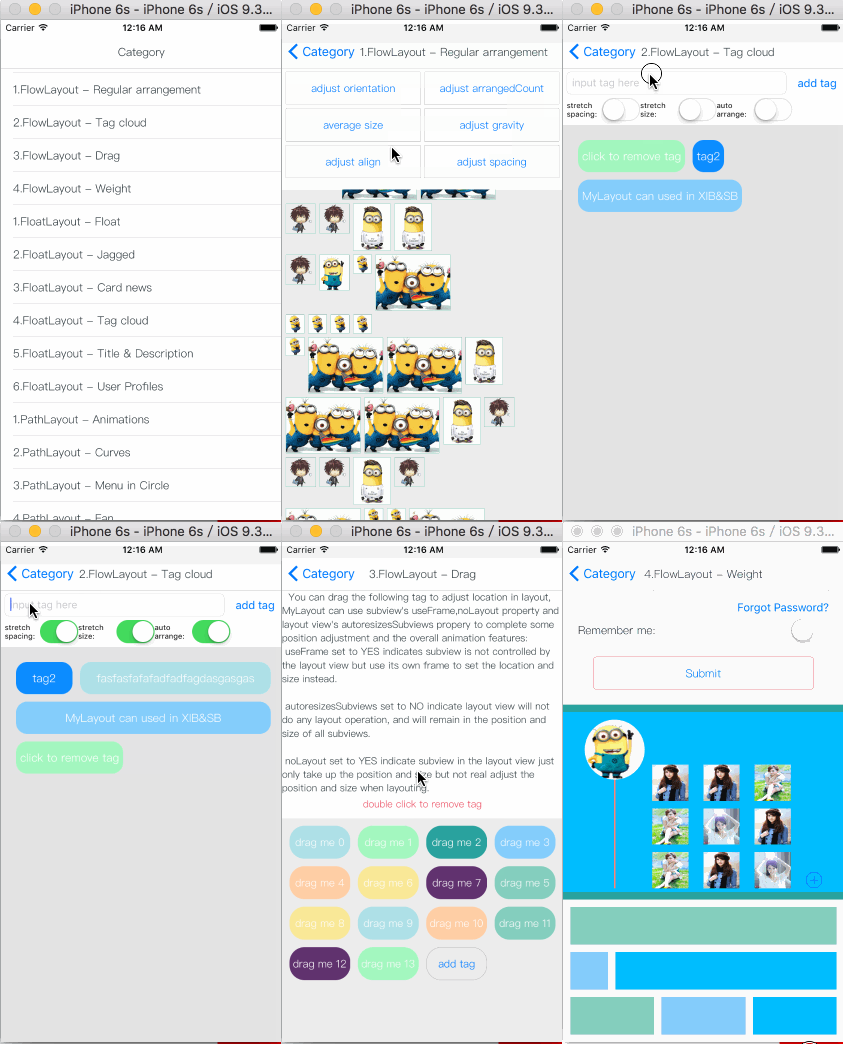
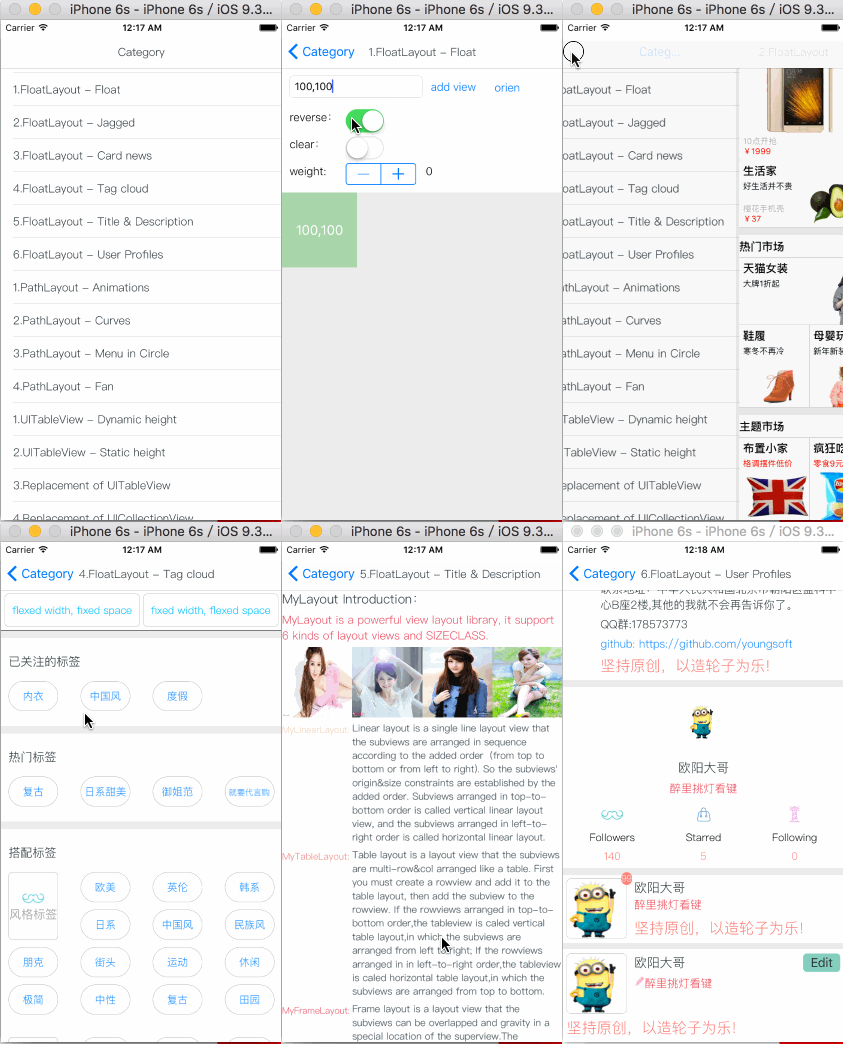
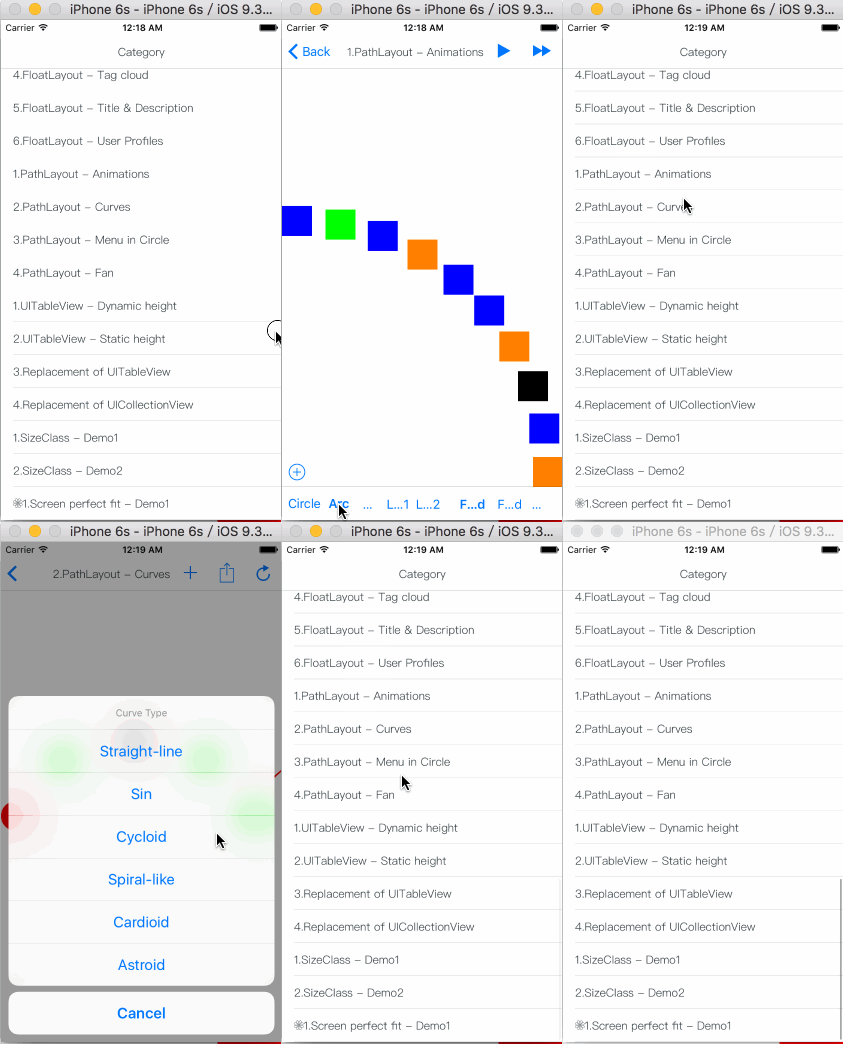
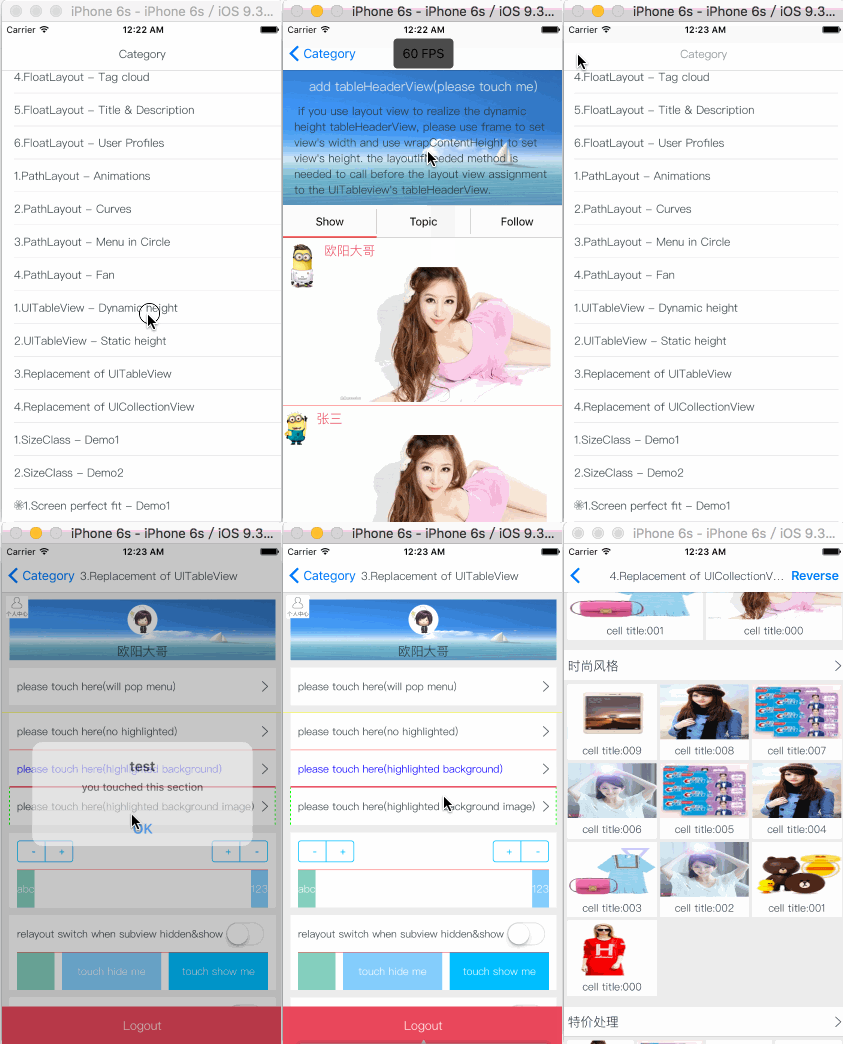
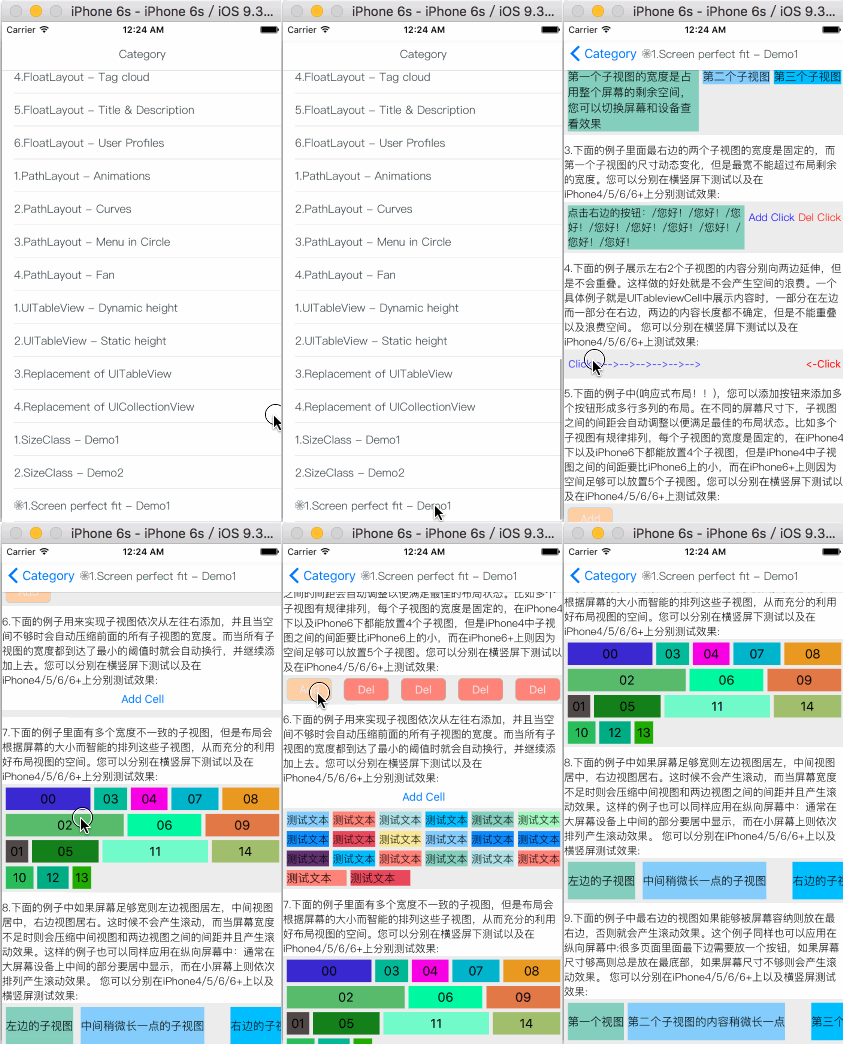
应用场景
举例下面一个应用场景:
- 有一个容器视图S的宽度是100而高度则是由四个从上到下依次排列的子视图A,B,C,D的高度总和。
- 视图A的左边距占用父视图宽度的20%,而右边距则占用父视图宽度的30%,高度则等于自身的宽度。
- 视图B的左边距是40,宽度则占用父视图的剩余宽度,高度是40。
- 视图C的宽度占用父视图的所有宽度,高度是40。
- 视图D的右边距是20,宽度是父视图宽度的50%,高度是40。
最终的效果图如下:

    let S = TGLinearLayout(.vert)
    S.tg_vspace = 10
    S.tg_width.equal(100)
    S.tg_height.equal(.wrap)
    //you can use S.tg_size(width:100, height:.wrap) to instead

    let A = UIView()
    A.tg_left.equal(20%)
    A.tg_right.equal(30%)
    A.tg_height.equal(A.tg_width)
    S.addSubview(A)

    let B = UIView()
    B.tg_left.equal(40)
    B.tg_width.equal(.fill)
    B.tg_height.equal(40)
    S.addSubview(B)

    let C = UIView()
    C.tg_width.equal(.fill)
    C.tg_height.equal(40)
    S.addSubview(C)

    let D = UIView()
    D.tg_right.equal(20)
    D.tg_width.equal(50%)
    D.tg_height.equal(40)
    S.addSubview(D)
因为TangramKit 重载了运算符:~=、>=、<=、+=、-=、*=、/= 来实现布局尺寸类TGLayoutSize和布局位置类TGLayoutPos的equal,max,min,add,offset,multiply方法。因此您也可以将代码写成如下方式:
 let S = TGLinearLayout(.vert)
    S.tg_vspace = 10
    S.tg_width ~=100
    S.tg_height ~=.wrap

    let A = UIView()
    A.tg_left ~=20%
    A.tg_right ~=30%
    A.tg_height ~=A.tg_width
    S.addSubview(A)

    let B = UIView()
    B.tg_left ~=40
    B.tg_width ~=.fill
    B.tg_height ~=40
    S.addSubview(B)

    let C = UIView()
    C.tg_width ~=.fill
    C.tg_height ~=40
    S.addSubview(C)

    let D = UIView()
    D.tg_right ~=20
    D.tg_width ~=50%
    D.tg_height ~=40
    S.addSubview(D)
TangramKit和各种布局方式的性能比较
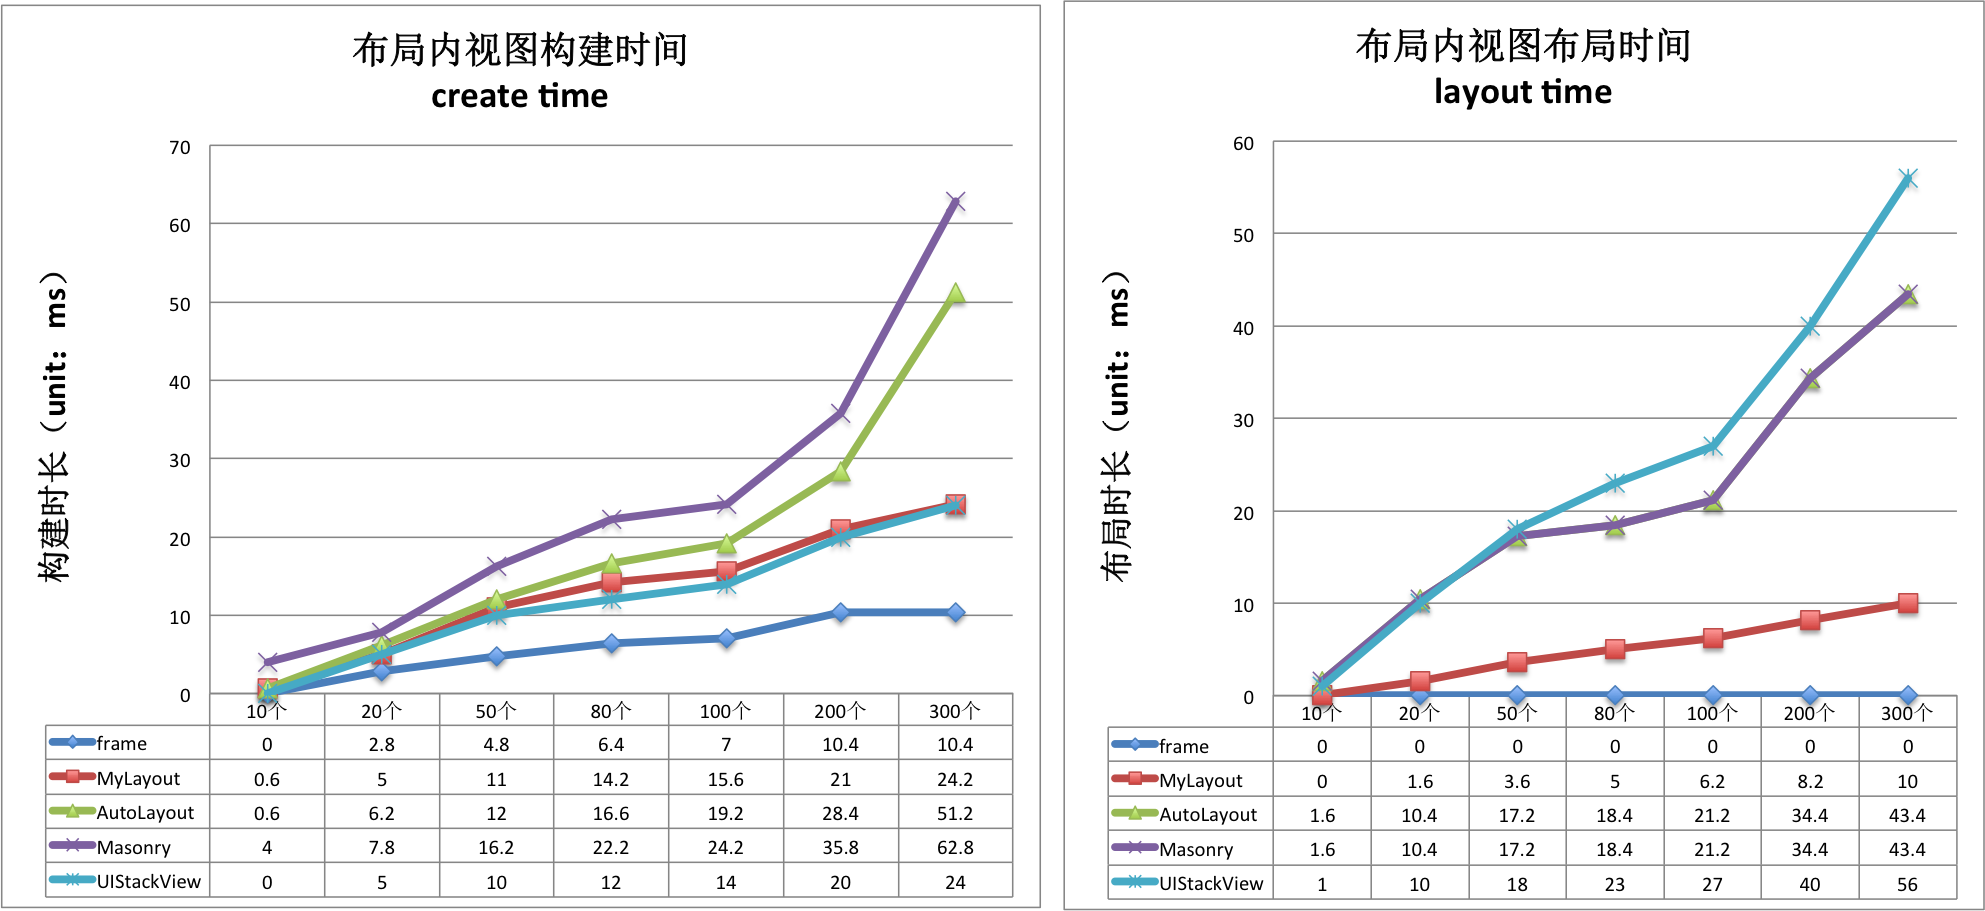
下面两张表格分别列表每个子视图的建立消耗的时间和布局消耗时间,单位为:毫秒
| create time(ms)/per subview | Frame | TangramKit | AutoLayout | Masonry | UIStackView |
|---|---|---|---|---|---|
| TGLinearLayout | 0.08 | 0.164 | 0.219 | 0.304 | 0.131 |
| TGFrameLayout | 0.05 | 0.149 | 0.209 | 0.273 | 0.131 |
| TGRelativeLayout | 0.079 | 0.182 | 0.116 | 0.359 | 0.131 |
| TGFlowLayout | 0.08 | 0.107 | 0.198 | 0.258 | 0.131 |
| TGFloatLayout | 0.044 | 0.148 | 0.203 | 0.250 | 0.131 |
| layout time(ms)/per subview | Frame | TangramKit | AutoLayout | Masonry | UIStackView |
|---|---|---|---|---|---|
| TGLinearLayout | 0 | 0.049 | 0.269 | 0.269 | 0.272 |
| TGFrameLayout | 0 | 0.042 | 0.243 | 0.243 | 0.272 |
| TGRelativeLayout | 0 | 0.068 | 0.274 | 0.274 | 0.272 |
| TGFlowLayout | 0 | 0.036 | 0.279 | 0.279 | 0.272 |
| TGFloatLayout | 0 | 0.055 | 0.208 | 0.208 | 0.272 |
从上面的表格可以总结如下:
- 用frame构建视图用时最少,平均每个视图花费0.068ms。当视图的frame指定后就不再需要布局视图了,所以布局时间几乎是0。
- 当用AutoLayout进行布局时每个子视图的平均构建时长约为0.189ms,而Masonry因为是对AutoLayout的封装所以平均构建时长约为0.289ms。在布局时则因为都是使用了AutoLayout所以是相等的,大概花费0.255ms左右。
- TangramKit的实现因为是对frame的封装,所以无论是构建时长和布局时长都要优于AutoLayout,但低于原始的frame方法。TangramKit的平均构建时长约0.150ms,比frame构建要多花费2.2倍的时间;而AutoLayout的平均构建时长是TangramKit的1.26倍;Masonry的平均构建时长则是TangramKit的1.9倍。
- TangramKit的平均布局时长是0.05ms, 而AutoLayout的布局时长则是TangramKit的5倍。
- UIStackView的构建时长要稍微优于TangramKit的线性布局TGLinearLayout.但是布局时长则是TGLinearLayout的5.5倍。
- TangramKit中流式布局TGFlowLayout的构建时长和布局时长最小,而相对布局的构建和布局时长最长。
系统结构

布局位置类TGLayoutPos
TGLayoutPos类是用来描述一个视图所在的位置的类。UIView中扩展出了tg_left,tg_top,tg_bottom,tg_right,tg_centerX,tg_centerY这六个变量来实现视图的定位操作。您可以用这些变量的equal方法来设置视图之间的边距和间距。
布局尺寸类TGLayoutSize
TGLayoutSize类是用来描述一个视图的尺寸的类。UIView中扩展出了tg_width,tg_height这两个变量来实现视图的宽度和高度尺寸的设置。您可以用其中的equal方法来设置视图的宽度和高度。系统提供了三个常量的布局尺寸值:.wrap, .fill, .average 来分别表示尺寸包裹所有子视图,尺寸填充父视图的剩余空间,尺寸均分父视图的剩余空间。
布局比重值类TGWeight
TGWeight类用来设置相对的位置和尺寸的值。相对值表明视图的位置或者尺寸是占用父视图的剩余空间或者父视图空间的比例值。为了方便使用,您可以用重载的运算符%来构建一个TGWeight对象,比如20%就等价于TGWeight(20).
线性布局TGLinearLayout
等价于iOS的UIStackView和android的LinearLayout布局。
线性布局是一种里面的子视图按添加的顺序从上到下或者从左到右依次排列的单列(单行)布局视图,因此里面的子视图是通过添加的顺序建立约束和依赖关系的。 子视图从上到下依次排列的线性布局视图称为垂直线性布局视图,而子视图从左到右依次排列的线性布局视图则称为水平线性布局。
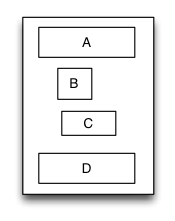
示例代码:
override func loadView() {


            super.loadView()

            let S = TGLinearLayout(.vert)
            S.tg_width.equal(120)
            S.tg_height.equal(.wrap)
            S.tg_vspace = 10

            let A = UIView()
            A.tg_left.equal(5)
            A.tg_right.equal(5)
            A.tg_width.equal(100)
            A.tg_height.equal(40)
            S.addSubview(A)

            let B = UIView()
            B.tg_left.equal(20)
            B.tg_width.equal(40)
            B.tg_height.equal(40)
            S.addSubview(B)

            let C = UIView()
            C.tg_right.equal(40)
            C.tg_width.equal(50)
            C.tg_height.equal(40)
            S.addSubview(C)

            let D = UIView()
            D.tg_left.equal(10)
            D.tg_right.equal(10)
            D.tg_width.equal(100)
            D.tg_height.equal(40)
            S.addSubview(D)

            self.view.addSubview(S)
            S.backgroundColor = .red
            A.backgroundColor = .green
            B.backgroundColor = .blue
            C.backgroundColor = .orange
            D.backgroundColor = .cyan
     }
相对布局TGRelativeLayout
等价于iOS的AutoLayout 和 Android的RelativeLayout布局。
相对布局是一种里面的子视图通过相互之间的约束和依赖来进行布局和定位的布局视图。相对布局里面的子视图的布局位置和添加的顺序无关,而是通过设置子视图的相对依赖关系来进行定位和布局的。
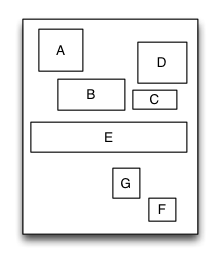
示例代码:
 override func loadView() {


            super.loadView()

        let S = TGRelativeLayout()
        S.tg_width.equal(170).and().tg_height.equal(280)

        let A = UIView()
        A.tg_left.equal(20).and().tg_top.equal(20)
        A.tg_width.equal(40).and().tg_height.equal(A.tg_width)
        S.addSubview(A)

        let B = UIView()
        B.tg_left.equal(A.tg_centerX).and().tg_top.equal(A.tg_bottom).offset(10)
        B.tg_width.equal(60).and().tg_height.equal(A.tg_height)
        S.addSubview(B)

        let C = UIView()
        C.tg_left.equal(B.tg_right).offset(10)
        C.tg_bottom.equal(B.tg_bottom)
        C.tg_width.equal(40)
        C.tg_height.equal(B.tg_height, multiple:0.5)
        S.addSubview(C)

        let D = UIView()
        D.tg_bottom.equal(C.tg_top).offset(10)
        D.tg_right.equal(15)
        D.tg_height.equal(A.tg_height)
        D.tg_width.equal(D.tg_height)
        S.addSubview(D)

        let E = UIView()
        E.tg_centerY.equal(0)
        E.tg_centerX.equal(0)
        E.tg_height.equal(40)
        E.tg_width.equal(S.tg_width).add(-20)
        S.addSubview(E)
        //...F,G

            self.view.addSubview(S)
            S.backgroundColor = .red
            A.backgroundColor = .green
            B.backgroundColor = .blue
            C.backgroundColor = .orange
            D.backgroundColor = .cyan
            E.backgroundColor = .magenta
       }
框架布局TGFrameLayout
等价于Android的FrameLayout布局。
框架布局是一种里面的子视图停靠在父视图特定方位并且可以重叠的布局视图。框架布局里面的子视图的布局位置和添加的顺序无关,只跟父视图建立布局约束依赖关系。框架布局将垂直方向上分为上、中、下三个方位,而水平方向上则分为左、中、右三个方位,任何一个子视图都只能定位在垂直方向和水平方向上的一个方位上。
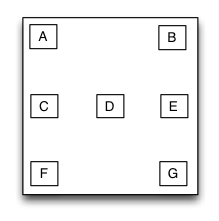
示例代码:
override func loadView() {


        super.loadView()

        let S = TGFrameLayout()
        S.tg_width.equal(320)
        S.tg_height.equal(500)

        let A = UIView()
        A.tg_width.equal(40)
        A.tg_height.equal(40)
        S.addSubview(A)

        let B = UIView()
        B.tg_width.equal(40)
        B.tg_height.equal(40)
        B.tg_right.equal(0)
        S.addSubview(B)

        let C = UIView()
        C.tg_width.equal(40)
        C.tg_height.equal(40)
        C.tg_centerY.equal(0)
        S.addSubview(C)

        let D = UIView()
        D.tg_width.equal(40)
        D.tg_height.equal(40)
        D.tg_centerY.equal(0)
        D.tg_centerX.equal(0)
        S.addSubview(D)

        //..E,F,G

        self.view.addSubview(S)
        S.backgroundColor = .red
        A.backgroundColor = .green
        B.backgroundColor = .blue
        C.backgroundColor = .orange
        D.backgroundColor = .cyan
}
表格布局TGTableLayout
等价于Android的TableLayout布局和HTML的table元素。
表格布局是一种里面的子视图可以像表格一样多行多列排列的布局视图。子视图添加到表格布局视图前必须先要建立并添加行视图,然后再将子视图添加到行视图里面。如果行视图在表格布局里面是从上到下排列的则表格布局为垂直表格布局,垂直表格布局里面的子视图在行视图里面是从左到右排列的;如果行视图在表格布局里面是从左到右排列的则表格布局为水平表格布局,水平表格布局里面的子视图在行视图里面是从上到下排列的。
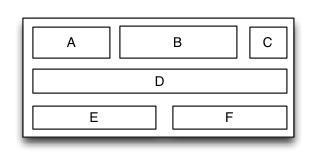
示例代码:
  override func loadView() {


        super.loadView()

        let S = TGTableLayout(.vert)
        S.tg_height.equal(.wrap)
        S.tg_width.equal(.wrap)
        S.tg_vspace = 10
        S.tg_hspace = 10


        S.tg_addRow(size:TGLayoutSize.wrap,colSize:TGLayoutSize.wrap)

        let A = UIView()
        A.tg_width.equal(50)
        A.tg_height.equal(40)
        S.addSubview(A)

        let B = UIView()
        B.tg_width.equal(100)
        B.tg_height.equal(40)
        S.addSubview(B)

        let C = UIView()
        C.tg_width.equal(30)
        C.tg_height.equal(40)
        S.addSubview(C)

        S.tg_addRow(size:TGLayoutSize.wrap,colSize:TGLayoutSize.wrap)

        let D = UIView()
        D.tg_width.equal(200)
        D.tg_height.equal(40)
        S.addSubview(D)

        //...E,F

        self.view.addSubview(S)
        S.backgroundColor = .red
        A.backgroundColor = .green
        B.backgroundColor = .blue
        C.backgroundColor = .orange
        D.backgroundColor = .cyan
}
流式布局TGFlowLayout
等价于CSS3的flex-box。
流式布局是一种里面的子视图按照添加的顺序依次排列,当遇到某种约束限制后会另起一行再重新排列的多行展示的布局视图。这里的约束限制主要有数量约束限制和内容尺寸约束限制两种,而换行的方向又分为垂直和水平方向,因此流式布局一共有垂直数量约束流式布局、垂直内容约束流式布局、水平数量约束流式布局、水平内容约束流式布局。流式布局主要应用于那些子视图有规律排列的场景,在某种程度上可以作为UICollectionView的替代品。
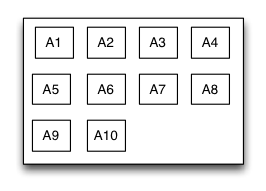
示例代码:
    override func loadView() {


        super.loadView()

        let S = TGFlowLayout(.vert,arrangedCount:4)
        S.tg_height.equal(.wrap)
        S.tg_width.equal(300)
        S.tg_padding = UIEdgeInsetsMake(10,10,10,10)
        S.tg_gravity = TGGravity.horz.fill
        S.tg_space = 10

        for _ in 0 ..< 10
        {
            let A = UIView()
            A.tg_height.equal(A.tg_width)
            S.addSubview(A)

            A.backgroundColor = .green
        }

        self.view.addSubview(S)
        S.backgroundColor = .red
}
浮动布局TGFloatLayout
等价于css中的float定位。
浮动布局是一种里面的子视图按照约定的方向浮动停靠,当尺寸不足以被容纳时会自动寻找最佳的位置进行浮动停靠的布局视图。浮动布局的理念源于HTML/CSS中的浮动定位技术,因此浮动布局可以专门用来实现那些不规则布局或者图文环绕的布局。根据浮动的方向不同,浮动布局可以分为左右浮动布局和上下浮动布局。
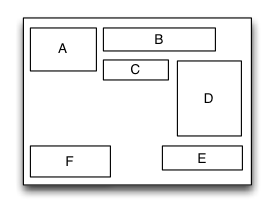
示例代码:
    override func loadView() {


        super.loadView()

        let S = TGFloatLayout(.vert)
        S.tg_height.equal(.wrap)
        S.tg_width.equal(300)
        S.tg_padding = UIEdgeInsetsMake(10,10,10,10)
        S.tg_space = 10

        let A = UIView()
        A.tg_width.equal(80)
        A.tg_height.equal(70)
        S.addSubview(A)

        let B = UIView()
        B.tg_width.equal(150)
        B.tg_height.equal(40)
        S.addSubview(B)

        let C = UIView()
        C.tg_width.equal(70)
        C.tg_height.equal(40)
        S.addSubview(C)

        let D = UIView()
        D.tg_width.equal(100)
        D.tg_height.equal(140)
        S.addSubview(D)

        let E = UIView()
        E.tg_width.equal(150)
        E.tg_height.equal(40)
        E.tg_reverseFloat = true
        S.addSubview(E)

        let F = UIView()
        F.tg_width.equal(120)
        F.tg_height.equal(60)
        S.addSubview(F)

        self.view.addSubview(S)
        S.backgroundColor = .red
        A.backgroundColor = .green
        B.backgroundColor = .blue
        C.backgroundColor = .orange
        D.backgroundColor = .black
        E.backgroundColor = .magenta
        F.backgroundColor = .white
}
路径布局MyPathLayout
布局库独有
路径布局是一种里面的子视图根据您提供的一条特定的曲线函数形成的路径来进行布局的布局视图。您需要提供一个实现曲线路径的函数、一个特定的坐标体系、一种特定的子视图在曲线上的距离设置这三个要素来实现界面布局。当曲线路径形成后,子视图将按相等的距离依次环绕着曲线进行布局。路径布局主要应用于那些具有特定规律的不规则排列,而且效果很酷炫的的界面布局。
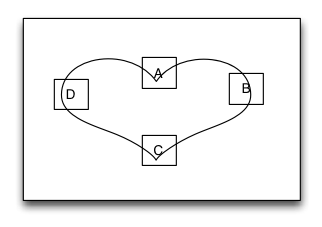
示例代码:
override func loadView()
{

   super.loadView()

   let S = TGPathLayout()
   S.tg_width.equal(320)
   S.tg_height.equal(320)
   S.tg_coordinateSetting.isReverse = true
   S.tg_coordinateSetting.origin = CGPoint(x: 0.5, y: 0.2)
   S.tg_polarEquation = { 80 * (1 + cos(CGFloat(\$0))) } // r = a *(1 + cos(𝛉))

   for _ in 0 ..< 4
   {
       let A = UIView()
       A.tg_size(width:40,height:40)
       S.addSubview(A)

       A.backgroundColor = .green
   }

   self.view.addSubview(S)
   S.backgroundColor = .red
}
SizeClass的支持
等价于iOS的Size Classes
TangramKit布局体系为了实现对不同屏幕尺寸的设备进行适配,提供了对Size Classes的支持。您可以将Size Classes和上述的6种布局搭配使用,以便实现各种设备界面的完美适配。系统提供1个UIView的扩展方法:
public func tg_fetchSizeClass(with type:TGSizeClassType, from srcType:TGSizeClassType! = nil) ->TGViewSizeClass
来实现对Size Classes的支持。比如下面的例子:
//all device
let rootLayout = TGLinearLayout(.vert)
        rootLayout.tg_padding = UIEdgeInsetsMake(10, 10, 10, 10);
        rootLayout.tg_vspace = 10
        rootLayout.tg_hspace = 10

//iPhone landscape orientation.
let lsc = rootLayout.tg_fetchSizeClass(with: .comb(.any, .compact, nil), from:.default) as! TGLinearLayoutViewSizeClass
        lsc.tg_orientation = .horz
使用方法
直接拷贝
- 将github工程中的TangramKit文件夹下的所有文件复制到您的工程中。
CocoaPods安装
如果您还没有安装cocoapods则请先执行如下命令:
$ gem install cocoapods
为了用CocoaPods整合TangramKit到您的Xcode工程, 请建立如下的Podfile:
source 'https://github.com/CocoaPods/Specs.git'
platform :ios, '8.0'

pod 'TangramKit'
然后运行如下命令:
$ pod install
使用Carthage
1.创建一个 Cartfile 文件,内容如下:
github "youngsoft/TangramKit"
2.终端执行carthage update。
3.点击“General”按钮,然后把Carthage/Build/iOS/TangramKit.framework拖拽到到“Linked Frameworks and Libraries”栏目里。
4.点击“Build Phases”按钮, 然后点击左上角的加号 “+” 选择“New Run Script Phase”,在Shell下面填写下面内容:
/usr/local/bin/carthage copy-frameworks
然后在 “Input Files”栏目加上:
$(SRCROOT)/Carthage/Build/iOS/TangramKit.framework
MyLayout和TangramKit的差异
- 库的名称由MyLayout变为TangramKit,Tangram的中文意思是七巧板,意思是可以支持千变万化的界面布局。
- 所有的类名都以TG开头,所有的方法和属性都以tg_开头。
- 增加了TGWeight类型,用来设置那些位置和尺寸是相对值的场景。比如宽度和父视图保持一致: tg_width.equal(100%)。
- 删除了weight扩展属性,统一通过TGLayoutPos,TGLayoutSize的equal方法来设置,其值类型就是上面的TGWeight。比如原来的A.weight = 1 变为 A.tg_width.equal(100%)
- 废除了线性布局和框架布局的位置设置为大于0小于1时所表示的相对值的概念,统一由新的类型TGWeight来表示相对值。
- 废除了垂直线性布局默认wrapContentHeight,以及水平线性布局默认wrapContentWidth的特性。需要自己去设置包裹属性。
- 增加了TGLayoutSize的方法equal能够设置的值的类型:.wrap 表示包裹值,表示视图的尺寸由内容或者子视图决定;.fill表示填充值,表示视图的尺寸填充父视图的剩余空间。
- 删除了布局视图的wrapContentHeight,wrapContentWidth属性,统一由TGLayoutSize设置为.wrap类型的值。比如原来的A.wrapContentWidth = YES 变为 A.tg_width.equal(.wrap)
- 删除了框架布局子视图的marginGravity属性扩展,直接通过TGLayoutPos设置来实现定位。
- 删除了子视图的扩展属性flexedHeight,而是直接由TGLayoutSize设置为.wrap来表示。
License
TangramKit is released under the MIT license. See LICENSE for details.