Minecraft Plugin Setup
June 27, 2024 · View on GitHub
Prerequisites
- Install Java 17. You can download it from https://www.microsoft.com/openjdk.
- Install gradle version 7.3.1 following the steps in the official documentation https://gradle.org/install/, under section "Installing manually".
- The different servers (e.g. game server, lobby server, Task Editing Server, .etc) use Redis to communicate between each other. Instead of installing and running Redis directly, it is suggested to run it's official Docker image instead.
- Install Docker for you OS
- Run Redis with the command
docker run -it -p 6379:6379 redis:6.2.6- This will create a brand new instance of Redis and expose it locally on port 6379
- Install PowerShell version 7 or higher. (hint: old version PowerShell might need to be manually uninstalled to avoid unexpected errors)
- You'll also need to download the specific Minecraft client version that is compatible with the PaperMC server we use. See here for more information.
Server set up
Set secrets as environment variables
We need to get the Event Hub shared key that allows McPlugin to authenticate with EventHub, which is a requirement to send/receive events from it. To get the actual shared key you can refer to this explanation.
McPlugin uses a .env system to make variable values available to the running servers. There are two main files involved in this:
McPlugin/.envis committed with the code and contains all the values that are safe to commit to our codebase (e.g. non-secret values). Some of the variables from this file have no value and instead, it is expected that the developer provides their values in a file named.env.local. To change the value of any of the variables in this file you can do so by directly editing its value in the file (although don't commit the change unless it's necessary) or overwrite them in your.env.localfile.McPlugin/.env.localcontains developer-specific variable values. This file is ignored by Git and is where you would set any secret variable values that cannot be set directly in.env.
Create the McPlugin/.env.local file with the following content:
⚠️ Note: Remember to replace the placeholders
API_SERVICE_HOST=http://localhost:49154/

EVENT_HUB_NAME=<Removed>-games
EVENT_HUB_CONNECTION_STRING=<Removed>

API_KEY=<Removed>

STORAGE_CONNECTION_STRING=<Removed>
STORAGE_CONTAINER_NAME=<Removed>taskdata

# Application Insights
APPLICATIONINSIGHTS_CONNECTION_STRING=<Removed>
APPLICATIONINSIGHTS_ROLE_INSTANCE=greenlands-mcplugin-<Removed>
Running locally
Gradle is able to download all the dependencies by itself, so the project can be run with these simple commands from the root of the McPlugin project in a PowerShell window:
# Download Minecraft server files from MS and setup initial folder structure
gradle scaffoldMinecraft

# Compile plugins and put them under the Minecraft servers so they're loaded on server startup
gradle copyPluginJarToServer

# Start up minecraft servers and proxy
./minecraft-server/start.ps1
The start.ps1 script will launch different process for each server. To know more about the scaffolding process it is recomended you check out Scaffolding.
If necessary, allow external connections by opening up your port in your router. See How to Setup a Minecraft: Java Edition Server for detailed instructions.
Debugging a Plugin
The JVM makes it very easy for us to have it accept connections from a remote debugger, and most IDEs support connecting to remote JVMs out of the box.
During the scaffolding process, a debug.ps1 script is created inside the folder of each server e.g. McPlugin\minecraft-server\servers\GameServer-1. You can use this script instead of the normal start.ps1 to start the server in debug mode. When doing this, the JVM process will bind itself to the port 5005 to allow remote debuggers. Note that this means you can't run more than one server at a time in debug mode.
Example command to start specific server with debug symbols
./minecraft-server/start.ps1 -DebugServerName "GameServer-1"
On the server that you intended to enable debugging on, you should see this log message as the first message:
Listening for transport dt_socket at address: 5005.
Once that's done you need to tell your IDE to connect the debugger to this port. In IntelliJ, you can open the Run/Debug Configurations dialog by clicking on the Run menu item and choosing Edit Configurations from the drop down menu. Create a new Remote JVM Debug configuration. Make sure that the port corresponds to 5005.
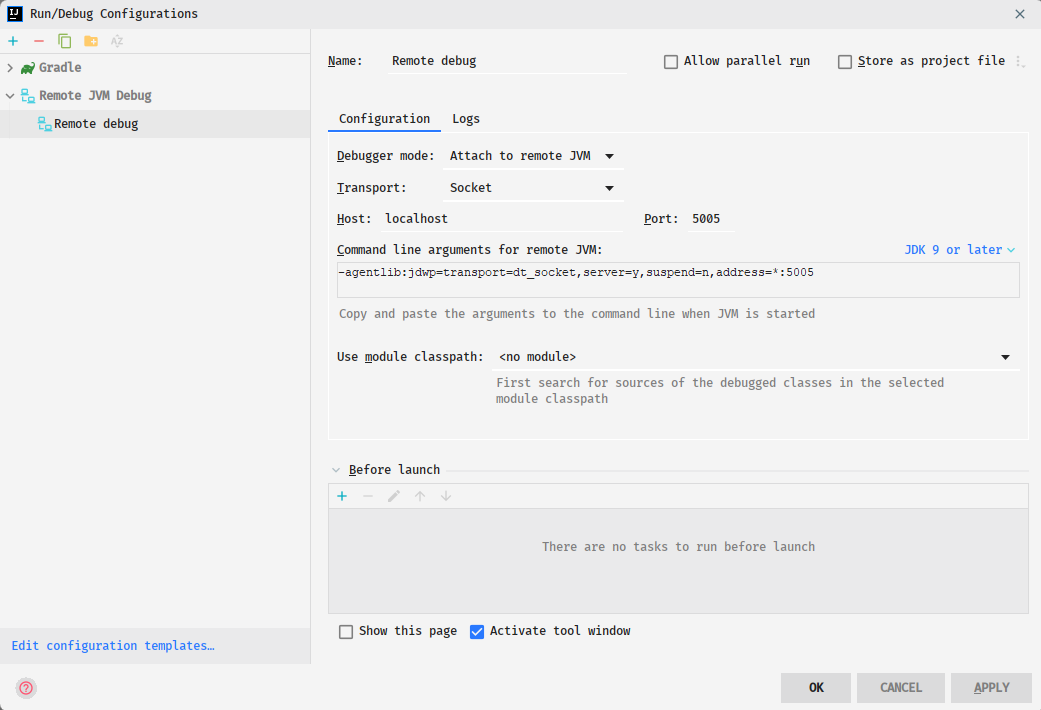
You can then start a debugging session using this new configuration, and now you should be able to add breakpoints, inspect variables, and all the other goodies of Java debugging.
For more information on debugging Minecraft plugins, see this page on the Bukkit wiki.
McPlugin Project Structure
Path to McPlugin - [root-folder]/**McPlugin**.
Java based plugins:
-
GameServerPlugin:
Plugin entrypoint: GameServerPlugin.java
-
LobbyServerPlugin
Plugin entrypoint: LobbyServerPlugin.java
-
Shared/Common
Contains code shared by all the plugins.
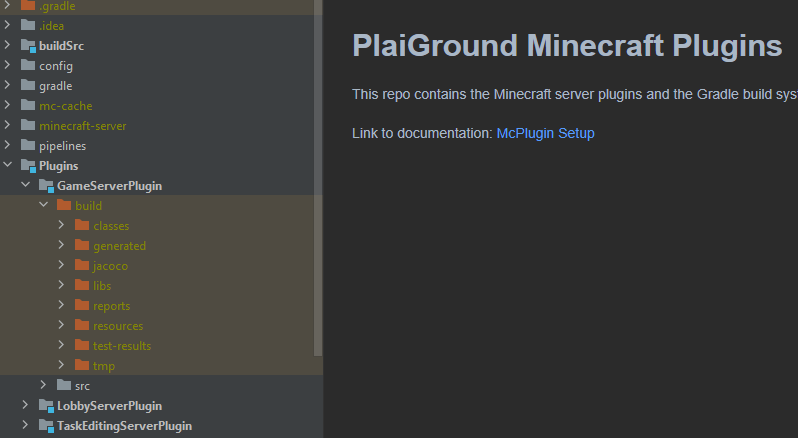
The build system is managed using Gradle. When you build a Plugin, the "build" folder appears under each of three plugin folders mentioned above.
build/classes: path to compiled classes (the *.class files)

build/libs: path to packaged .jar files (e.g. LobbyServerPlugin-1.0.0.jar)

build/reports: test coverage reports.
Other useful references
If you want to learn more about Plugin, then check out these other pages:
- Agents -- explains a bit how the Agent abstraction works on the Minecraft side. At least enough to understand the code.